Author:
Bobbie Johnson
Date Of Creation:
3 April 2021
Update Date:
1 July 2024

Content
- Steps
- Method 1 of 4: Basic Preparation
- Method 2 of 4: Loading the Film
- Method 3 of 4: Taking Pictures
- Method 4 of 4: Removing the Film
- Tips
- What do you need
The Canon T50 is an outrageously simple SLR camera with manual focus that will give you great pleasure if you know how to handle it. You may have such a camera lying in your closet or your friend's, or you can buy it for next to nothing on eBay. Get yourself one, dust it off, read this article and have fun like 1983.
Steps
Method 1 of 4: Basic Preparation
- 1 Change batteries. Even if your camera has batteries, change them, you don't want them to run out while shooting.
 Press the latch and open the battery compartment. Slide off the battery compartment cover and open the battery compartment. Open the compartment cover carefully, the cover is very fragile and can break easily. Shake out the batteries that are installed there.
- If you just bought a camera, inspect the battery contacts. If they are white, treat them with contact cleaner and carefully clean with a sharp object.
 Insert a pair of AA batteries. Insert a pair of AA batteries. Never use rechargeable batteries. Canon warns of the dangers of using rechargeable batteries (otherwise the meter will give false readings or your camera will explode). Get your hand in environmental destruction by inserting a pair of disposable batteries ("powerful" carbon zinc or alkaline).
- Close the battery cover, again, very carefully so as not to break.
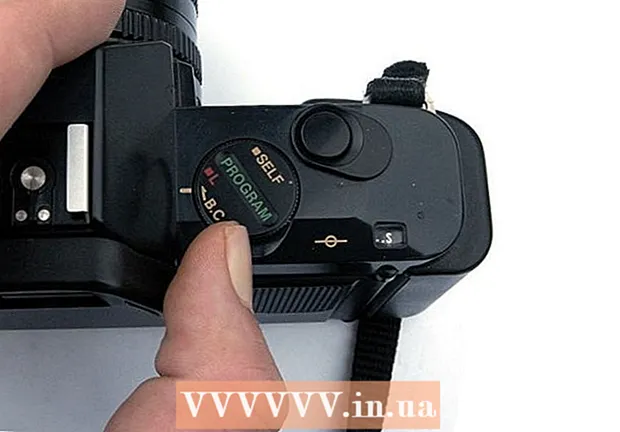 2 Be paranoid and check your batteries constantly. It's great if you get in the habit of checking your batteries regularly. Turn the main switch to the "BC" position. ("Battery Check"); if you hear a "beep" sound, the batteries are in good condition.
 - 3 Attach the lens. There are two types of mounts for FD lenses, both mounts are slightly different:
 Older lenses are attached with a chrome ring that holds the lens against the camera. For lens mounts with chrome ring, which were produced before 1979, you will need to align the red dots on the camera and lens and turn the ring clockwise (when viewed from the front of the camera) to the desired density.
 "New FD" lenses, such as this 28mm f / 2/8 lens, mount like bayonet lenses. The new FD lens does not have a locking ring. Just line up the red dots and rotate the lens until it clicks, just like with bayonet lenses that other camera and lens manufacturers have and that our lens is trying to look like.
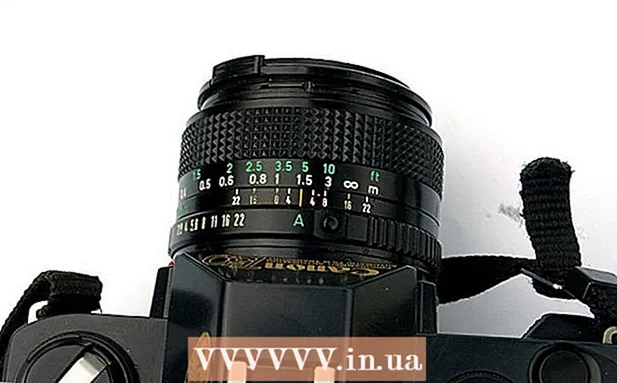 4 Make sure the aperture ring is set to the "A" mark. Press the button to the right in the direction of the letter "A" and place the switch under the yellow strip so that the letter "A" is located below it. Switching from "A" mode will set the shutter speed to 1/60 second. This mode is only required when using manual flash (if you want to flare at the subject, use a Canon Speedlite 244T, which works well in A mode) or when working in the studio with off-camera flashes.For other types of shooting, keep it in "A" mode.
Of course, for big blockheads, this mode will be manual underexposed and merciless.
Method 2 of 4: Loading the Film
 1 Open the back cover of the camera. To do this, lift the film rewind knob up. Sometimes it is difficult to give in, so not too much be afraid to put in a little effort.
  2 Insert the film into the film compartment.
 3 Pull the film over the tab until it reaches the red line to the right of the film compartment. (It may not look as far away as the picture, this is because the film is not flat.)
 - 4 Pull the film rewind handle down to its normal position. You may need to slightly wiggle the rewind and rewind mechanism in order for it to grip the film properly.
- 5Close the back cover of the camera.
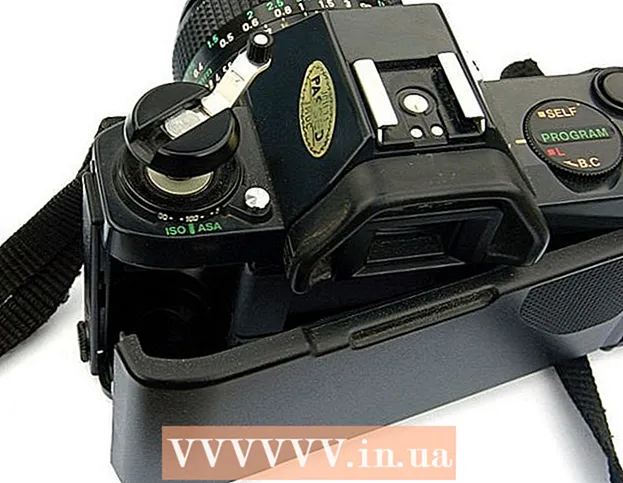
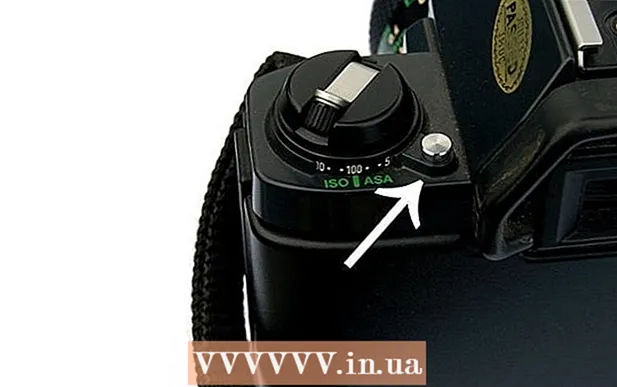 6 Set the speed (sensitivity) of the film on the scale ISO ASA. Press the silver button to remove the scale from the lock, and then, while holding the button, scroll the scale wheel, aligning the marks so that the film speed coincides with the mark on the scale.
 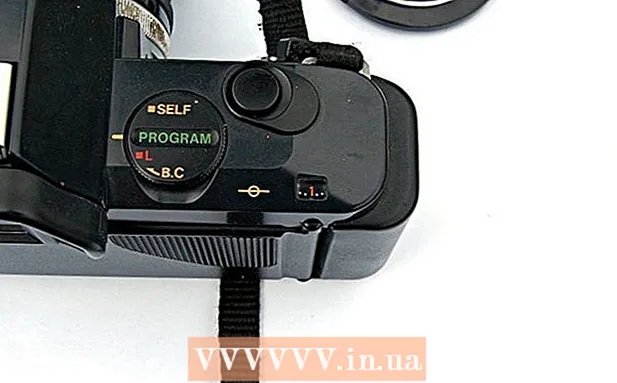 7 Scroll the film to the first frame. Make sure the main switch is set to PROGRAM mode and press the shutter button; the motor itself should rewind the film to the desired position (if not, you have a problem). Press the button several times until the frame counter is at 1.
Method 3 of 4: Taking Pictures
 1 Go outside. Go outside when the light is most favorable (not too bright, as in the daytime, early morning or late evening is the best time).
  2 Set the main switch to PROGRAM mode.This is the only camera mode that is fully automatic. The only thing you need to do when stowing the camera in your bag is to put the main switch in L mode to lock the shutter and avoid accidental photos; you can keep the camera around your neck and not worry about it.
 - 3 Look for your subject. How to do this is described in detail in another article.
- 4 Look through the viewfinder and focus on your subject. Don't worry about it being a manual focus camera. The T50's viewfinder is large and bright, so you have to try to make an unclear frame. To help you focus, you have two useful devices to help you get a clear picture. The focus ring, which is in the center of the viewfinder, will double the image if the photo is out of focus and align it if the subject is in focus.
Another device (which is more useful) is the microprism, which sits around the focusing ring and enhances the out-of-focus effect, which is more noticeable than usual. When the image is out of focus, it blinks and shows a very noticeable "cross" pattern. Turn the focusing ring on the lens until the image stops doubling or becomes clear in the microprism. - 5 Smoothly press the shutter button halfway. This will wake up the camera and a small green P will appear.
- 6 Watch out for the letter P. She gives you the information you need:
- Solid green P, not flashing: forward! the camera is ready and you can take pictures.
- Slow Blinking P: If it blinks approximately twice a second, it means that your photo may be blurred by camera movement (this happens when the shutter speed is less than 1/30). Use a tripod or lean against a stationary object. If you find yourself in this situation often, you may need to use faster film.
- Fast blinking P: This means you will fail. Either you are trying to photograph outside of the T50's exposure meter, or you need a shutter speed longer than 2 seconds. The T50 just can't handle extremely low light, sorry.
 7 Press the shutter button all the way down and take a picture. A small motor in the camera will feed the film until the next shot. If you hold down the button, a second later, the camera will take a picture again. This will come in handy if you are photographing with a slowly blinking -P, (as it will increase the chances that one of the frames will not be blurred when photographing hand-held and when the camera is moving), otherwise you are only transferring the film.
  8 The camera will tell you that the tape has ended with a big and loud "Beep".
Method 4 of 4: Removing the Film
 1 Press the rewind button on the bottom of the camera.
 2 Raise the film rewind knob and turn clockwise. Continue turning the handle. At first, you will feel a slight resistance, then you will feel a sharp decrease in resistance after the camera releases the film. Rotate the handle a few more times.
 - 3 Raise the rewind knob and open the cover. Then take out the film.
 4 Send your film to be developed and scanned (don't worry about the latter). Show the result to the world. Due to the fact that this camera is compatible with many cheap lenses with excellent optics, the results will be comparable with the quality of more advanced cameras like the Canon A-1, or even a professional camera like the F-1. Even experienced photographers love the lack of manual modes of the T 50, despite the fact that they curse it, because the photographer does not need to think about anything else but a good composition in photography.
Tips
- Try not to use telephoto lenses with this camera. After all, the exposure meter of the T 50 camera is designed to use short and normal lenses (50 mm and shorter).
 You can forcefully underexpose or overexpose exposure using the ASA settings as in this example. Although the T 50 does not have shutter speed compensation, you can use ASA settings to force exposure times to increase or decrease.
In the example to the right, with the ASA film speed set to 50 (Fuji Velvia), the camera was pointed almost directly towards the sun; the ASA settings were set to 25 to add a full unit of overexposure, thereby adding light to the puddles and making the sky brighter.
What do you need
- Canon T50
 The T 50 is compatible with many FD lenses, some of which are very cheap, such as the 50mm f / 1.8. Lenses. Unlike other FD cameras, this one will only work with Canon's FD lenses. And there is no hope for that. that it will work with other types of lenses, FL or non-FD type
- Film. Any film of our time will do (ASA 25 to ASA 1600)
- Two non-rechargeable batteries


