Author:
Joan Hall
Date Of Creation:
6 July 2021
Update Date:
1 July 2024

Content
- Steps
- Method 1 of 3: Learn about programs that many players can accept
- Method 2 of 3: Using GameRanger
- Method 3 of 3: Using Garena +
- What do you need
If you're having trouble connecting to Battle.net, you may start to think that you won't be able to play Warcraft 3 online anymore. Fortunately, there are other services available to help you connect with other players without having to log into Battle.net. Read on to find out how to do this.
Steps
Method 1 of 3: Learn about programs that many players can accept
 1 Understand what these programs do. You can use third party software to emulate LAN (Local Area Network) games. This means that you do not need to be connected to the game server when you play. Most of these services require you to sign up for an account, while others may require a paid subscription so you have more choices.
  2 Find the program you are downloading. There are several choices when it comes to LAN gaming. The two most popular choices are Garena + and GameRanger. Both options are free, and you can make an annual payment to have no ads and support. Both programs support Warcraft 3 and its add-ons.
  3 Understand all the disadvantages. You will need to open certain ports in order for you to use these programs, which will adversely affect the security of your computer. You will also meet more hackers and cheaters, as accounts that are banned from Battle.net can use these programs without restriction.
Method 2 of 3: Using GameRanger
 1 Download the GameRanger client. You can download the client from the GameRanger website. Run the setup file as soon as you download the program. The client weighs less than 1MB.
 - GameRanger will automatically download and install all program updates. After updates, it will start downloading additional content. It may take a little time.

- GameRanger will automatically download and install all program updates. After updates, it will start downloading additional content. It may take a little time.
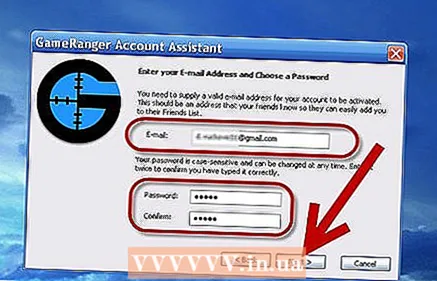
 2 Create an account. After the installation is complete, you will begin the process of creating an account. You will need to agree to the End User License Agreement to proceed. After you agree to the license agreement, you will be given the choice to create a new account or use an existing one.
 - If you have an invite code from a friend, you can enter it after you select "Create New Account"

- You will need to have a valid email address to create an account. You will also need to create a password for your account.
- If you have an invite code from a friend, you can enter it after you select "Create New Account"
 3 Choose a nickname. You will be asked to create a nickname. By default, your name can be entered in the field. Change it to protect your personal information. GameRanger will ask you to enter your real name and it will be public, so enter it at your own risk.
  4 Turn on the mat filter. If you are offended by profanity, or if the program will be used by a child, you should turn on the filter against the mat. It will filter messages with obscenities in the chat window. You can block the mat filter with a password.
  5 Choose your city. This information will be stored on your profile and will be used to find games running on servers near you.
  6 Confirm your account email address. Once you create an account, GameRanger will send you an email to the email you entered during registration. Click on the link provided in the email to activate your account before you click on “Continue” in the GameRanger window. Once you click on the confirmation link, press Next to enter GameRanger.
  7 Add the Warcraft 3 game files. Before you can enter the game, you will need to tell GameRanger where Warcraft 3 is installed. Click on the "Edit" menu and select "Options". In the game tab, scroll down until you find Warcraft 3. In the Location section, click Browse, and find the location where Warcraft 3 is installed.
  8 Find a game. From the main game list, either scroll down to Warcraft 3 or select “My Games” from the drop-down menu and select a Warcraft 3 game. Each game shown will be a lobby that another player has started. Find a game with full ping and green light. A green light means you can join the game.
 - The description of the game will tell you which version of Warcraft you need to have. Most are using the most recent patch.

- Games that have a lock will require a password in order for you to join them. The password is created by the person who created the game.

- The description of the game will tell you which version of Warcraft you need to have. Most are using the most recent patch.
 9 Wait for the game to start. Once you enter the lobby, the game creator will launch the game as soon as he or she is ready. Once the game starts, Warcraft 3 will automatically launch and it will automatically connect through the LAN menu.
Method 3 of 3: Using Garena +
 1 Download the Garena + client. You can download the client from the Garena + website. Run the installation file as soon as it downloads. The installation file weighs about 60MB.
  2 Install the program. Run the installation as soon as you finish downloading. The installation will proceed automatically, you only need to specify where to install all the files. The default file location will be fine for most users. Run the program as soon as the installation is complete.
  3 Create an account. If you already have a Garena account, enter it and log in. If you need to create a new account, click on the “Create an Account” link at the very bottom of the program. Enter a valid email address and create a username. Garena will check to see if the name is taken. If it is busy, you will need to select a new name.
  4 Go to the program. Use your new account to log into the Garena + program. Log in using your username, not your email address. Your friends list will be open.
  5 Find a game. Click on the LAN button in your friends list. This will open the Garena + game browser. Click on the Games button and select Warcraft 3. This will open a list of lobbies for Warcraft 3. You can select your region from the left menu.
  6 Configure game files. Click on the "Menu" button in the lower left corner of the game browser. Select "Settings" from the menu. In the Game Settings tab, scroll down until you find Warcraft 3. Make sure the executable is configured correctly in the Executable Settings field. Click on the gear icon to view the Warcraft 3 files.
  7 Go to the game. After you set up the game, you can join the game in the lobby. Click on "Server List" to see all available games. Once you log into the game, Warcraft 3 will automatically log in through the LAN menu.
What do you need
- Warcraft iii
- The Frozen Throne (optional)
- Multiplayer software


