Author:
John Stephens
Date Of Creation:
26 January 2021
Update Date:
1 July 2024
![How to Fix: No Sound After Windows 10 Update - Sound Missing 2022 [Solved]](https://i.ytimg.com/vi/tvjynf0zMG8/hqdefault.jpg)
Content
This wikiHow article shows you how to fix some typical errors that cause loss of sound on your Windows PC. Note that the problem your computer encounters can be too complex to detect and fix on its own. In this case, you should bring the computer to a qualified repairer.
Steps
Method 1 of 5: Basic error correction
Make sure that the computer is not mute. Most likely, you turned down the computer's volume without remembering. Before trying any other way, press the "Volume Up" button to see if the volume is going up.
- If you see that the volume is at its highest and still cannot hear anything, continue below.

Check the jack of the audio device. If the speaker or headphones are plugged in, no sound is usually heard.- You also need to make sure that the audio device is plugged in to the correct position.

Find out that the audio device is having problems. The best way is to play a song while the device is plugged in and unplugged. If you hear an output from your computer's default speakers rather than from your speaker system, it's most likely that the problem isn't originating from the computer.
Restart the computer. Before trying more aggressive measures, you can try to get the sound back by restarting your computer. After restarting, if the sound error of your computer has been resolved, you don't need to try to fix it. advertisement
Method 2 of 5: Check the Audio Mixer
Right click on the volume icon. This icon is a speaker in the lower right corner of the screen. After clicking, you will see a drop-down menu.
- If you're using a laptop, you'll need to touch the trackpad with two fingers to open a drop-down menu.
- If the volume icon does not appear in the toolbar then right-click on the toolbar, click Taskbar settings (Toolbar Setup), click Select which icons appear in the taskbar (Select the icons that appear in the toolbar) and flip the switch next to it Volume right to "On".
Click Open Volume Mixer. This option is at the top of the drop-down menu.
Review the volume level of open applications. Every open app has a pentagonal slider below its icon. If this slider is at the bottom of the Mixer window, the volume for that particular application is turned off.
Click and drag the volume slider upwards. This is how to increase the volume of the desired application.
- If you want to increase the volume of the whole system, click and drag the "Speakers" volume slider upwards.
Click X. This button is located in the upper right corner of the Mixer window. If the Mixer is the cause of the computer's sound error, the problem has been resolved. advertisement
Method 3 of 5: Change speaker format
Unplug all audio devices from the computer. Audio equipment includes headphones, speakers, and anything else that can be plugged into a computer's headphone jack.
- If a Bluetooth headset is connected to the computer it should also be unplugged.
- If you're using a desktop computer, you need to reconnect the speaker securely.
Right click on the sound icon. This icon is in the lower right corner of the screen.
- If you're using a laptop, you'll need to click on the two-finger trackpad to open a drop-down menu.
- If the volume icon is not displayed in the toolbar, you need to right click on the toolbar, click Taskbar settings, click Select which icons appear in the taskbar and flick the switch next to it Volume right to "On".
Click Playback devices (Playback devices). This option is in the center of the drop-down menu.
Double-click Speakers. This is the step to open the properties of the speaker that are integrated with the computer.
- If you're using a desktop computer, click the name of the plugged speaker.
Click Advanced (Advanced). This tab is at the top of the window.
Click the drop-down menu under "Default Format". The bar typically records "24-bit, 44100 Hz (Studio Quality)" or "16-bit, 48000 Hz (DVD Quality)".
New audio frequency selection. If this register is initially "24 bit" then select 16-bit and vice versa.
Click Kiểm TRA (Sound test). This option is on the right side of the window. If clicked, the speaker will tone to see if it is working properly or not.
Repeat test with a different frequency. If you find the frequency of the sound, you have successfully dealt with the computer's audio error.
Press OK. Click this button to save the settings. advertisement
Method 4 of 5: Update sound drivers of Windows operating system
Open the Start menu. When you want to open this menu, you can click the window icon in the lower left corner of the screen or press the key ⊞ Win.
- If you are using Windows 8 operating system, you need to drag your mouse to the upper right corner of the screen and then click the magnifying glass icon.
Type Device Manager Go to Start. This will open the Device Manager icon at the top of the Start window.
Click the Device Manager icon. This icon looks like a printer and camera side by side.
Scroll down and click the button on the left side Sound, video and game controllers (Game, video and audio controllers). This option is near the bottom of the Device Manager window. This step displays a list of computer audio devices and programs.
Right click on the "High Definition Audio" option. This option is usually recorded in "High Definition Audio" format (for example Realtek High Definition Audio).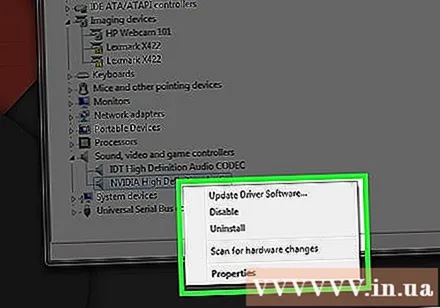
- If you click on the volume icon in the lower right corner of the screen, you will see the name of the speaker system in use.
Click Update driver (Driver update). This item appears at the top of the drop-down menu.
Click Search automatically for updated driver software (Automatically search for updated driver software). This is the option at the top of the Driver Update window. This will cause the computer to start looking for the upgrade file.
Install new drivers if asked. You may have to confirm your decision by pressing Yes (Agree) or Install (Setting). However, usually new drivers are automatically downloaded.
- If your drivers have been updated to the latest version, then your computer's sound problem is not related to the driver.
Restart the computer. After completing the driver installation process, you need to restart your computer to apply the changes. If the driver was the cause of the computer's sound problem then this issue should be resolved. advertisement
Method 5 of 5: Using Command Prompt
Open the Start menu. You can click the window icon in the lower left corner of the screen or press the key ⊞ Win.
- If you are using Windows 8, you need to move the mouse pointer to the upper-right corner of the screen and then click the magnifying glass icon.
Type command prompt Go to Start. You should see the Command Prompt icon at the top of the Start window.
Right-click on the Command Prompt icon. This icon looks like a black box. You will see a drop-down menu appear.
Click Run as administrator (Run as administrator). This option is usually at the top of the drop-down menu.
- If you do not have administrator rights on the computer you are using, just click the Command Prompt icon.
Click OK if asked. Command Prompt will open.
Import net localgroup Administrators / add localservice. This command reduces the baseline level of security for creating and executing system files, which include computer audio drivers.
Press ↵ Enter. This is the step to run the command you entered.
Restart the computer. After the command has finished running, you need to restart your computer to apply the change. advertisement


