Author:
Monica Porter
Date Of Creation:
19 March 2021
Update Date:
1 July 2024
Content
This wikiHow teaches you how to scan a physical document to your AirPrinter or computer using your iPhone's camera.
Steps
Part 1 of 2: Scanning a Document
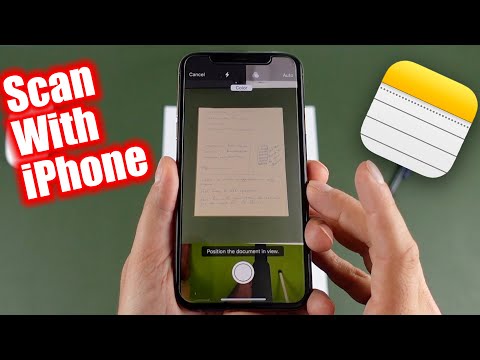
Open the iPhone's camera. The app is gray with a black camera icon inside. You can usually find this option on the Home screen.
- You can also swipe up from the bottom of the screen and tap the camera icon in the bottom right of the menu.

Point the phone camera towards the document. Press the screen while the document is in the middle so that the camera focuses on the content in the highest possible quality.- If Camera opens to your face, tap the camera icon in the lower right corner of the front screen to switch lenses.

Press the shutter button. This button has a white circle at the bottom of the screen. The photo will be taken.- Repeat this process with the rest of the document (if applicable).
Tap the square in the lower left corner of the screen. The iPhone's Camera Roll will open up the last photo you took.

Click the share button with the up arrow icon located in the lower left corner of the screen. A list of options will appear at the bottom of the screen.
Scroll left and tap Add To iCloud Drive (Add to iCloud Drive). This button is in the row of gray options at the bottom of the screen. As long as iCloud Drive is enabled on your iPhone and you select only one photo, this option will appear at the bottom of the screen.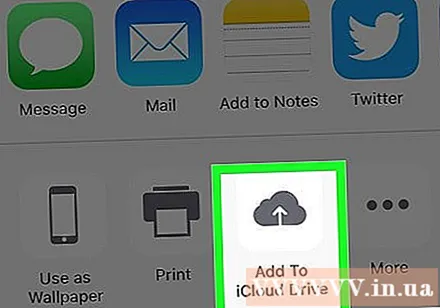
- If you just want to print a copy of the document and the AirPrinter is connected to your iPhone, tap Print (Print).
Click iCloud Drive. This option is at the top of the "iCloud Drive" window. The selected photo will be saved to iCloud Drive; you can now open the file on any computer with an Internet connection.
- You can also click on any folder if you want to save the photos in a specific place.
- If there are multiple pages of documents to upload, you'll need to upload them one at a time.
Part 2 of 2: Accessing Scanned Documents
Access iCloud website on the computer. You can open iCloud Drive and download any photo saved here.
Enter your Apple ID and password, then click the button →. If the computer remembers the account and logs in automatically, you can skip this step.
Click iCloud Drive. The app is blue with a white cloud inside.
Click the document to select it.
- You can hold down the key Ctrl (or ⌘ Command on Mac) and click multiple files to select all of them.
- If you save the document in a specific folder, double-click that folder first.
Click the cloud icon with the down arrow located at the top of the page; here is the download button.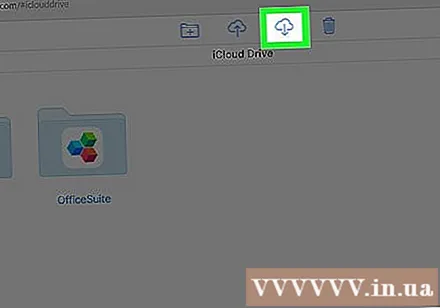
Wait for the scanned document to download to complete. Once the download is complete, you can open the document in your computer's "Downloads" folder and do whatever you want.
- Depending on your browser, you may need to choose a download location (for example, your desktop computer).
Advice
- You can crop the image to remove excess content (such as the surface on which the paper is placed).
- This process can be applied to any cloud service (e.g. Google Drive or Dropbox), but first you need to add that app to the row of image options by scrolling all the way right in the group. top application, tap More (Other) then swipe the switch for the app you want to use to the "On" position.
Warning
- iCloud Drive has a default storage limit of 5 GB. If you want more storage, you'll need to upgrade your iCloud storage.


