Author:
Robert Simon
Date Of Creation:
17 June 2021
Update Date:
24 June 2024
Content
This article shows you how to copy pictures from a computer to a USB.
Steps
Method 1 of 2: On the Mac
Insert the USB into the Mac computer. Your computer usually has rectangular ports, called USB ports, on either side of the laptop body or on the back of the screen, on the keyboard wall, or on the desktop CPU. You need to insert the USB into the appropriate port.
- The USB ports have a plastic pad on the top; you will also find the USB connector with a similar plastic pad. You need to attach the USB to the computer port so that the plastic plug is underneath.
- If you have trouble inserting the USB into the port, try rotating the USB.
- However, some Macs do not have USB ports.

Open Finder with a blue face icon in the Dock section of your Mac, usually at the bottom of the screen.- The USB can be displayed as soon as it is plugged into the computer, in which case you don't need to open Finder.

Click the USB's name in the lower-left corner of the Finder window, just below the "Devices" heading. This will open the USB window so you can save the image.- If the USB flash drive shows up as soon as it's plugged into the Mac, you can skip this step.

Open the Photos app with the colorful pinwheel icon on a white background displayed in the Dock.
Click and drag the photo onto the USB window. When you release the mouse button, the image will be "dropped" into the USB window and the process of copying pictures from the computer to the USB is completed.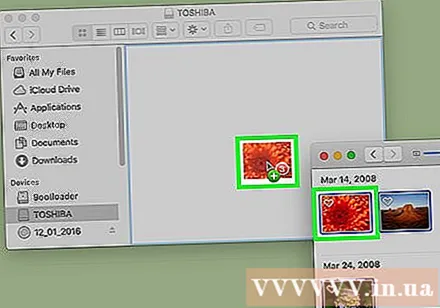
- By default, you cannot move photos from your computer to the USB, you can only copy them. If you want to move photos from your computer, you need to delete them on the computer after copying the pictures to the USB.
- You can hold down the key ⇧ Shift While clicking to select multiple photos, or click and drag the mouse pointer over the number of pictures you want to copy.
Repeat this step for all images to be processed. You can save the number of pictures depending on the memory capacity of the USB.
- For example, USB with 64GB memory can store the number of photos with 64GB capacity.
Click the "Eject" button with the up arrow icon next to the USB's name in the Finder window. Do this to ensure that files don't get damaged when you remove the USB flash drive.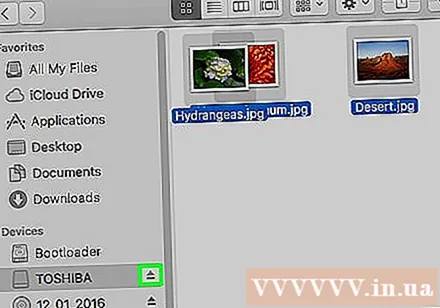
Remove USB. Your photo is now saved to USB. If you want to transfer photos from a USB flash drive to another computer, simply insert the USB flash drive into that computer and drag the photos from the USB to the computer's Pictures folder. advertisement
Method 2 of 2: On Windows
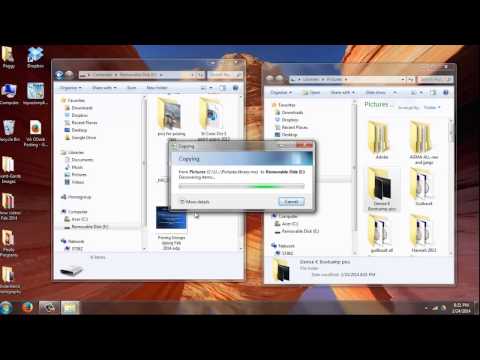
Insert the USB into the Windows computer. Your computer usually has rectangular ports, called USB ports, on either side of the laptop body, or on the back of the screen, on the keyboard wall or on the desktop CPU. You need to insert the USB into the appropriate port.
- The USB ports have a plastic pad on the top; you will also find the USB connector with a similar plastic pad. You need to attach the USB to the computer port so that the plastic plug is underneath.
- If you have trouble inserting the USB into the port, try rotating the USB.
Open "My PC" with the icon on the computer screen. You can find it on your desktop or open it from the Start menu by clicking the Start icon in the lower left corner of the screen and then selecting My PC.
- On some computers, My PC is also called "My Computer".
- Windows may ask you what action you want to do with your USB drive. Clicking OK when asked allows you to choose Open folder to view files (Open folder to view files) to open the window of the USB.
Double-click the USB's name under the "Devices and drives" section in the middle of the window.
- If the flash drive displays as soon as the USB is plugged into your Mac, you can skip this step.
Right click on the folder Pictures (Photo) on the left side of the My PC window.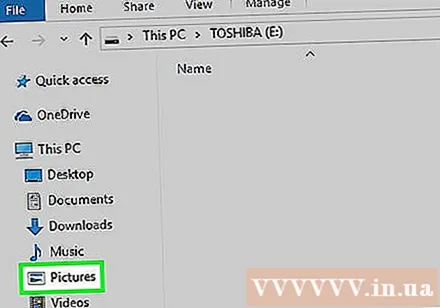
- If the USB window appears as soon as the USB is attached to the computer, left-click Pictures.
Click Open in new window (Opens in a new window). This will open a window with a "Pictures" folder - the default location for your computer's image.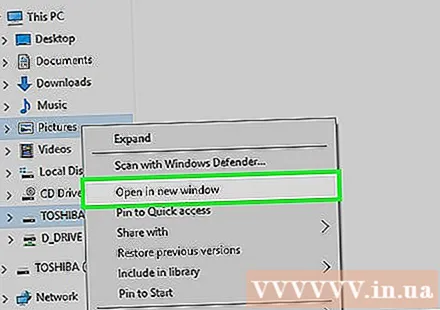
- If the USB flash drive shows up as soon as it is plugged into the Mac, you can skip this step.
When you release the mouse button, the image will be "dropped" into the USB window and the process of copying pictures from the computer to the USB is completed.
- By default, you cannot move photos from your computer to the USB, you can only copy them. If you want to move photos from your computer, you need to delete them on the computer after copying the pictures to the USB.
- You can hold down the key ⇧ Shift While clicking to select multiple photos, or click and drag the mouse pointer over the number of pictures you want to copy.
Repeat this step for all images to be processed. You can save the number of pictures depending on the memory capacity of the USB.
- For example, USB with 64GB memory can store the number of photos with 64GB capacity.
Right-click the flash drive icon below the "Devices and drives" heading under "My PC".
Click the "Eject" button to ensure that files are not damaged when you remove the USB flash drive.
Remove USB. Your photo is now saved to your flash drive. If you want to transfer pictures from a USB flash drive to another computer, simply attach the USB to that computer and drag the photos from the USB to the computer's Pictures folder. advertisement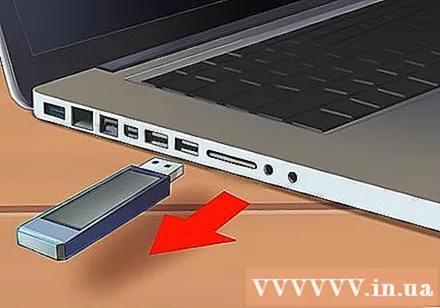
Advice
- This action applies to all drives, from flash drives, hard drives, to MicroSD cards.
- If you use a Chromebook, you still attach the USB to your computer as usual, then click the square icon with three dots edges at the bottom of the screen to open the Files window. Click the toolbar in the lower left corner of the Files window, choose the name of your flash drive and add photos.
Warning
- Improper ejecting of the USB flash drive before removing it from the computer may result in damage or loss of files.


