Author:
Lewis Jackson
Date Of Creation:
12 May 2021
Update Date:
1 July 2024

Content


Method 2 of 6: Tie a Bow with a Horizontal Striped Silk Ribbon

Measure and wrap the ribbon. Cut 2 meters of horizontal silk ribbon. Wrap the ribbon perpendicular to the two sides of the gift box. Use glue or tape to secure the ribbon to the box, but don't cut it too quickly (you will need to leave the ribbon long enough to make a bow).
Create a bow. Let's create a bow from the center point of the box. Use your finger to keep the ribbon in place. Make a fold for the ribbon at the top of the bow. Next bend in the opposite direction to create the next bow. Apply glue or tape if needed. Create more bows this way.

Create more bow wings. Move to the other half of the center point of the gift. Create three more bows in the same way. Return the top of the ribbon to the center point and fix the adhesive. advertisement
Method 3 of 6: Tie a Bow with Ribbons
Cut out a piece of ribbon. You can use this bow style to wrap gifts, bouquets, hair accessories and decorate parties. Place the ribbon horizontally on a flat surface.

Create two bow wings. Cross the ends of the ribbon together at the center. Leave a few of the tails left.- Hold your hand at the midpoint.
Wrap and cover the knot. Use a thin piece of string to wrap tightly in the center of the bow. Wrap or paste a small piece of ribbon over it to cover it. Use a ribbon of the same color or a suitable different color. You can glue or stitch it to fix it.
Complete the bow. Align the wings and tail of the bow to be balanced. Trim the tail section to reduce spun phenomenon. Attach a bow to a wreath or gift box for decoration. advertisement
Method 4 of 6: Tie the Bow to the Flower
Measure the bow wings. Mark a point 2.5 cm and 20 cm from the ends of the ribbon. Use your thumb and index finger to hold it steady.
Bending into a bow. Move the longer string to the left to form a bow 2.5 cm long. Use your thumb and index finger to hold it steady.
Change direction. Do the same as above to create another bow in the opposite direction. Keep doing so to create more symmetrical bows. Make three to five pairs of symmetrical bows to complete.
Fix the bow. Wrap a thin steel wire in the center of the bow. Tighten to fix and cut off excess. Cover it by wrapping the ribbon on it. Stick glue or stitch to fix it.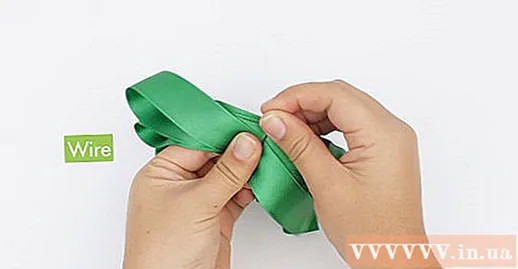
Spread the bow wings. They should form the shape of a round flower. advertisement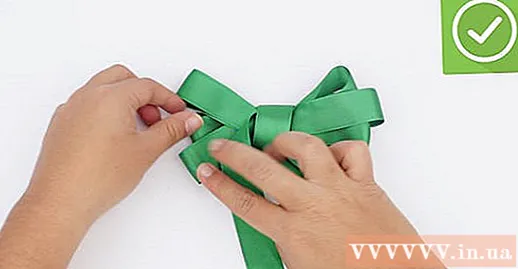
Method 5 of 6: Posing the Bow Tail
Don't forget the end of the bow. Along with the bow wings, the bow tail will also make the difference of each bow. Not all bow styles have tails, but if they do, make them neat and sharp.
Always pay attention to the end of the bow. Keep the tail as long as possible when tying the bow. You can cut them down if you need to, but conversely, you won't be able to lengthen them without damaging the bow.
Cut tail. Cutting the tail will help prevent the ribbon from splitting and the bow will look cleaner. Use a sharp scissors suitable for fabric cutting. The bow can be cut as follows:
- Diagonal cut: You will cut a diagonal at the end of the bow.
- Cut in a V-shape. Choose a center point in the middle of the bow. Cut a diagonal line to this point from the right, doing the same from the left. The two diagonal lines must intersect exactly at the midpoint. Carefully cut off excess if it doesn't come off on its own.
Method 6 of 6: Choosing the Ribbon Type
Choose according to quality. The satin is a common ribbon used to make a bow, but this material is quite slippery for the inexperienced. Making a bow from grosgrain ribbons will be easier. Pre-printed ribbon, velvet ribbon, iridescent ribbon, cotton or chiffon ribbon are all very suitable for making bow. The edged type is great for wrapping gifts and bouquets.
- Most fundamentally, if you can tie the ribbon into a knot, you can already make a bow.
- There are some types of ribbons that are too stiff, for example thread or string, if you make a bow from them you must have a tool to support.
Experiment. Try out different types of ribbons of different widths to find the exact type of bow you like.
- Always remember that you will need lots of ribbons to make a bow. The folds and knots take ribbons very much.
Advice
- For more ideas on bow tie, please see other articles in the same category.
- To get an estimate of how long the ribbon is needed to wrap the gift, wrap it halfway into the gift box, then add another 60 cm to each end to make a bow.
- If you used glue to stick the ribbon, try putting some glue on the ribbon first. If, after drying, the glue gets soaked through the ribbon, you will have to adjust the ribbon to cover it, or use a different kind of glue.
- For those who don't want to tie the bow on their own, try a bow tie machine. Or you can buy pre-made bows online or at craft shops.
What you need
- Ribbon
- Steel fiber used for bouquets (thin steel wire)
- Drag
- Glue


