Author:
Louise Ward
Date Of Creation:
10 February 2021
Update Date:
1 July 2024
Content
You should not use a removable bottom die as the locking part and the height of the mold may cause it mold does not fit in the pot.

- If there is not enough flour, add about ½ - 1 tablespoon of flour to the mold.

Place stencils in the mold. First, you will place the mold on stencils, then draw around the bottom of the mold with a brush. Next, cut the circle on the stencils, and place it in the mold.
- Repeat this step for each mold to be used.
- You do not need to put stencils into the mold.

Lightly knock the mold on the kitchen counter several times. This is not required, but this is how to reduce air bubbles in the dough.
advertisementPart 2 of 3: Prepare the cake steamer

Pour a little water into the saucepan, then place the steamer on top. Water should be about 2.5 cm from the bottom of the steam bath. You will pour water into the pot before placing the steamer. Add or remove water if needed.- If you are using a glass baking tray, the amount of water used should also be approximately 2.5 cm from the bottom of the tray.
- Not necessarily exactly 2.5cm distance. Just make sure the water in the pot when it boils won't overflow into the steamer.
Spread a thin layer of dried beans on the bottom of the steamer. You can use any kind of beans. You can even use small stones. The use of peanuts is used to create a cushion between the steamer and the bottom of the mold.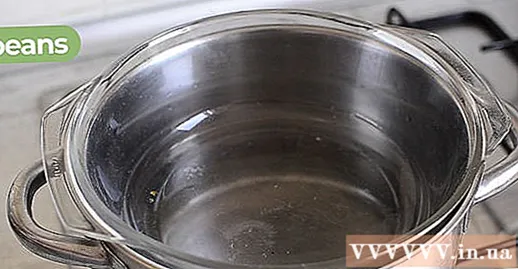
- You will also do the same thing using the glass baking tray. In this case, it is safer to use dried beans than for glass.

Place the cake mold in the steaming tray. If you are using a glass baking tray, place the cake mold in the tray. Make sure the bottom of the mold is on top of the dry beans. Do not try to push the mold under the bean.If the bottom of the mold hits the bottom of steamer or glass baking tray, The cake mold will be very hot cause the cake to burn.
Place a piece of parchment on the top of the pot before closing the lid. Do not cover the pot immediately. If you do this, steam will build up and run down the cake, making it soft. Instead, cut a piece of stencils to cover the top of the pot and gently place the lid on the parchment paper.
- The stencils should be about 5cm wider than the top of the pot because the weight of the lid causes the stencils to sink.
Use a kitchen towel to remove the cake from the pot. First, you open the lid and remove the parchment. Next, hold the kitchen towel in hand and hold the mold with your hand and carefully remove the cake mold.
- This can be a bit tricky, especially when you don't have a lot of space between the mold and the steamer / glass grill. Try to manipulate it skillfully!
- If the kitchen towel is too thin, you can fold it in half or use a pot lift. Kitchen gloves may be too big to fit between the pot and the cake mold.
Wait 5 minutes for the cake to cool before removing it from the mold. To remove the cake from the mold, just turn the mold upside down on the flat surface to let the cake fall off. Peel off the parchment and turn the cake over.
- Now the cake is finished. You can flatten the surface of the cake to make it look better.
- If you want to spread the cream on the cake, you right Place the cake on the blister to cool completely (takes about 10-15 minutes); otherwise, the cream will melt.
Advice
- The cake may take longer than 25-30 minutes.
- Don't let the bottom of the cake mold touch the bottom of the steam tray or the glass baking tray, as the mold will overheat.
- If you use a gravel, make sure it is clean.
What you need
- Gas stove
- Cauldron
- Steamer or glass baking tray
- Stencils
- Pre-mixed sponge cake or cake recipe
- Dried beans or gravel


