Author:
Laura McKinney
Date Of Creation:
9 August 2021
Update Date:
1 July 2024
Content
Microsoft Word is the most commonly used word processor, if not the most popular computer editing software in the world. To get the most out of the performance, however, you must know how to navigate the software's increasingly complex screens and menus. Luckily, adding page numbers is not difficult.
Steps
Method 1 of 3: Insert page numbers
Double-click the top or bottom of the page. This will activate the "Design Menu" which allows you to add page numbers. Or you can click the "Insert" tab in the top bar. The top ribbon will open, allowing you to add a page number.

Select "Page Number" to open up options available to you. You will be able to choose the placement of the page number. Proceed to hover over each option ("Top of Page", "Bottom of Page", etc.) to see more options and decide if you want the number to be on the right, left or center of the page.- In the Design menu, the Page Number option is to the left.
- In the Insert menu, the Page Number option will be in the center.

Select the page numbering style to automatically set up the numbering. After you choose the exact position of the page book, Word automatically adds numbers to the entire text.- There are many page numbering options. However, you can also adjust it a bit if the number of pages is not showing as you want.

Note: Some versions of Word differ slightly in their numbering. The positions of some function buttons may vary depending on the version of Word. However, all current versions of Word allow page numbering by double-clicking the top or bottom of the page. This allows you to bring up the Page Number menu. advertisement
Method 2 of 3: Format the page number
Double-click the page number to change the font, color, or ki. If you want the page numbers to use a specific font just double click on it. The page numbers will be highlighted in blue similar to the text selected in Word. Next, you just need to adjust the font, color and size as you normally would. These parameters are automatically applied throughout the text.
Start page numbers by using page breaks. If you want to start numbering the word "1" on the next page of your document, you need to divide that page. First place your mouse pointer at the top of the page where you want to start numbering. Later:
- Click on "Page Layout" → "Breaks" from the top bar.
- Select "Next Page" in the "Breaks" section.
- Double-click the current page number.
- Click "Page Number" and select "Format Page Numbers".
- Select the bubble labeled "Start At", then select "1" to renumber this page from 1.
Ignore the first page number for a better title page. Start by double-clicking on the header or footer again to bring up the appropriate menu. Then, find and check the box "Different First Page". So feel free to click on the first page number and delete it, while keeping the rest of the page numbers.
- Many times you just need to click the "Different First Page" button and the first page number will be automatically deleted.
- Most presentations and newspapers do not need the first page number because they default to the first page, of course, the number "1".
Use the "Format Page Numbers" option for specific changes, such as the number type and the set title. If you want to improve your skills, you can double-click the top or bottom of the page again, click "Page Numbers" and choose "Format Page Numbers" below the menu that appears. From here you can set up many different types of numbers, such as Roman numerals or letters, as well as customize the basic look of numbers. This feature is not very powerful, but quite effective.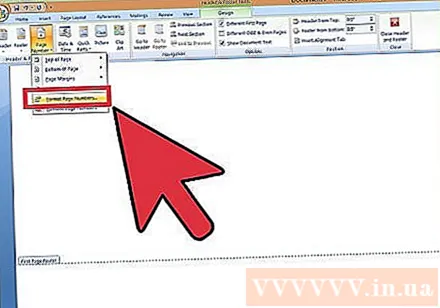
Press "esc" to exit the Header and Footer or Design bar. The escape key will return you to normal editing mode, while also applying the page number format. Now you can keep writing! advertisement
Method 3 of 3: Insert page number on mobile app
Click "Insert". A simplified menu will appear for you to format the document, even easier to use than software on your computer.
Select "Page Numbers" to set up numbers. There are many options for the page number layout, including options for art.
Select "Headers and Footers", then click "Options" to customize the numbers. This will allow you to set up a different first page, change the look of odd and even numbered pages, or delete all pages.
Smoothly transfer documents from Word application to desktop software. Any changes you make to the application will also be applied to the computer program, so you can safely add or change page numbers here and all data will remain as you submit. documentation to another program. advertisement
Advice
- If you plan to create a complex header or end (such as your name or header), try adding page numbers first. After that, the operation will be easier.


