Author:
Christy White
Date Of Creation:
8 May 2021
Update Date:
1 July 2024

Content
- To step
- Part 1 of 3: Getting the snails
- Part 2 of 3: Building a snail fence
- Part 3 of 3: Maintaining your nursery
- Necessities
Cultivating snails, also called helicia, is a lucrative practice that is carried out all over the world. Snails are sold for their meat and used in popular escargot dishes. To start and maintain a healthy snail farm, you need to make sure you have the right kind of snails, that you are creating a favorable habitat and that you are looking after the health of your snails. With patience and dedication you can grow your snail farm from a hobby to a lucrative business venture.
To step
Part 1 of 3: Getting the snails
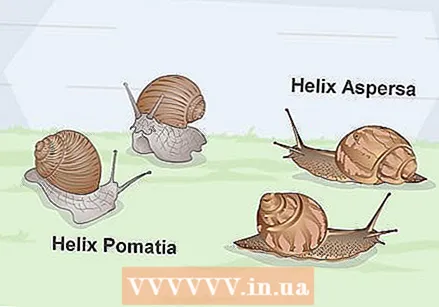 Decide what kind of snails you want to breed. When creating a snail farm, you should use a single species of snail. The smaller helix pomatia and helix aspersa can lay hundreds of eggs and can withstand seasonal climate changes. The bigger one achatina achatina and archchatina marginata can only survive in climates where it is warm all year round. Research common snail species in your area and choose the one you want to breed.
 - The helix aspersa is a popular snail for breeding in Europe.
 Make sure you have the correct permits for the snail farm. There are different local and national regulations regarding snail farming depending on where you live. In the U.S. for example, it is illegal to transport most snail species across state lines without a special permit. Other countries will have their own restrictions and laws regarding starting a snail farm. Check the website of the Department of Agriculture in your country to determine what forms and permits you need to start a snail farm.
 - In some countries, certain snail species are considered invasive, so they should not be kept.
- The lissachatina fulica or large African land snail is in the U.S. illegal.
 Buy your snails online or look for snails in your garden. If you want to start a snail farm, you need snails. Search online for another snail farm near you where you can purchase adult snails. It is always best to be able to examine the snails before buying them to make sure they are healthy.
 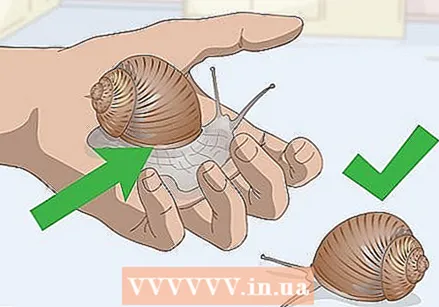 Choose full grown snails. If you are just starting the snail farm, you need healthy, fully grown snails that lay eggs to help populate your farm. Check out the snail's house. If it has a lip, the snail is fully grown. The lip looks like a rolled up or curled piece of the shell at the entrance to the cottage.
 - Choose snails that fit in their shells, as that is an indication of health.
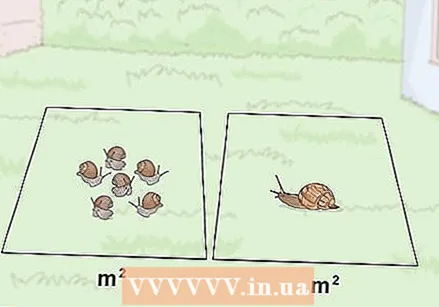 Buy enough snails for the size of your nursery. If you grow smaller snails, place a maximum of six snails per square meter. When growing larger snails, you will need at least one square meter per individual snail. More snails that place this lead to overpopulation and an unhealthy snail population. Buying more snails results in more eggs.
Part 2 of 3: Building a snail fence
 Choose a wind-free, moist environment for the fence. Places where the soil does not drain well after it has rained or that are exposed to strong winds are not good places for snails. Choose a location that offers plenty of space, but is not exposed to severe weather conditions.
 - A ditch is the perfect location for a snail fence, as it is not exposed to strong winds.
- A spot at the bottom of a hill or surrounded by trees will also protect your nursery.
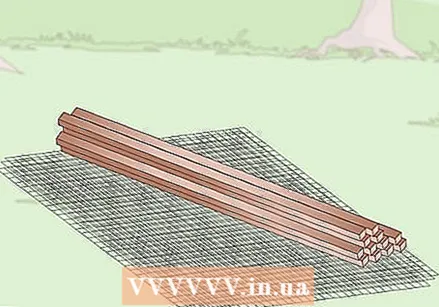 Choose the fence material. You can buy snail fence material on the Internet and at most DIY stores. Popular fence material includes corrugated metal or plastic sheet, chicken wire or a woven material. The purpose of the fence is to keep the snails in it. Choose a material that is within your budget and buy enough to build a 5x5 meter fence.
 - You can increase the perimeter of your fence if you want to house more snails.
- A larger snail farm can be as large as 1,000 to 10,000 square meters.
 Create the perimeter of the fence by driving posts into the ground. You can buy wooden fence posts from the same store where you bought the fence material. Space the posts four feet apart so that there are five posts on each side of the fence. This will form the outline of your snail fence, which you will be attaching the fence material around.
  Dig a ditch 40 cm deep around the posts. Use a shovel to dig a ditch around the outside of your snail farm. This is where the bottom of the fence material will be placed.
 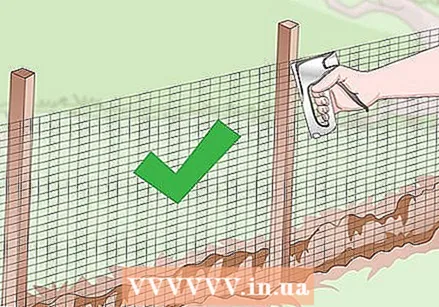 Wrap the mesh around your posts. Take your fence material and wrap it tightly around the wooden posts.Place the bottom of the fence in the ditch you dug earlier. This ensures that the snails cannot escape and that larger predators cannot burrow under the fence.
 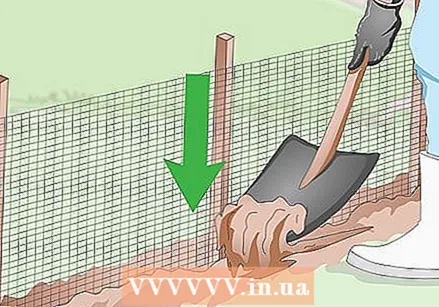 Cover the ditch with soil. Use a shovel to refill the ditch with soil. Once the trench is covered, you will need to compact the soil in that area so that the fence remains underground. Your snail fence is now ready.
 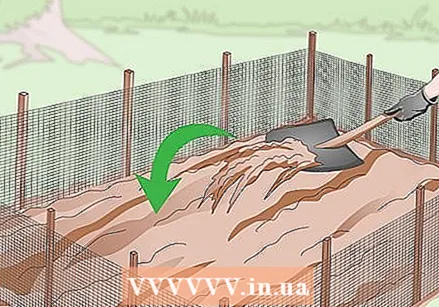 Lay out moist, loamy soil. Snails prefer moist, loamy soil with low acidity and lots of organic matter. Go to a gardening supply store and buy soil with a pH of 7 or lower to boost your snail health. Sprinkle the soil in the snail habitat. This gives your snails plenty of room to move.
 - Clay is not suitable for snails, because it becomes too hard when wet.
- Sand is also not ideal for snails as it has a low water holding capacity.
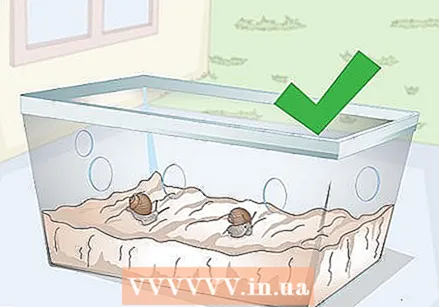 Choose a well-ventilated container if you are starting a small, personal nursery. Snails eat through cardboard, so cardboard boxes are not the best containers. Instead, create a habitat in a glass or plastic container. An aquarium is also suitable. Make sure that the habitat is covered so that the snails cannot escape, and make sure there are ventilation holes in the lid of the habitat so that your snails can breathe.
Part 3 of 3: Maintaining your nursery
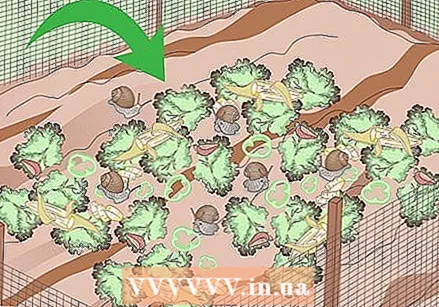 Add snail food to the habitat. Snails eat a variety of foods. You can feed your snails things like lettuce, cabbage, weeds, vegetable peels and pieces of fruit. Put the food in the habitat and remove it when it starts to rot or mold. Also place a bowl of distilled water so your snails can drink.
 - You can also grow leafy greens in the nursery to feed your snails.
- Other plants that snails like are turnip, swede and dandelion clover.
- Tap water sometimes contains chemicals that can harm snails, so remember to boil and cool the water if you decide to use tap water.
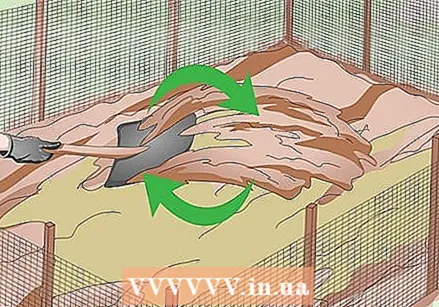 Refresh the soil every three months. The chemical makeup of your soil changes over time. In addition, the soil will likely contain more and more excrement and slime from your snails. For these reasons, you should replace all soil every three months to keep your snails healthy. Remove the snails from their habitat and place them in a temporary container before using a shovel to replace the old soil with fresh loamy soil.
 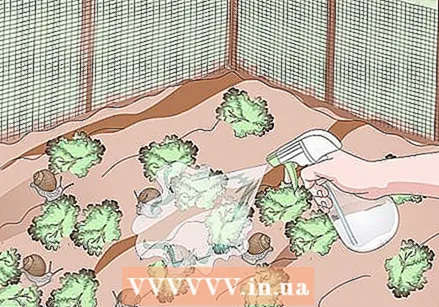 Water your nursery when it is not raining. Use a spray bottle to moisten the leaves and soil in your snail farm. Water your nursery in the evening or early in the morning when it is cooler outside. If you water when it's hot outside, the snails can be attracted to the water and die from exposure to the sun. If you grow snails outside and it hasn't rained for a while, you should water your nursery. Water your nursery daily when the weather is very dry.
 - Do not flood the nursery.
 Pull weeds out of the fence. Weeds and wild grasses can limit the growth of leafy greens that you may have planted in your nursery. Carefully pull weeds and grasses out of the ground in and around the snail fence.
Necessities
- Fence material
- Wooden posts
- Staple gun
- Loamy soil
- Scoop
- Leafy vegetables, vegetables and fruit
- Spray bottle
- Water


