Author:
Morris Wright
Date Of Creation:
25 April 2021
Update Date:
1 July 2024

Content
- To step
- Part 1 of 3: Connecting your scanner
- Part 2 of 3: Choosing a scanning program
- Part 3 of 3: Adjusting scan preferences
- Tips
- Warnings
- Necessities
At the time of purchase, an Apple computer already has software with which you can scan. Once you have your scanner or multifunction printer installed, you can add it to "Devices" on your Mac and scan with the Preview or Image Capture programs.
To step
Part 1 of 3: Connecting your scanner
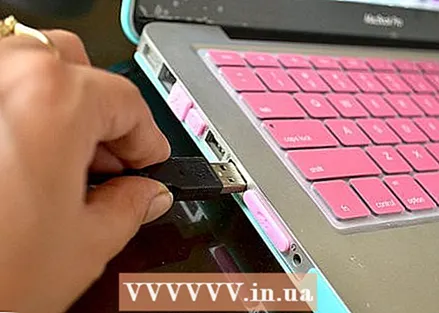 Plug your scanner or multifunction printer into the Mac. Connect your scanning device or multifunction printer with a USB cable that runs from the port of the printer to the back or side of your Mac.
 - Instead, you can use a wireless scanner or printer connected to your local WiFi network.
- If you prefer to connect your scanner or printer wirelessly, follow the installation procedure for your scanner or printer. Make sure your scanning device is connected to the same wireless network as your Mac.
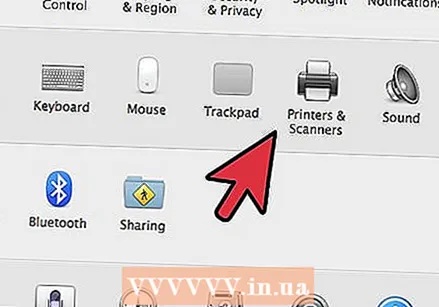 Click on the Apple icon at the top left of your desktop. Choose "System Preferences". Select "Print & Fax" from the Hardware menu.
 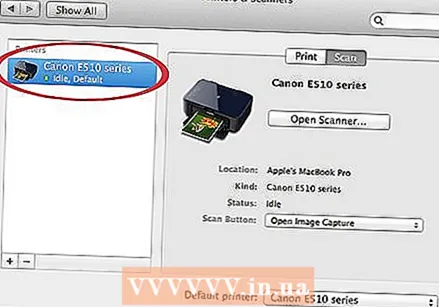 Wait for your Mac to add the scanner / printer. If it doesn't, click the plus (+) sign to make your Mac recognize the device. Click "Add".
Part 2 of 3: Choosing a scanning program
 Place the document to be scanned on the scanning plate. If you are using a scanner with a feeder, place the document in front of the feeder.
 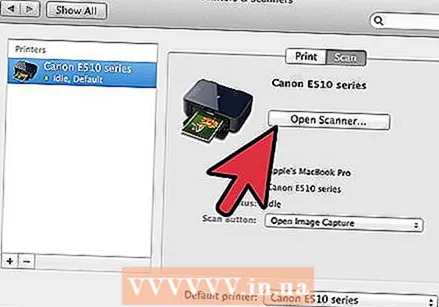 Open the scan program. You can choose from a number of scanning programs that are automatically installed on your Mac. Choose one of the following applications:
 - Use Preview. If it is on your desktop, Preview is the fastest way to scan.
- Use Image Capture. If you use devices on a network, you can easily choose from cameras, shared devices and devices directly connected to your Mac.
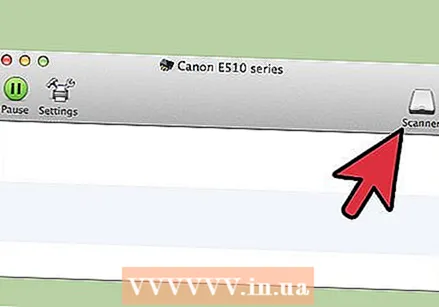
- Use the scanner icon. When the scanning device is installed, you can place it on your dock. If you then want to print or scan, click the scan icon and choose "Scanner" in the top right corner.
- You can also find the icon of your scanning device in the "Print & Fax Preferences" under "System Preferences". Click on "Scanner" and then click on "Open Scanner".
 Switch on the scanner on your computer.
- If you are using Preview, click "File" and "Import From Scanner."
- If you are using Image Capture, double click on the program icon in the dock or in the Applications folder.
- If you are using the scanner icon, click on "Scanner" in the top right corner.
Part 3 of 3: Adjusting scan preferences
 Select whether the document to be scanned is on a glass plate or in a feeder. Your scanner may have additional options for different types of scans, such as transparencies.
 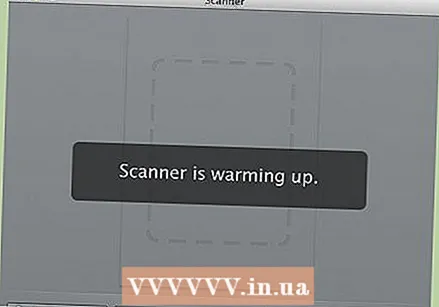 Click "Scan" to warm up your scanning device. This gives you an overview of the scan, so that you can make adjustments. If the device scans automatically, you can go back to the scan menu to adjust it before scanning again.
 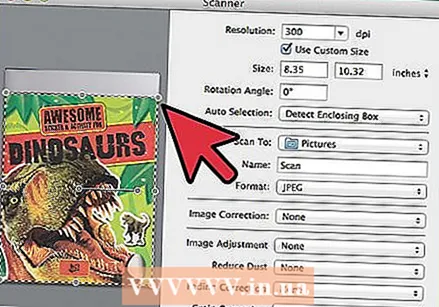 Use the Crop / Reframing option ("Crop" in English) to adjust the scan area. This is shown by the dotted line around the document. You can drag any corner or side in or out to adjust the scan area.
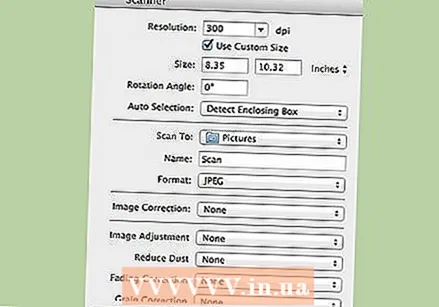
  Choose the scan size. Choose from fixed font sizes or legally prescribed standard sizes.
 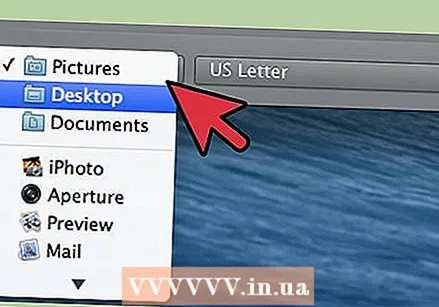 Click the drop-down menu next to "Scan To". Choose where you want your scanned file to appear. You can choose between your Desktop or your Documents or Photos folders.
 - If you are using Image Capture, you can also choose to open the scanned file in Preview, Mail or iPhoto.
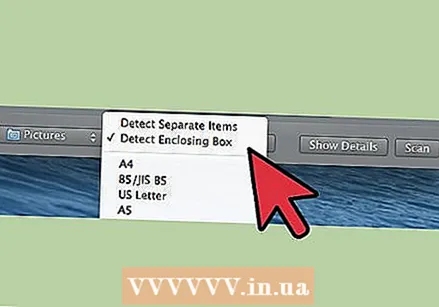 Select or deselect the option to recognize individual parts. If you're scanning something with both text and images, you better deselect it. If you want to distinguish different parts in the scan, this option can help you with this.
 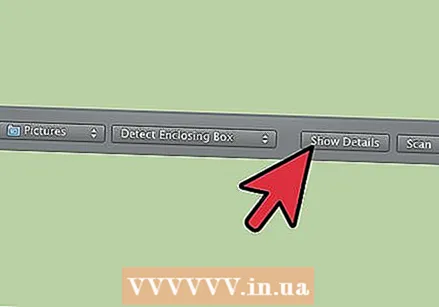 Click on "Show Details" to further adjust the orientation, resolution, color or file format of your scan. You can even adjust the brightness and color tones of an image.
 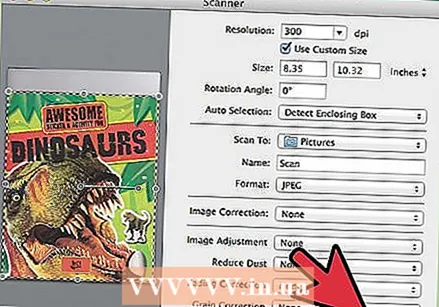 Name the scan. Click or the "Scan" button. You can find the scanned file in the folder you previously specified as a storage location.
Tips
- Update your computer using the Software Update program before connecting a scanner or printer. Double-click this in "System Preferences" and then click the Software Update icon under "System". Select "Check Now" to find and install new software. A list of supported printers and scanners is regularly updated through this program.
- If your wirelessly connected scanner does not work, check if the scanner is still connected to the wireless network after the device has been inactive for a while.
Warnings
- Be careful if you use CDs to install your printer or scanner. Most Macs are programmed to automatically recognize external devices and initiate the scanning process without the use of CDs. Some installation CDs are outdated, which can cause problems on your Mac.
Necessities
- USB cable
- Scanner
- Multifunction printer


