Author:
Christy White
Date Of Creation:
4 May 2021
Update Date:
1 July 2024

Content
- To step
- Method 1 of 5: Dyeing Easter eggs
- Method 2 of 5: Make Batik Easter eggs
- Method 5 of 5: Make printed Easter eggs
- Tips
- Necessities
Decorating Easter eggs is a great way to celebrate Easter with family and friends of all ages. From traditional dyeing to colorful glitter and silk ties - there are many ways you can decorate Easter eggs. Below are a number of ways so that you can make special Easter eggs yourself.
To step
Method 1 of 5: Dyeing Easter eggs
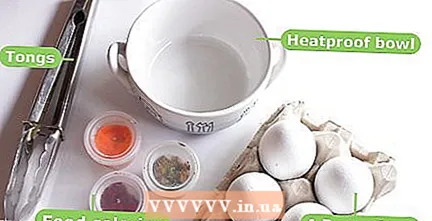 For this method you will need:
- A dozen eggs, hard-boiled or hollow blown
- A heat-resistant bowl, cup or pot
- 4 tsp. natural vinegar
- 1 cup of warm water
- Food coloring
- A grab
 Protect your work surface with kitchen paper, newspapers or a plastic tarp. You can protect your clothes with an apron. This is because paint can stain clothes, countertops and tables.
  Let the eggs dry thoroughly and then carefully put them back in the egg carton. Let them dry a little longer before touching them again.
Method 2 of 5: Make Batik Easter eggs
 For this method you will need:
- A dozen hard-boiled eggs
- Wax crayons
- A heat-resistant bowl, cup or pot
- 4 tsp. natural vinegar
- 1 cup of warm water
- Food dyes
- A grab
 Preheat the oven to 250 degrees.
 Bake the eggs for about 10 minutes or until the wax looks shiny, wet and starts to melt.
 For this method you will need:
- A colander
- A dozen hard-boiled eggs
- 1/2 cup of natural vinegar
- Food coloring
- Water
 Place 5-6 hard-boiled eggs in a colander in the sink.
 Take the eggs out and let them dry on some kitchen paper or in an egg carton.
 For this method you will need:
- A dozen hard-boiled eggs
- A sponge
- Glue
- Glitter
 Return the egg to the egg carton and let it dry before touching it again. You can sprinkle some glitter over the egg while it is drying in the box.
Method 5 of 5: Make printed Easter eggs
 For this method you will need:
- A dozen raw eggs
- 12 pieces of 100% printed silk measuring 12.5 x 12.5 cm.
- 12 pieces of white cotton measuring 12.5 x 12.5 cm.
- 24 rubber bands
- 4 tbsp. vinegar
- Water
- A grab
 Remove the eggs from the pan with the grab and let them cool for 20 minutes.
 Remove the wipes from the eggs and admire the trendy patterns on the eggs!
Tips
- If you are trying to make several layers of color, it is best to start with a light color. You can always color the eggs darker, but you cannot make darker colors lighter.
- Try quail, ostrich, or brown eggs for different effects.
- You can mix many colors with the few colors that come in a food coloring package. If you mix some green with blue you have petrol and with a little yellow with green you have lime.
- You can put stickers on any design to add even more color and your personal taste to the eggs and it's fun too.
Necessities
Painted Easter eggs
- A dozen hard-boiled eggs
- A heat-resistant bowl, cup or pot
- 4 tsp. natural vinegar
- 1 cup of warm water
- Food coloring
- A grab
Batik Easter eggs
- A dozen hard-boiled eggs
- Wax crayons
- A heat-resistant bowl, cup or pot
- 4 tsp. natural vinegar
- 1 cup of warm water
- Food coloring
- A grab
Tie-dye Easter eggs
- A colander
- A dozen hard-boiled eggs
- 1/2 cup of natural vinegar
- Food coloring
- Water
Glitter Easter eggs
- A dozen hard-boiled eggs
- Sponge
- Glue
- Glitter
Printed Easter eggs
- A dozen raw eggs
- 12 printed 100% silk patches of 10 x 10 cm.
- 12 white cotton patches of 10 cm. 10 cm.
- 24 rubber bands
- 4 tbsp. natural vinegar
- Water
- A grab


