
Content
- To step
- Part 1 of 2: Cleaning and sanding the wood
- Part 2 of 2: Apply primer and paint
- Necessities
- Tips
- Warnings
Paint can be easily removed to give a wooden object or surface a new look. Clean the wood, fill in uneven spots with wood filler and sand the surface. Apply 1 or 2 coats of primer, let the primer dry and then apply 2 or 3 coats of water-based paint. With some preparation and paint, you can completely transform your wooden furniture and other wooden surfaces such as stairs and floors.
To step
Part 1 of 2: Cleaning and sanding the wood
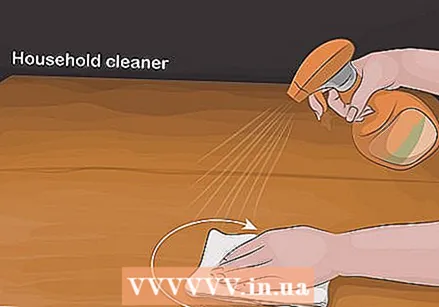 Wipe the surface you want to paint with a household cleaner. Spray a regular household cleaner on the surface and wipe it over the wood using circular motions and a clean cloth. If you see stubborn dirt and residue, spray some cleaner on the area and scrub the dirt off with a scouring pad.
 - Cleaning the surface removes any residue that could prevent the paint from adhering properly.
- Read the directions on the cleaner packaging to make sure it is safe to use on the wood.
 Fill all cracks and uneven spots in the wood with wood filler and a scraper. Wood filler is a creamy paste with which you can easily fill all uneven spots in wooden surfaces. Using a putty knife, grab a coin-sized amount of wood filler and spread the paste into the crack or dent with even pressure. Then use a scraper that is larger than the area in question to spread the wood filler evenly over the surface. Do this for all irregularities that you see in the wood.
 - Flattening the surface with wood filler will allow you to apply the paint evenly and smoothly.
 Wait 30-90 minutes for the wood filler to dry completely. Read the directions on the wood filler packaging to see how long it should dry. You can touch the wood filler itself to see if it is already dry.
 - If you sand the wood surface before the wood filler is completely dry, the surface may not be completely flat.
 Sand the surface thoroughly with fine sandpaper to flatten it. Fine sandpaper has a grain size of 120-220. Use a sander to sand the surface effortlessly, or sand the surface by hand if it has fine details and intricate embellishments. Continue to sand the wood with small circular motions until the surface of the wood is smooth and flat. Sanding etches the surface so that the paint adheres to it more easily.
 - Cover your mouth and nose with a face mask while sanding to avoid inhaling dust and dirt particles.
- To make the wood even smoother, sand the surface with medium grit sandpaper (60-80) after you have finished using the fine sandpaper. This is useful if the wood surface is badly damaged or uneven.
On the question 'If the paint is smooth, do I still need to sand the surface before painting it? "
 Wipe the surface completely to remove all sanding dust. When you have finished sanding the surface, wet a clean cloth under the tap and run it over the surface to wipe away any dust and dirt particles. That way, no particles get under the paint layer. Dust and grain under the paint can make the wood surface look uneven.
Part 2 of 2: Apply primer and paint
 Use a paint roller to paint large, flat surfaces. The easiest way to paint wooden surfaces and objects is to use a small paint roller or a medium-sized paint roller. This works well because you can apply the paint quickly and thoroughly without using too much paint.
 - To use the paint roller, dip the paint roller into the paint and move your hand back and forth to soak the roller with paint.
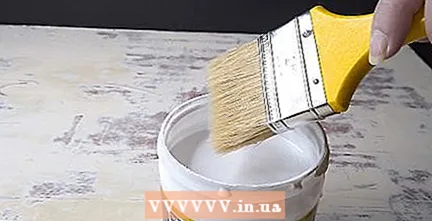 Apply the primer and paint with a medium size brush to small areas with a lot of detail. For example, if you are painting a fine-edged chest of drawers or the edge of a table, it may be easier to apply the paint with a smaller brush. Use a brush 3-5 inches wide instead of or in combination with a paint roller.
  Wait 30-60 minutes for the primer to dry. Before applying more paint to the surface, make sure the primer is completely dry. The drying time depends on the type and brand of primer. Before proceeding, touch the surface of the object with your fingertip to check if it is sticky.
 - When the first coat of primer is dry, apply a second coat of primer if you are covering a very dark stain or lacquer coat.
 Let each coat of paint dry for about 30-60 minutes. On average, it takes about an hour for a coat of water-based paint to dry. It can dry faster, depending on the surface, the method of application and the type of paint.
 - If you don't wait for the paint to dry, the paint can dry unevenly and look weird.
 Apply a coat of water-based lacquer for a glossy, long-lasting finish. This is not mandatory, but by applying a layer of water-based lacquer, the paint layer will remain in good condition and the surface will look nice. Make sure the paint is completely dry, then apply an opaque, even coat with a roller or brush.
 - The lacquer dries in 1-2 hours and you can then use the wooden object or surface.
Necessities
- Household cleaner
- Wooden surface
- Scourer
- Wood filler
- Scraper
- Face mask
- Fine sandpaper
- Sander
- Clean cloth
- Paint roller or paintbrush
- Water-based primer
- Water-based paint
- Stirrer for paint
- Water-based paint (optional)
Tips
- If there is a spot you don't want to paint, cover it with masking tape. Remove the tape when the paint is dry.
- If you're repainting a chest of drawers or dresser, you can remove the iron parts before painting if you want to keep them looking tidy.
Warnings
- Wear a mask if you work in an area that is not well ventilated. Paint and varnish fumes can make you dizzy, nauseous and can give you a headache. It is therefore best to cover your face and nose. If you work in a well-ventilated area like a room with a large casement window, you don't need to wear a face mask.


