Author:
Charles Brown
Date Of Creation:
10 February 2021
Update Date:
28 June 2024

Content
- To step
- Method 1 of 3: Select and prepare a piece of furniture
- Method 2 of 3: Remove old paint and varnish
- Method 3 of 3: Apply stain and lacquer
- Necessities
Refinishing furniture is a great way to give new life to pieces of furniture that would otherwise be too worn or outdated for your decor. You use the same standard finishing process to save a piece of furniture you bought at a flea market or to give a used piece of furniture a completely new look. Read on to find out how.
To step
Method 1 of 3: Select and prepare a piece of furniture
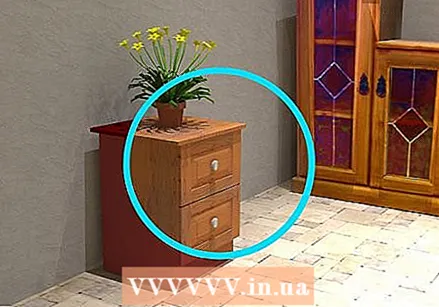
 Choose the right piece of furniture. Not every piece of furniture is suitable for refinishing. Valuable antique pieces should be refinished by a craftsman, for example, because you can reduce the value of the piece if you are not careful when finishing it. To choose a suitable piece of furniture, you should pay attention to the following characteristics:
 - Furniture pieces made of sturdy wood. Furniture pieces made of fine wood that can be easily damaged, chipboard or other woods that are not very sturdy cannot be properly refinished.
- Furniture pieces where not too many layers of paint have been applied. If you have to remove coat after coat, it may not be worth the time it takes.
- Furniture pieces with smooth, even surfaces. If this is your first time refinishing a piece of furniture, don't choose a piece of furniture with intricate carvings or turned legs.
 Make a plan for the job you want to do. Take a look at the piece of furniture you've chosen and create a plan to turn it into the perfect piece for your dining room, kitchen or any other room. Consider the following questions:
 - What do you need to refinish the furniture? If the furniture is painted, you will need a paint remover. If the furniture has an old varnish or lacquer layer, then you need a thinner paint remover.
- What do you want the furniture to look like? Do you want to paint it in a new color or do you want to make the wood and its natural drawing visible? You may not be able to answer this question until you know what the wood looks like under the old paint or varnish.
- Consider going to furniture stores, researching the internet and talking to professionals to get ideas on how to create the look you want.
 Buy your supplies. Now that you have a plan in place, you need the following things to get the job done:
 - Protective clothing and equipment. You need a fan (especially if you work indoors), safety glasses, an apron and safety gloves that are resistant to chemicals. To protect your floor, lawn or patio, you need a tarpaulin that is resistant to chemicals.
- Stripper suitable for paint and / or lacquer. If the furniture is painted, you will need a thick paint stripper to remove it. If the furniture is only lacquered, you only need a thinner paint stripper.
- Brushes to apply the paint remover and scrapers to remove it.
- Sandpaper (grit 100) and / or an electric sander, as well as a sander suitable for a fine finish.
- Wood stain in the color of your choice.
- A protective polyurethane lacquer to cover the stain.
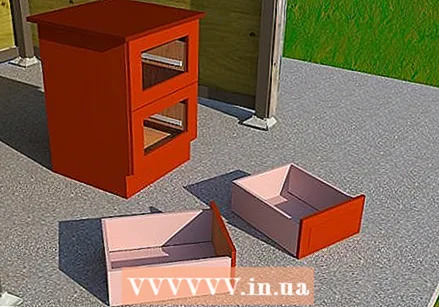
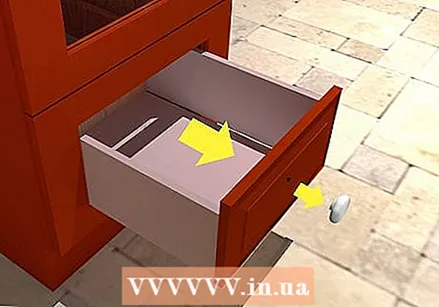 Remove all iron parts from the furniture. Remove knobs, handles, hinges and other ironwork to prepare the furniture for refinishing. These parts can be damaged by the chemicals in the paint stripper you use.
 - Put the iron parts in plastic bags and label them, so that when you put everything back in place, you know where everything belongs.
- Plan to polish the iron parts to match the refinished piece of furniture. You can of course also buy new parts to refurbish the furniture.
Method 2 of 3: Remove old paint and varnish
 Prepare your workplace. The chemicals in paint strippers are very toxic. It is therefore important that your workplace is well ventilated. Choose your garage, a shed or a place outside.
 - Do not work in your living room or in any of the other rooms in your house. Basements are also generally not ventilated well enough to do this job.
- Unfold the sheet, making sure to cover a large area with it. Have the paint stripper ready, along with the brushes to apply the paint stripper and the scrapers to remove it.
- When you are inside, turn on your fan and put on your safety gloves and apron. Also put on your safety glasses.
 Apply the paint remover. Dip your brush in the paint remover and apply it to the furniture. If you're working on a large piece of furniture, remove the paint in sections rather than all at once. The paint stripper will bond directly to the paint after you apply it, loosening the paint from the wood.
  Scratch off the paint. Use the steel wool and other scrapers to scrape away the paint and paint stripper. It should come off in large chunks.
 - Pay equal attention to each part of the furniture. When you remove the paint or varnish with a paint remover, it will affect how the wood will look underneath. So you want to make sure that every part receives the same treatment to avoid irregularities in the wood.
- If the furniture has several layers of paint, you may have to repeat the process several times.
 Remove the old varnish. When you have completely removed the paint, you must also remove the layer of varnish underneath. Use a paintbrush to apply the thinner paint remover. Then sand it down with a clean piece of steel wool. Let the furniture dry completely.
 - Now that the wood is visible, make sure you scratch with the grain rather than against it. That way you don't damage the wood.
- If most of the old varnish appears to have been removed with the paint remover, you still need to rinse the furniture with a detergent to make sure all remnants of the old varnish have been removed. Rinse the furniture with methylated spirits or mineral spirits and then let it dry.
 Sand the furniture. Use a sander or a piece of sandpaper (grit 100) to thoroughly sand the furniture. Make even strokes and spend the same amount of time on each part of the furniture so that the wood looks smooth. For a finer finish, use a sander to rework the wood and make the surface completely smooth. Wipe the furniture with a cloth to remove the sanding dust. The furniture is now ready to be refinished.
Method 3 of 3: Apply stain and lacquer
 Apply stain to the furniture. Use a brush to evenly apply your chosen stain. Do not overlap the strokes. You create a darker shade with each subsequent stroke of stain.
 - You can try the stain on the bottom of the furniture. This way you can practice finding the right brush stroke and applying the right amount of pressure to get the color you want.
- Smooth with the grain so that the stain does not accumulate in the cracks, so that they look darker than the rest of the furniture.
- After allowing the stain to soak into the wood for a period of time, follow the directions for wiping the stain off the wood with a soft cloth. If you let the stain soak in the wood longer, the color will become even darker.
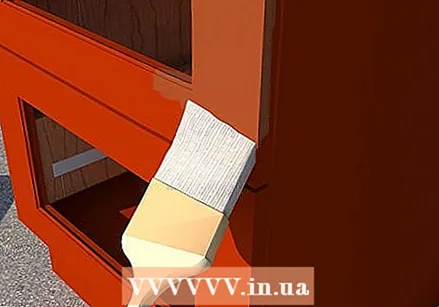
 Apply the polyurethane lacquer. Use a brush to apply the lacquer of your choice to the furniture. Make sure you apply the paint evenly. Let the furniture dry completely when you are done.
 - Use an old, lint-free cloth or T-shirt to spread the varnish further over the surface and rub it evenly into the wood.
- Make sure to apply only a very thin coat of lacquer. A thicker layer of paint can look matte instead of glossy.
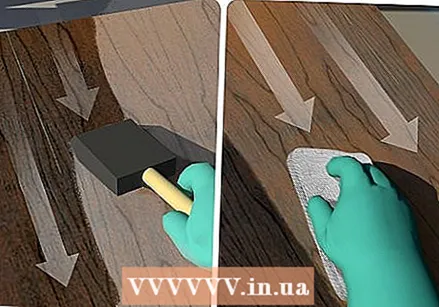
 Sand the furniture. Use a piece of sandpaper with a fine grit to sand the furniture evenly after the lacquer has dried. Pay equal attention to each part of the furniture and sand with the grain. This way all parts of the furniture look evenly. If you want, you can apply another coat of lacquer, let it dry and sand the wood again. Repeat the process until your piece of furniture looks perfectly finished.
  Reattach the iron parts to the furniture. Screw knobs, hinges, handles and other iron parts back onto the completely dried and finished piece of furniture.
Necessities
- Protective fan
- Safety glasses
- Safety gloves that are resistant to chemicals
- Apron
- Tarpaulin
- Paint stripper
- Paint stripper
- Paintbrushes
- Paint scrapers
- Fine steel wool
- Sander
- Sandpaper (100 grit)
- Sander suitable for a fine finish
- Wood stain
- Polyurethane lacquer


