Author:
John Pratt
Date Of Creation:
14 April 2021
Update Date:
1 July 2024

Content
- Ingredients
- To step
- Method 1 of 3: Using the microwave
- Method 2 of 3: Using the stove
- Method 3 of 3: Modeling with cold porcelain
- Tips
- Warnings
- Necessities
This clay for arts and crafts projects is cheap and easy to make, even though it's not actually made from porcelain. When you have made this clay, you can easily model with it. The clay hardens when exposed to the air and you don't need to bake it in the oven.
Ingredients
- 240 milliliters of cornstarch or corn flour
- 240 milliliters of white glue
- 2 tablespoons (30 milliliters) of baby oil or olive oil
- 2 tablespoons (30 milliliters) of lemon juice, lime juice, or vinegar
- Lotion (optional)
To step
Method 1 of 3: Using the microwave
 Mix 240 milliliters of cornstarch with 240 milliliters of white glue. Use a microwave-safe bowl.
  Mix 2 tablespoons (30 milliliters) of baby oil and 2 tablespoons (30 milliliters) of lemon juice into the mixture. Under the heading "Ingredients" you can see which alternatives you can use. Keep mixing until there are no more lumps in the mixture.
 - There is no need to use lemon juice to give the mixture the correct consistency. It is strongly recommended because it prevents the growth of mold.
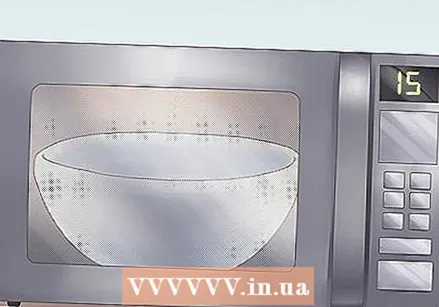 Alternate 15 second periods in the microwave with stirring the mixture. Place the mixture in the microwave for 15 seconds at a time, removing the bowl in between to stir. Depending on the power of your microwave, this should take between three and nine 15 second periods.
 - There will be lumps in the mixture when it gets warm. Try to stir away as many lumps as possible between microwave periods.
- The mixture is ready when it is sticky and forms a lump. You will be able to judge this more easily when you see what your first attempt ultimately looks like.
- It is better to make an amount of clay that has not been in the microwave long enough than clay that has been in it too often. Clay of the first kind is easier to save.
 Spread lotion on your hands and on a clean surface that you will be using for kneading. This way the mixture does not stick. You can choose to prepare the surface on which you will be working when you have the mixture in the microwave.
  Knead the mixture until it cools down. Remove the hot, doughy mixture immediately from the bowl and start kneading.
 - It usually takes 10 to 15 minutes for the mixture to cool to room temperature. Continue to knead the mixture this entire time.
 Pack the mixture tightly and let it rest for 24 hours. Use plastic wrap to seal the cold porcelain mixture airtight. Keep it in a cool, dry place for 24 hours.
 - You can smear the plastic wrap with lotion so that the mixture doesn't stick.
- To easily package the mixture airtight, mold the mixture into a wood block and roll the plastic wrap around it. Twist the ends of the foil around, just like a toffee.
- The refrigerator is a suitable place to store the mixture, but in fact any place without direct sunlight, heat and moisture is fine.
 Check the thickness of the mixture. After the mixture has rested for a day, remove it from the foil and see how it turned out in the end. You should be able to use the cold china now.
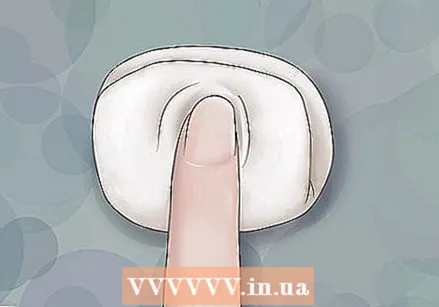
 - Take a piece of cold china and carefully pull it apart. Well-made clay will take the shape of a teardrop when you stretch it and break it into pieces.
- If the inner part of the clay feels sticky, knead in some more cornstarch.
- If the cold china is brittle or dry, it has probably been in the microwave for too long. You can try adding a little extra oil. You can also make an amount of clay that you don't microwave long enough and then knead that clay through the old clay.
Method 2 of 3: Using the stove
 Mix the ingredients in a saucepan. Mix 240 ml cornstarch or corn flour, 240 ml white glue, 2 tablespoons (30 ml) olive oil and 2 tablespoons (30 ml) lemon juice together.
  Heat the mixture over low heat for 10 to 15 minutes and keep stirring. Remove the pan from the stove when the mixture pulls away from the edge of the pan. The mixture should resemble ricotta cheese when ready.
  Knead the mixture until it cools. Wait for the mixture to cool enough for you to work with it. Then start kneading and continue until it has cooled to room temperature.
  Store the clay in an airtight box or bag. Use a resealable plastic bag or plastic wrap and store the mixture in a cool, dry place away from direct sunlight.
  Use the clay. The clay is ready for use after 24 hours. You can then adjust the thickness of the clay by kneading extra oil or cornstarch to make the clay less brittle or sticky, respectively.
Method 3 of 3: Modeling with cold porcelain
 Knead acrylic or oil paint through the clay. If you want to make colored cold porcelain, knead the paint color of your choice thoroughly into the mixture before you start sculpting.
 - You can also add the paint when you knead the mixture while making the clay, but this way you won't be able to keep the clay as long.
 Knead each piece of clay before modeling with it. Every time you take a new piece of clay, you have to knead it first to make it more elastic.
  Model the clay in the desired shape. With well-made and kneaded cold porcelain you should be able to sculpt easily and you should be able to create delicate designs with it.
  Stick pieces of clay together using water. To join two wet pieces of cold china, press them together and smooth the seam with a wet finger.
 - Dry pieces of clay can be glued together with normal white glue.
 Use a basic shape for larger workpieces. Cold china shrinks significantly when it dries. A large workpiece may not dry completely and not enough. Instead, cover a base mold made of a different material with a layer of clay.
  Let your piece dry. You don't have to bake cold porcelain in the oven and will simply harden when exposed to the air.
 - How long it takes to dry depends very much on the size of your workpiece, as well as the temperature and humidity. Keep checking your workpiece until it is hard.
 Paint your workpiece. Without a coat of lacquer, a cold porcelain workpiece may "melt" due to heat or water, although you should still store a lacquered workpiece in a cool, dry place whenever possible.
 - There are many different types of lacquer and varnish intended for clay, with either gloss or matte finishes. You can use clear acrylic lacquer for a simple, transparent finish.
Tips
- To mend a crack in an old cold porcelain workpiece, mix equal parts white glue and water and spread this paste over the crack with your fingers.
- Keep any clay you are not using in a cool, dry place until you want to use it for a new piece of work. Make sure you pack the clay airtight.
- Cold china is safe for children to work with as long as you use non-toxic paint for painting.
Warnings
- Making cold china leaves a lot of mess in the bowl, pan, and utensils you use. Clean them before the mixture dries and don't use your finest cooking utensils.
- The clay will be very hot when you are done heating it.
- You must use cornstarch or corn flour. Any other kind of flour or starch will not work.
Necessities
- Bowl that is suitable for the microwave
- Whisk or other utensils for stirring
- Plastic foil
- Microwave or saucepan


