Author:
Christy White
Date Of Creation:
7 May 2021
Update Date:
1 July 2024

Content
- Ingredients
- To step
- Part 1 of 3: Making the tea
- Part 2 of 3: Adding the culture
- Part 3 of 3: Finishing the kombucha
- Necessities
- Tips
- Warnings
Kombucha tea is a fermented sweet nutritious decoction. In addition to a sweet tea taste, Kombucha has a sour, vinegar-like taste. The strength of the tea flavor can be adjusted by the number of tea bags you add to the boiled water. Kombucha is available at most health food stores and on the organic shelves of some grocery stores. Below you can read how you can make it yourself at home.
Ingredients
- A kombucha mother mushroom. This is also called a scoby (Symbiotic Culture of Bacteria and Yeast) or kombucha culture. In this article the term culture is used. You can easily order the mother fungus via the internet. Or, if you're lucky, you can get one from a friend who has one left! In principle, once you have the mother fungus, you will never have to buy a new one again. In that case, follow the steps necessary to preserve the old mother fungi.
- A little kombucha tea that has already been made or some natural vinegar.
- Tea. Both tea bags and loose tea are suitable. Sometimes low quality regular tea tastes even better than the expensive teas. Tea with oil such as bergamot oil in earl gray can damage the fungus, which takes longer to achieve good results. Many teas are suitable:
- Green tea
- Black tea
- Echinacea tea
- Lemon balm
- Sugar. Both regular refined white sugar and organic cane sugar work fine. You can also experiment with other nutrients that can be fermented, such as concentrated fruit juice diluted with tea. Most people choose organic ingredients. Drinks with artificial additives, for example, can discolor the fungus and tea.
To step
Part 1 of 3: Making the tea
 Wash your hands thoroughly with warm water and do not use antibacterial soap as this can contaminate the kombucha and destroy the culture's good bacteria. Instead of antibacterial soap, you can also use apple or natural vinegar to wash your hands and the materials you use. The use of latex, rubber or PVC gloves is also recommended, especially if you are going to touch the culture directly.
  Fill a large pan or kettle with 3 liters of water and set the stove to a high setting.
 Boil the water for at least 5 minutes so that it is purified.
 Add about 5 tea bags to the hot water. You can take the tea bags out after brewing or leave them in while following the next two steps.
  Turn off the heat and add a cup of sugar. The culture is fed by the sugar. This step is therefore an important step in the fermentation process. Sugar makes the water viscous when the water boils; so turn off the heat before adding the sugar.
  Cover the pan and let the tea cool to room temperature (around 24 ºC). That takes a while, but adding the culture while the water is still hot is not possible because it will be damaged too much.
Part 2 of 3: Adding the culture
 Wash a glass jar (a bowl or bottle with a wide mouth is also possible) thoroughly in the sink with hot water. If you don't have a lot of extra water left to properly clean the jar, you can put two drops of iodine in the jar, add some water and shake well to disinfect it. Rinse the jar and wait a while. You can also put the pot in the oven at 140 ° C for 10 minutes. However, only do this if the pot is made of stoneware or porcelain.
  When the tea has cooled, pour it into the glass jar and add the kombucha tea that has already been made. This makes up about 10% of the total amount of moisture. You can also use a quarter cup of natural vinegar per 3.5 liters. This keeps the pH level low so that unwanted fungi or yeast cannot form while the tea is fermenting.
 - To make sure that the kombucha is acidic enough, you can measure the pH value (optional), it should be less than 4.6 ph. If not, add more of the kombucha tea that has already been made, vinegar or citric acid (no vitamin C, which is too weak) until the correct pH level is reached.
 Gently add the mother mushroom or scoby to the tea, cover the pot with a cloth and wrap it with an elastic band to secure the cloth.
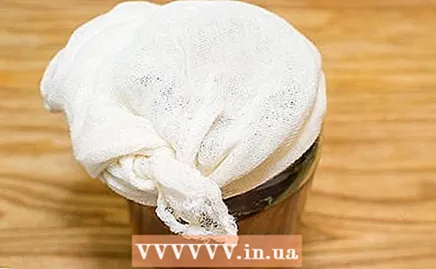 Place the pot somewhere dark and warm and where the kombucha can stand undisturbed. A constant temperature is important, at least 21 ºC. About 30 ºC is best if you can get that done. At lower temperatures, the kombucha grows more slowly, but at a temperature lower than 21 ºC you run the risk of unwanted organisms growing.
  Wait about a week. If the tea smells like vinegar you can taste and measure the pH value.
 - The culture will settle, float or something in between. It is better that the fungus floats on top of the moisture so that no aspergillus contamination can take place.
- The best way to sample is with a straw. Do not drink directly from the straw as any bacteria from your mouth can contaminate the tea this way. It is also better not to dip the test strip in the jar. Instead, lower the straw to about half way through the tea, close the opening at the top of the straw with your finger, and take the straw out. Then drink the moisture from the straw or put the moisture on the test strip.
- If the kombucha tastes very sweet, the culture will probably need more time to absorb the sugar.
- A pH value of 3 means that the fermentation process is complete and the tea is ready to be drunk. Of course this can vary a bit depending on your needs and taste. If the final pH value is too high, the tea needs a few more days or must be discarded.
Part 3 of 3: Finishing the kombucha
 Carefully remove the mother and baby culture with clean hands (and rubber gloves if you have one) and place in a clean bowl. Sometimes they stick together. Pour a little kombucha over it and cover the bowl with a cloth so that they are shielded.
  With a funnel you pour most of the tea into one or more empty bottles. It is best to fill the bottles to the brim. If you don't, it will take forever for the tea to get prickly. If you don't have enough kombucha to fill a bottle completely, you can use smaller bottles. Or, when the bottle is almost full, you can fill the bottle with a little fruit juice or tea. Only use a little, otherwise the kombucha tea may become too watery. Leave about 10% kombucha in the glass jar: you use it for the new jar of kombucha that you are going to make. Now start the cycle again: put in the fresh tea, add the culture again, cover it, etc.
 - You can use any layer of kombucha culture for a new amount of kombucha tea; some people recommend using the new layer of culture and discarding the old one. You don't have to put both layers of the culture back into the new pot where you will be making the kombucha; one is enough.
- Each fermentation cycle creates a new baby from the mother fungus. So once you ferment the first mother mushroom, you will have two mothers after that, one from the original mother and one from the new baby. This multiplication occurs with each subsequent fermentation process.
 Put a lid on the bottles of kombucha that are ready. Tighten the caps on the bottles so that there is a sting in the drink and let them sit at room temperature for 2-5 days.
  Put the kombucha in the fridge. Kombucha tastes best when it is cold.
Necessities
- A pot in which you ferment the kombucha. A preserving jar or something similar is the most common. Chemicals (lead if ceramics are concerned) can leak into the fermented kombucha via pottery, metal and / or plastic. This is due to the natural acid production from the fermentation process. While some people have had success with stainless steel and plastic drums, most people choose glass anyway. A pot that can hold 1-4 liters is a good start. Most people drink 30 ml in the beginning. Kombucha per day because the digestive tract takes time to get used to it. Make sure to adjust the size of the jar to the amount of kombucha you will be drinking over time. You also need a larger place where you put the larger pot away. Large bottles that are also used in the brewing of beer and wine such as a carboy or other large beer or wine bottle are very handy.
- A lint-free, tightly woven cloth (such as a clean T-shirt). This is used to keep the fermentation pot covered to keep insects, especially fruit flies, dust and other foreign particles at bay. The culture is then not contaminated and the microorganisms are given air in the meantime. Make sure that the cloth is larger than the opening of the pot.
- A rubber band or string. This is used to secure the cloth to the pot.
- Apple cider vinegar to clean the supplies.
- A large pan or kettle in which the water is heated and where the tea and sugar are added. Stainless steel is very suitable for this. The pan must be large enough to contain the moisture that will enter the fermentation pot.
- Glass bottles with caps to put in the finished kombucha. You need enough glass bottles to hold all of the fermented tea. The size of the bottles must be adjusted to the amount of kombucha you are going to drink.
- A funnel with which you pour the fermented kombucha into the bottles.
- Test strips with which you measure the pH value.
- Straw or pipette (this way you can measure the pH value easily and hygienically)
Tips
- Some prefer the continuous method where you brew kombucha continuously: you pour the amount you want to drink into a cup and immediately replace this amount with the same amount of sweet tea that has been brought to room temperature. The advantage of this method is that it takes less effort (especially if you put the tea in a bottle that has a tap at the bottom) but the disadvantage is that the fermentation is not so complete or refined so that the kombucha always contains sugar that does not fermented in combination with tea that is actually highly fermented. When using this method, you should empty and clean the bottle regularly to avoid contamination.
- Be aware that while some natural products that contain antibacterial properties (such as honey) do not kill the scoby, they will significantly increase the brewing time.
- Also be aware that kombucha fungi can look very different.
- If you want to speed up the process, here's the fast cooling method: make the sweet tea with only 1 or 2 liters of water, but with the same amount of sugar and tea. Dilute it in the bottle with purified or filtered water (not tap water) so that it cools quickly and still has the correct consistency. Then add the scoby, cover the jar and put it away as usual.
Warnings
- Before you start with the kombucha, make sure that you wash your hands thoroughly, clean your work surface very well and keep everything sterile and clean, even while you are at it. Because if the kombucha becomes infected while it is still young, something may grow that is not intended. Usually this means it will only ruin your drink, but sometimes it is also dangerous.
- Be warned if you use plastic, metal, pottery, or glass bottles not intended for the kitchen to make the kombucha - toxins such as lead can (and probably will) leak out. A preserving jar is the safest.
- Do not close the jars or bottles, even slightly, during fermentation, even after the fermentation process appears to be complete. Because without oxygen, anaerobic bacteria, which can make you sick, can settle in the kombucha because the oxygen is then replaced by carbon dioxide.


