
Content
- To step
- Part 1 of 4: Look for visible mold
- Part 2 of 4: Check for hidden mold spots and mold in the air
- Part 3 of 4: Treating the fungal patches
- Part 4 of 4: Preventing new mold growth
- Tips
- Necessities
Mold is a type of fungus that grows in moist environments and propagates through microscopic seeds called spores. Even if you are healthy, you can experience respiratory problems, skin irritation and headaches when exposed to dangerous fungi. If you live in the house with children, the elderly or people with respiratory problems, know that they are at an even greater risk. That's why it's very important to learn how to find mold, examine your home for it, and treat it. This knowledge can improve your health and even save your life.
To step
Part 1 of 4: Look for visible mold
 Note the characteristic features. Mold often looks soft and fluffy, but can also look like a stain when mold grows on a wall or a piece of furniture. It is often green-black, brown or white in color. Mold can feel like cotton, leather, silk, or sandpaper. It often smells musty or earthy.
  Check the basement if you have one. This should be the first place you check. Because a cellar is underground, it gets moist very quickly. After every heavy rain shower, check for water leaks and treat the affected areas immediately. Check the following places:
 - Skirting boards
- Walls, especially where they merge into the ceiling
- Behind and under household appliances, especially the washer and dryer
 Check the laundry room. Look in and around the tumble dryer air exhaust duct to see if mold is growing. If the air from the dryer is not properly vented, the room can become damp. Make sure the air exhaust line is to the outside of the house.
 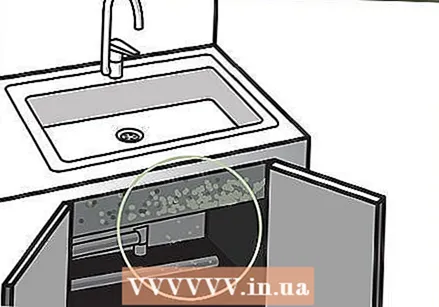 Check small, enclosed areas. Darkness and moisture provide the ideal conditions for mold growth. Check the following places:
 - Under sinks, especially if there are cupboards under the main stone.
- Closets, especially if not properly ventilated.
 Check your windows. If your house is not well insulated, condensation can form on the windows all year round. Watch for mold growth around your windows and along the frames.
  Check areas recently damaged by water. Check the baseboards and floor in the basement and on the ground floor if your house has recently been flooded. Remove all carpeting in these areas. If there have been heavy rains recently, check the attic and upper floors for damp spots.
 - If a drain or water pipe is broken, treat any areas with water damage as if they were submerged.
 Check your shower curtain. Dirt and grease that washes off your body often mixes with shampoo and shower gel residue. This mixture will eventually build up on your shower curtain. Make sure the bathroom is well lit. Spread the shower curtain to check the entire surface. Use a magnifying glass to look for tiny spots of mold that you might otherwise miss.
  Check the corners of the ceiling. Mold often grows in the corners where the walls merge into the ceiling because water from a leaking roof gets there. Check all four corners of each room for mold. If the wallpaper is loose where the wall meets the ceiling, check behind it to see if mold is growing.
  Check ventilation ducts and grilles. If you have hot air heating and air conditioning, fluctuations in temperature can cause moisture to accumulate on the cooling coils and drip trays. Remove the grille in front of the ventilation duct and check it carefully. Turn on the lights or use a strong LED flashlight to easily spot mold spots. Check all parts of the channel you can see.
Part 2 of 4: Check for hidden mold spots and mold in the air
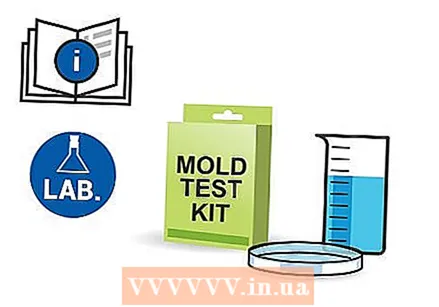 Use a test kit for indoor mold testing. Such a set contains tools and instructions for testing. Follow the instructions provided with the set. Send the samples to a laboratory near you.
 - If you see mold during a visual examination, it is not necessary to use a test set.
- Such a set can be difficult to use and the result can be unreliable. Only use a test set as a last resort if you have no other options.
 Use a boroscope. A boroscope can be useful for examining the spaces between walls. Drill a small hole in a wall that has recently been affected by water or moisture. Slowly insert the fiber optic cable into the hole. Check the monitor for mold. Work slowly as you continue to insert the end into the hole.
 - The boroscope monitor distorts the color and size of the mold spots. If you find discolored spots on the inside of the wall, contact a professional for a second examination.
- You can also use a boroscope to examine ventilation channels, but there are drawbacks. With the device you can only look into a ventilation duct up to a certain point. If you see an angle of 90 degrees in the channel, you will not be able to see around the corner.
 Hire a specialist company to inspect your home for mold. Such a company has tools and equipment that cannot be obtained by private individuals to detect fungi. Request quotes from a variety of companies to ensure you get the best price. Read reviews and complaints from previous customers on the internet. Also make sure that the company you engage has the necessary certificates and quality marks.
Part 3 of 4: Treating the fungal patches
 Protect yourself. Cover your mouth and nose with an FFP2 breathing mask to avoid inhaling spores. Wear rubber or latex gloves that reach up to your elbows to protect your hands from mold and cleaning products. Put on safety glasses to protect your eyes from the fungal spores in the air.
  Clean hard surfaces. Mix equal parts water and bleach or a cleaner. Dip a scrub brush into the mixture and remove the mold. Completely dry the area when you are done. EXPERT TIP
  Repair all leaks. If you encountered leaking drains and water during your investigation, resolve those problems immediately. Call a plumber to fix leaky or sweaty plumbing. Fill all spaces between plumbing pipes and walls with Icynene sealant or insulating foam.
  Close small openings. Use caulk to seal gaps around windows and doors, as well as around key areas where the walls merge into the floor and ceiling. Apply sealant or draft barriers around the windows, especially between the frames and the window. Dry the area completely.
 - Do not sealant or paint surfaces until mold has been completely removed.
- Call in a company if you do not have enough knowledge and skills to carry out these repairs yourself.
 Have your ventilation ducts cleaned. Call a company unless you know how to get mold out of ventilation ducts.This is especially important if you see mold growth in multiple rooms or if the mold problem keeps coming back despite doing your best to address it. Search the internet for businesses near you or ask friends and family if they know a business.
  Remove materials that absorb moisture. If you see mold on your carpet, ceiling tiles and other porous surfaces, remove and dispose of the material. Due to the mold, they cannot be recycled. Ask your municipality how best to dispose of moldy materials.
  Get help. If you see mold growing on books, heirlooms, or items of sentimental value, enlist the help of a professional. Ask a librarian or curator at a museum if they know a trusted expert. You can also search the internet for experts who repair and preserve rare objects. Make sure to ask for references.
Part 4 of 4: Preventing new mold growth
 Lower the humidity. Keep the humidity in your home between 30 and 50 percent. Open the windows on days with dry weather. As a result, fresh air can flow in and mold will grow less quickly. Place a dehumidifier in the areas that become humid most quickly when the weather is humid and humid.
  Remove carpeting from the basement and bathroom. These spots quickly become damp. Moisture can remain under the carpet even if the room is not flooded and no water leaks in. If you don't have carpeting in the basement and bathroom, leave the floor bare. Use loose, washable mats to avoid slipping.
  Install a submersible pump. This is a good investment if water regularly enters your home. Water that leaks into the basement ends up in a container and is pumped out. Contact a professional to install a pump unless you have the knowledge and skills to install a submersible pump yourself. Choose a submersible pump with the following characteristics:
 - Cast iron housing
- Alarm that turns on when the water level becomes too high
- Mechanical switch
- Can be completely submerged under water
- Opening without grid
- A paddle wheel that can withstand objects with a diameter of 1 centimeter
 Turn on your ventilation. Switch on the extractor hood above the cooker during cooking to collect the water vapor. When showering, use the ventilation in the bathroom to reduce condensation from steam. To be on the safe side, turn on the ventilation when taking a cold shower. Let the ventilation in each room do its work until all the steam has disappeared.
  Use dehumidifiers. Put them in the basement and in cupboards. Clean the dehumidifiers regularly. Follow the directions on the package carefully for best results.
  After showering, wipe the shower curtain dry. Use a clean dry towel or squeegee to wipe any water droplets from the shower curtain. Make sure the shower curtain is completely dry. Do this after the last shower of the day to prevent moisture build-up.
  Make sure that no puddles of water remain. Puddles of water can accumulate around the foundation of your home, allowing moisture to enter. Make sure the soil runs down around the foundation and away from the foundation. Extend your downspouts so that the rainwater ends up at least five feet away from the house.
  Use the correct insulation material. Spray Icynene insulating foam on the ceiling of your attic. The foam forms a waterproof layer when it has dried. Do not use glass wool and hard foam. These materials can peel off from the surface underneath, allowing moisture to leak in. Cellulose flakes that you apply wet can also quickly become moldy.
  Check your home regularly. Check all (possible) problem spots for new mold growth. After heavy rains, look at all sealed spots and cracks that previously leaked. Otherwise, check your home thoroughly every six months.
Tips
- If you have a mold area that is larger than 3 square meters, have the mold removed by a company that specializes in it.
- Remove any mold you can find in your home. It is not necessary to determine which fungal species is involved for each location.
Necessities
- LED flashlight
- Boroscope (optional)
- Mold test kit (optional)
- Bleach or soap
- Bucket
- Scrub brush
- Latex or rubber gloves
- Dehumidifier
- Sprayed insulation foam from Icynene


