Author:
Judy Howell
Date Of Creation:
5 July 2021
Update Date:
1 July 2024

Content
- To step
- Method 1 of 3: Taking screenshots on Windows computers
- Method 2 of 3: Mac OS X
- Method 3 of 3: Other ways to take screenshots
- Tips
- Warnings
- Necessities
In all kinds of situations it can be useful to take a screenshot of your computer screen. Moreover, this is easier than you might think! In this article, you will learn how to take a screenshot on both Windows and Mac computers, as well as your phone. All you have to do is learn a few simple tricks.
To step
Method 1 of 3: Taking screenshots on Windows computers
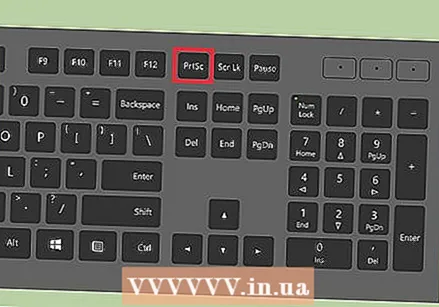 Use the "Prt Sc" key. This abbreviation stands for "Print Screen" and can save you a lot of time. When you press the key, a screenshot of your screen will be copied to your clipboard.
 - The key is usually located at the top right of your keyboard, above the "Backspace" key.
- Press "Prt Sc" to take a picture of your current screen.
- If you press the "Alt" key while taking a screenshot, only a screenshot of your current screen will be copied to the clipboard. For example, if your internet browser is open, only this screen will be saved. If you only want to save the data of the opened screen, it is best to press Alt & Prt Sc at the same time.
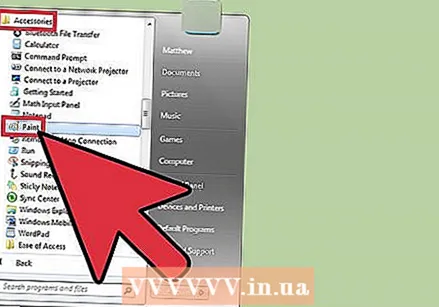 Open Microsoft Paint. This free program is available on any Windows computer and is very useful for saving and editing your screenshot.
 - You can find Paint through your Start menu. Simply go to "All Programs" → "Accessories" → "Paint".
- You can also use other programs into which you can paste images, such as Photoshop, Microsoft Word or Indesign. However, Paint is the easiest program to save your screenshot quickly.
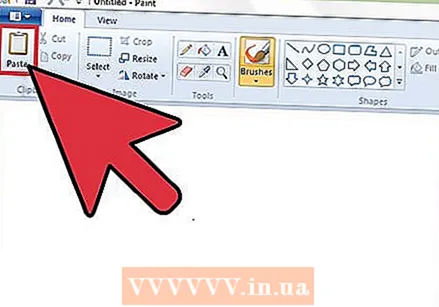 Click on "Paste" to view your screenshot. You will find the paste button at the top left of the screen after opening Paint. You can also press Ctrl + V to paste the screenshot into Paint.
  Save your screenshot. You can now save your screenshot in Paint. To do this, click the small floppy disk button at the top left of the screen or press Ctrl + S. You can now give the file a name and select the quality of the image.
  You can also use the snipping tool on Windows Vista, 7 or 8. In recent years, Microsoft has provided all new Windows systems with a special program to easily take screenshots. To use it, you can search for "snipping tool" from the Start menu. Open the program and take a screenshot as follows:
 - Click on "New"
- Select the part of the screen that you want to take a photo of.
- Click on "Save Snip" (square button with a floppy disk on it).
Method 2 of 3: Mac OS X
 Press Command ("Apple"), Shift and 3 at the same time. A screenshot of your screen will now be saved to your desktop. The file is automatically named "Screenshot" with the date and time after it.
  To take a screenshot of part of the screen, you can press Command ("Apple") and 4. Your cursor will now change into a small cross with which you can select the part of the screen that you want to save. After making the selection, the image is automatically saved to your desktop.
  Open the image to edit it. Double-click the file on your desktop to open the image. You can now edit, resize or rename the screenshot with a program of your choice.
 - If you click on the file name, you can also rename the file on your desktop.
Method 3 of 3: Other ways to take screenshots
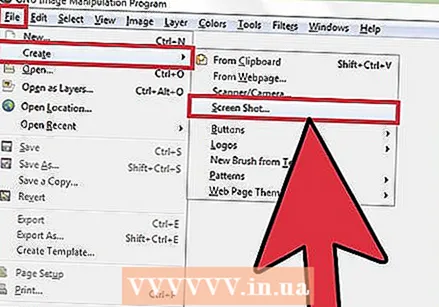 Use GIMP to take a screenshot. GIMP is a free open-source photo editing program and has a handy screenshot feature. GIMP allows you to take a screenshot in two ways.
 - Click on "File," → "Create" → "Screenshot".
- Press Shift and F12 at the same time.
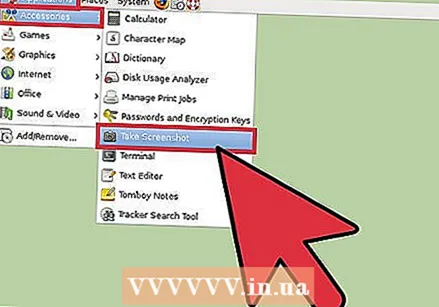 Take a screenshot on a Linux computer with GNOME. While the "Prt Sc" method often works fine on Linux, there are several other ways you can take a screenshot:
 - Click on "Applications"
- Click on "Accessories" and then on "Take screenshot."
- You can now choose from various options, for example to select a part of the screen or to delay taking the screenshot.
 Take a screenshot with your iPhone by pressing the home button and the side button at the same time. After a short flash, your screenshot will be automatically saved to your photo album.
  Take a screenshot with your Android device by pressing the power button and volume button at the same time. Most Android phones also allow you to take a screenshot by pressing the power button.
 - This method works on all Android phones running Android 4.0 or above.
- If you have an older Android phone, there are various apps in the Google Play Store that you can download to take screenshots. Simply search for "Screenshot" to view these apps.
Tips
- Try taking screenshots a few times so that you know how it works. This way you can act quickly in the future when you want to save information or other data quickly.
- The image saved when taking a screenshot is the size of the screen. If you need a smaller file, you will have to resize the image after taking the screenshot.
Warnings
- Reducing a screenshot can cause an image to look distorted. Therefore, when resizing the file, be careful and do not make the image too small.
Necessities
- Computer


