Author:
Eugene Taylor
Date Of Creation:
11 August 2021
Update Date:
1 July 2024
Content
- To step
- Method 1 of 4: Format on an Android
- Method 2 of 4: Format on a Windows Phone
- Method 3 of 4: Format in Windows
- Method 4 of 4: Format in OS X
- Tips
- Warnings
A micro SD card is a small memory card and is often used for extra storage in devices such as cameras, GPS devices and mobile phones. In most cases, you can format a micro SD card using the functions on your device. However, you can also format a micro SD card on your Windows or Mac computer.
To step
Method 1 of 4: Format on an Android
 Tap "Settings" on the home screen of your Android device. The "Settings" app can be found somewhere on the home screen. Scroll through the pages until you find it.
 - The "Settings" app may look slightly different depending on your version of Android, but on most phones this will be a gear icon.
 Tap the option "Storage" or "SD & Phone Storage". Each version of Android can have a different name for this group. Look for the option with the word "Storage" or "Storage" in it.
 - You can recognize the correct option by the icon of the SD card.
 Select the option "Erase SD card" or "Format SD card". In this screen you will see information about the space on your SD card, as well as the free space, and an option to unmount and format the SD card.
 - If the option to format the SD card is greyed out, you must first unmount the SD card. In this case, tap "Unmount SD card".
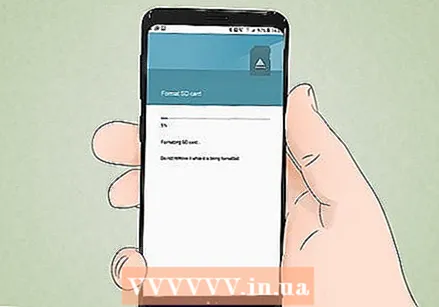 When you see the notification on your Android, tap the option to confirm that you want to delete the contents of the SD card. Your Android device will start formatting your micro SD card and delete all contents.
 - You will likely see multiple notifications asking if you are sure you want to format the SD card. This will delete all content on the card.
- Follow the onscreen instructions to erase and format your SD card.
- Your card will be formatted to the FAT32 file system. All content will be erased and then you will have a new, empty card for your Android.
- Note: If you are using Android 6.0 Marshmallow, you have the option to treat your SD card as internal storage or portable storage. If you choose to use it as portable storage, your SD card will be treated like any other removable storage, allowing you to remove it and transfer files to your computer or other device. If you indicate that it should be internal memory, the card will be formatted and you can no longer read it with your computer. Your SD card will be classified as the central storage of your system.
Method 2 of 4: Format on a Windows Phone
 Find the "Settings" app. This tutorial is for Windows Phone 8 or later, HTC One M8, Nokia Lumia 635, Nokia Lumia 830, and Microsoft Lumia 735.
 - You can find the "Settings" app from the tiles on your home screen, or from the app list.
- Depending on your phone and the firmware you are using, you may find the "Smart store" app in the list of apps.
 Scroll down to the "Storage on phone" option and tap it. When you are at the "Settings" screen, scroll down to the "Storage on Phone" option between "Battery Saver" and "Backup".
 - The "Storage on phone" option should indicate how much free space you have left on your phone and on your SD card.
- If you clicked "Store smart", you will see an option for "SD card".
 Tap the "Format SD card" option. When you are on the "Storage on phone" page, you will see a diagram showing the amount of memory used by all storage groups. Tap "SD card".
 - Formatting your SD card will erase all contents from the memory card. Make sure you have saved your data elsewhere.
 Tap the "Format SD card" option. Once you click the "SD card" option, you will see a window with two options, one for removing the card and one for formatting it. Choose the option to format.
 - If you tapped "Format SD card", a warning will appear that formatting your SD will erase all data and files on the card, and you will be asked if you want to proceed. Tap "Yes" to start formatting.
- After completing this procedure, your phone will recognize the card and ask you if you want to configure the card. Follow the prompts.
Method 3 of 4: Format in Windows
 Insert your micro SD card into a micro SD card adapter or reader that is compatible with your micro SD card. For example, for a SanDisk micro SD card you will need a micro SD card adapter supplied with it. The adapter looks like a regular SD card with a port at the bottom where you insert the micro SD card.
 - Note that most 32 GB or less Micro SD cards are formatted as FAT32. Cards over 64 GB are formatted according to the exFAT file system. If you format an SD for your Android or Nintendo DS or 3DS, you must format it as FAT32. with Android, as many apps or custom fixes will not read exFAT (without root).
- It is usually best to format to FAT32, although this file format makes it impossible to move or save files larger than 4 GB.
- You can also buy a separate micro SD card adapter, if you don't already have one. However, make sure it is compatible with your micro SD card. Some individual adapters also use a USB component on one end and act like a flash drive.
 Place the card reader or adapter in a USB port or SD card slot on your Windows computer. Depending on your computer and type of adapter, you will need to use the SD card slot or a USB port.
 - If you are using a micro SD card adapter, make sure the lock is open. If the lock is closed, your computer may not be able to read the card, or it may not be possible to make changes. You may get the message "Read only" or "Read only".
- Back up the files on the card by copying them to your computer. This way you will not lose any data and you can restore the files after formatting.
 Click the Start menu and select "Computer" or "My Computer". This method works under Windows 7 and higher.
 - When the "Computer" window is open, you will see a list of all drives on your computer.
- Find your micro SD card. You can distinguish this by the brand name of your SD card, unless you have changed the name of your card. If you have changed the name, find the card under that name.
 Right-click on your card reader in the list of drives and select "Format". A window with formatting options will be displayed on the screen.
 - If you don't see a "Format" option, you may need to download and install the fat32format utility for the GUI version.
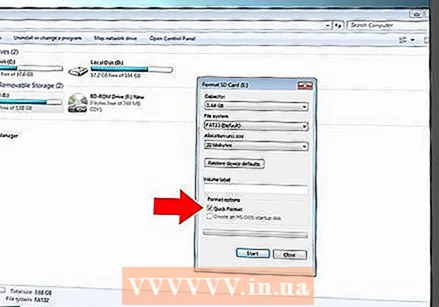 Place a check next to "Quick Format". If you were successful in clicking the "Format" option, a box will appear with several options, including "Quick Format". Check the box for best results.
 - If you had to install fat32utility, the same window will appear after starting the guiformat.exe file.
- Before clicking "Start", make sure the other tabs and options are correct. Check for "Capacity" indicating the correct amount of storage space. Make sure to check the correct format, usually FAT32.
 Click on the "Start" button. Windows will start formatting your micro SD card and deleting all files.
 - When formatting is complete, you will have an empty, formatted micro SD card.
Method 4 of 4: Format in OS X
 Insert your micro SD card into a micro SD card adapter or reader that is compatible with your micro SD card. For example, for a SanDisk micro SD card you will need a micro SD card adapter supplied with it. The adapter looks like a regular SD card with a port at the bottom where you insert the micro SD card.
 - Note that most 32 GB or less Micro SD cards are formatted as FAT32. Cards over 64 GB are formatted according to the exFAT file system. If you format an SD for your Android or Nintendo DS or 3DS, you must format it as FAT32. with Android, as many apps or custom fixes will not be able to read exFAT (without root).
- Also note that if you are using Mac OS 10.6.5 (Snow Leopard) or earlier, you will not be able to use or format an exFAT card as these older versions of Mac OS do not support this file system. You will have to upgrade your OS.
- It is usually best to format to FAT32, although this file format makes it impossible to move or save files larger than 4 GB.
- You can also buy a separate micro SD card adapter, if you don't already have one. However, make sure it is compatible with your micro SD card. Some individual adapters also use a USB component on one end and act like a flash drive.
 Insert the card reader or adapter into a USB port or SD card slot on your Mac computer. Depending on your computer and type of adapter, you will need to use the SD card slot or a USB port.
 - If you are using a micro SD card adapter, make sure the lock is open. If the lock is closed, your computer may not be able to read the card, or it may not be possible to make changes. You may get the message "Read only" or "Read only".
- Back up the files on the card by copying them to your computer. This way you will not lose any data and you can restore the files after formatting.
 Click the search icon at the top right of the main menu. Search for "Disk Utility" and click on it.
 - The Disk Utility opens. All available drives and storage media are displayed.
- You can also access "Disk Utility" from "Applications"> "Utilities"> "Disk Utility".
 Click on the name of your micro SD card as it appears in the left pane of Disk Utility. You will see a panel on the left with your computer hard drive and any partitions and external drives below.
 - Your SD card will appear as a removable disk with information about the amount of storage space.
- Click on your SD card for a list of options.
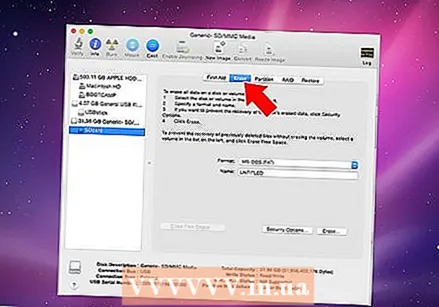 Select the "Delete" radio button. This will bring up a window that allows you to erase and format the card.
 - You will see three or four radio buttons at the top: "First Aid", "Delete", "Partition", "RAID" and "Restore". You may also see "Unmount" or "Unmount" when running El Capitan. Now click on "Delete".
 Select your desired layout. You will be presented with a drop-down menu with the option to format.
 - You also have options for Mac OS Extended (Journaled), Mac OS Extended (Case-Sensitive, Journaled) MS-DOS (FAT) and exFAT. MS-DOS (FAT) is the option to format your micro SD to FAT32. The exFAT option will format your memory card to the exFAT file system that allows you to store and move files larger than 4 GB.
- After selecting the format you want, enter a name for your card.
 Click "Erase" to restore and format your card. Once you clicked Delete, you will see a pop-up window asking if you are sure you want to delete and format the card. You will see a warning that this will delete all data from the card. Click "Delete" in the pop-up menu.
 - Once you clicked "Erase", the system will start erasing and formatting your SD card. Once completed, the map will be displayed with the new name. Your micro SD card is now formatted.
Tips
- Format your micro SD card if the card no longer works properly, or if you can no longer open certain files on your SD card. Formatting a micro SD card will, in many cases, resolve any technical issues you may have experienced with the card.
- Always keep your files in a safe place before formatting the card. Formatting will delete all data from the memory card.
- For best results and to reduce the risk of technical issues in the future, it is best to format the micro SD card in your device, rather than a card reader.
Warnings
- Keep in mind that formatting a micro SD card will erase and delete all content on that card. Before formatting a micro SD card, back up any data you want to keep, such as photos, music and other data.


