Author:
John Pratt
Date Of Creation:
12 April 2021
Update Date:
1 July 2024

Content
Scratching is an innate and necessary part of being a cat. Scratching cleans and tightens claws and is something a cat will always do, regardless of the inviolability of the surfaces in your home. If you want to lure your cat away from the furniture, a scratching post is necessary. You can make one with particle board, a square post, and carpet or rope.
To step
Part 1 of 2: Making the base
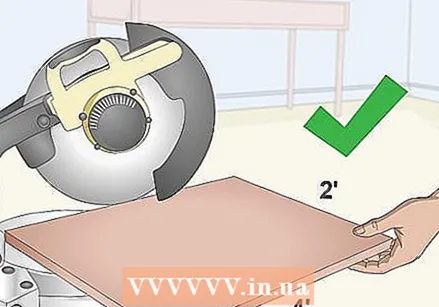 Cut or buy the wood for the base. Use plywood, chipboard, or MDF to make a base for the scratching post. Buy a piece that is 50cm by 1m by 1.5cm or cut it to the correct size with a table saw. Be careful when cutting to make sure no one gets hurt.
 - Choose a natural and untreated wood. Do not use wood that has been treated with chemicals as these can be harmful to cats.
 Cut the base carpet to size. The carpet should be at least 1m by 1.5m so that you have enough to wrap and staple the base with it. Use a utility knife and ruler to make a neat straight line.
 - Choose a stiff carpet, such as Berber carpet, so that the scratching post will last longer.
 Cut notches for the corners. Turn the carpet upside down and place the base in the center of the carpet.
 - Draw a straight line from each side of the base to the end of the rug so that there are squares extending from the corners.
- Draw a straight line 2 cm from the corner of the base that intersects the squares just created.
- First cut across the straight line and then along the lines you made from the corners.
 Lay the carpet on the base. Staple the carpet to the bottom of the base on one side, securing the staples every 5 cm with a 1.5 cm compressed air stapler. Pull the carpet taut and staple it at the bottom of the opposite side, inserting staples every 5 cm. Repeat this on the other two sides, making sure that you are not all the way to the edge, so that the corners are even.
Part 2 of 2: Making the pole
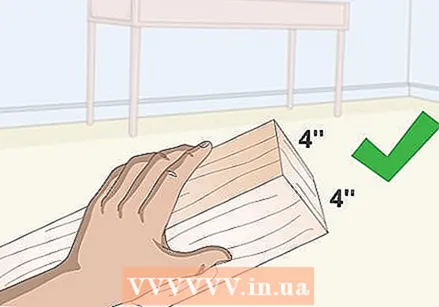 Pick the pole. Buy a piece of wood measuring 10 by 10 cm from the hardware store. You can also nail two pieces of wood 5 by 10 cm together, making sure that they are evenly aligned and that no nails come out that could injure your cat.
 - Again, opt for untreated wood for safety reasons.
 Attach the pole to the base. Lay the base upside down (the carpeted side facing the pole) on top of the pole. Make sure it is centered and screw the post into the base using 5cm wood screws. Then flip the base over so that it is on the ground, with the pole on top.
 - You determine the length of the post, but make sure it is long enough for your cat to stretch. If you're not sure how long the pole should be, measure your cat from nose to tail tip and add a few inches.
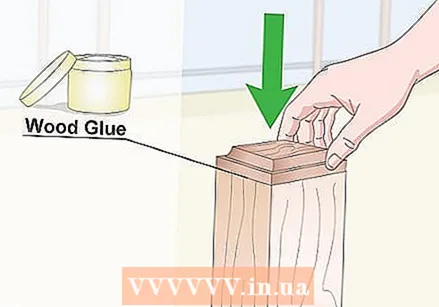 Cover the top of the pole. To make a neat top for the post, purchase a 10 by 10 cm beveled wood square from the hardware store. Use wood glue to attach the top to the pole.
 - Alternatively, you can carpet and staple the top. Put two staples on each side of the post instead of the top.
 Cut the carpet from the pole to size. It must be at least 50cm wide to go all the way around the post and the exact height of the post. Use a utility knife and ruler to make a neat straight line.
 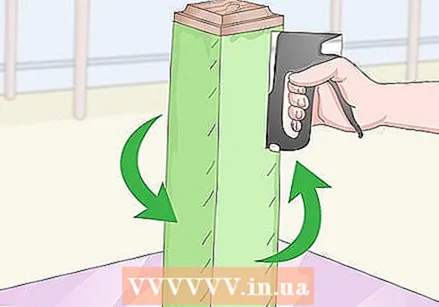 Wrap the carpet around the pole. Start in one corner and staple the carpet vertically every 1 inch. Wrap the rug all the way around the pile and staple it every inch along the vertical seam. Trim excess material and make sure the seam is smooth so that your cat's claws don't catch on the fabric.
  Use rope as an alternative to carpet. Alternatively, you can wrap the pole with sisal rope instead of carpet. Cover your pole with non-toxic glue so that the rope doesn't come loose.
 - Wrap the rope around the bottom of the pole and staple it in place.
- Continue to wrap the twine all the way to the top of the post, making sure the rows are neat, straight, and very close together.
- Add staples if the glue doesn't seem to hold the rope well enough.
 Flatten the hardware. Use a hammer to flatten the staples. A staple gun doesn't always shoot flat staples, and you need to make sure your cat's claws don't get caught or ripped out by a staple sticking out of the post.
Tips
- Scraps of material can be found everywhere! Check with neighbors or friends to see if they have the necessary materials.
- If your cat is particularly wild or heavy, you will probably need to use a heavier or larger piece of wood for the base to make the structure more stable.
Warnings
- Wear safety glasses and gloves.
Necessities
- A piece of post measuring 10 by 10 cm
- Plywood, chipboard or MDF
- Wood screws
- Staples and a staple gun
- Hammer
- Stiff carpet
- Non-toxic glue
- Sisal rope
- Protective goggles
- Work gloves


