Author:
Christy White
Date Of Creation:
3 May 2021
Update Date:
1 July 2024

Content
- To step
- Part 1 of 3: Preparing materials
- Part 2 of 3: Setting up the basic structure
- Part 3 of 3: Installing and finishing the hutch
- Tips
- Warning
- Necessities
A rabbit hutch provides a great way to keep your rabbit safe, while also giving him the freedom to run around and explore. You must first consider how big the loft should be. It should be large enough to accommodate all of your rabbits when they reach maturity. To build the hutch, make a simple rectangular frame and add wire mesh on the outside. Make a door in it too. You make the hutch more comfortable for the rabbits by placing their own food bowls and toys in it.
To step
Part 1 of 3: Preparing materials
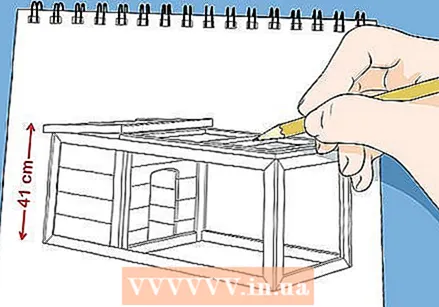 Plan the design. Most lofts are made of a wooden frame with wire mesh windows and doors. When determining the size of the hutch, consider how many rabbits will live in it. They need plenty of room to move, usually 4 times the size of each rabbit. Furthermore, a minimum height of 40 cm is also a good idea.
 - For example, if your rabbit is 12.5 cm wide and 25 cm long, it will need 1.25 m2 of space.
- If there are several rabbits living in the same hutch, consider adding partitions. This can be useful if you want to separate individual animals.
- Try to keep the cage less than 75cm deep. As you go deeper, it can be difficult to reach in and pick up your rabbits without struggling.
 Choose strong wood for the frame and supports. Use 5x10 cm beams for the frame and 10x10 cm beams for the support posts. Take wood that is straight, not bent. Do not choose beams with large knots or signs of splitting at the edges. The number of beams you need depends on the size of your house.
 - Untreated pine is a good choice for the frame and support posts. It is resistant to various weather conditions and is non-toxic to rabbits when ingested.
- For example, if you are building a loft that should be 100x70x50 cm, you will need 4 100 cm beams, 4 70 cm beams and 4 50 cm beams to build the frame.
- If you are adding a wooden door to the hutch, you will also need to get wood to build the door frame with and to make the door yourself. You can usually use narrower wood for this, such as bars of 2.5x2.5 cm or even 2.5x1.25 cm.
- Pay attention to how high the loft should be from the ground. If you want the loft to be off the ground, you will also need 4 4 '(1.2 m) beams as supports.
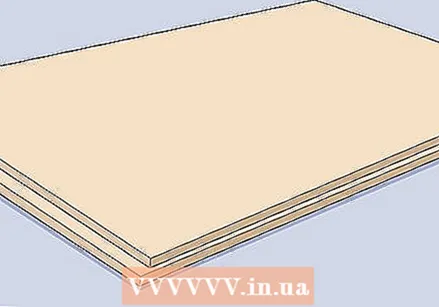 Choose plywood for the bottom and roof. You will need 1 wooden roof panel and 1 wooden floor panel, which correspond in size to the length and width of the house. Plywood is available in large panels, so it is usually good to buy 1-2 panels at the start of the project. You can then cut out the necessary pieces yourself and use what remains for other projects.
 - Look for plywood that has a gold or light red color. It should not have large knots and no signs of fraying or chips.
- For example, if you are building a cage measuring 100x70x50 cm, you will need 2 pieces of plywood (1 for the bottom and 1 for the roof) that measure 100x70 cm.
 Measure your pieces of wood. Arrange all pieces of wood in order, so that you can see exactly what you are going to work with. Choose a single piece of wood, place a ruler on it and measure the required length. Mark the length with a pencil or marker. This is where you are going to saw. Repeat until all pieces have been measured.
 - Divide the wood per type when measuring. For example, first measure all support beams one after the other. This is better than jumping back and forth between different pieces of wood for different purposes, potentially leading to incorrect measurement.
 Cut the wood to size. Use safety glasses and gloves. Set up the sawhorse (if you're using a handsaw) or prepare the table saw (if you're using an electric saw). Place one piece of wood at a time in the sawhorse or on the table saw. Align the saw blade with the size mark and make a clean cut in one go.
 - Make sure you have read all of the instructions on how to use your saw and are comfortable using it before starting any complicated projects, such as building a rabbit hutch.
- Before making each cut, do a quick safety check to make sure your limbs are in the correct position, away from the trajectory of the saw blade.
- If you don't have a saw or are not comfortable using it, you can usually have the wood cut to size at the DIY store. You then only have to buy the wood, specify the desired sizes and wait for an employee to make the cuts for you.
 Select the pieces of wire mesh. It is best to use galvanized mesh with a size of 14 or 16. This will not break if your rabbits start chewing it. Use 2.5x5 cm mesh for the walls and door. Use 1.25x2.5 cm mesh for the bottom. The flat mesh will protect your rabbit's legs.
 - Do not use chicken wire in the cage, as it is not strong enough to keep rabbits in.
- You can buy the wire mesh at a pet store or online, on a roll or in pre-cut panels. Most traditional metal shops do not have a mesh suitable for rabbits.
 Cut the wire mesh to size. Use wire cutters to cut the mesh into pieces that will fit the outside of the hutch. You need 4 pieces for the walls. You may need to cut another piece of wire mesh to fit your door.
  Organize the rest of the materials. Buy tiles for the roof when you know the hutch will be exposed to the weather. This will maximize the life of the roof. Buy 2 hinges and a sliding lock mechanism for the hutch door.
 - You can buy the roof tiles, hinges and closing mechanism at most DIY stores. You need roof tiles that overlap slightly and still cover the entire roof.
Part 2 of 3: Setting up the basic structure
 Screw the 2 ends together. Use wood screws to attach 2 width pieces to 2 height pieces. Once attached they should form a rectangle. The width pieces must be placed opposite each other, just like the height pieces. Repeat this process with the remaining 4 short pieces of wood. You now have 2 rectangles that form the end of the cage.
 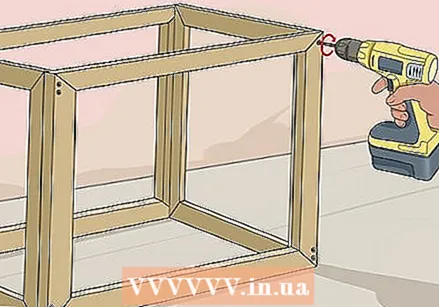 Attach the length pieces to the ends. Use wood screws to attach each length piece so that it runs from one corner of one end to the corresponding corner of the other end. Repeat until all 4 length pieces are attached. When you are done, the rabbit hutch frame should resemble a three-dimensional rectangle.
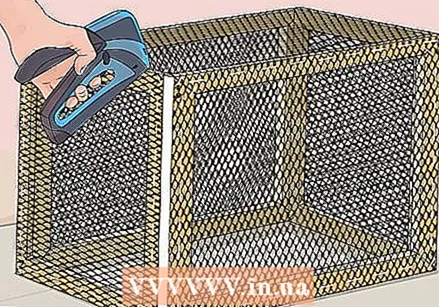
  Attach the mesh to the wooden frame. Rotate the frame on the ground until it is in the correct position, minus the supports. This will help you visualize how you are going to attach the mesh. Always take a piece of wire mesh cut to size and attach it to one of the open sides of the frame with a tacker. Use a staple about every 1 inch to avoid cracks forming in the mesh.
 - Make sure to pull the mesh taut as you attach it. It helps to ask someone to assist you at this stage of the build process.
 Attach the tops and bottoms last. Place the hutch in an upright position and place the roof on the frame. Screw it to the frame along the edges. Ask someone to help you turn the cage over so the top is facing up. Place the plywood board for the bottom on the frame and screw it on tightly. Then carefully turn the cage over again.
 - You can simply use a piece of cut-to-size plywood as a divider. To keep the air flowing in the hutch it is best to drill or punch some holes in the panel before placing it.
 Create the door. Use the wire cutters to cut the mesh and make a doorway in the front of the cage. Place plastic seals over the edges of the exposed wire. You can also make a square wooden frame for the door, attach 2 hinges to it and cover it with wire mesh before installing. You can also make the door out of wire mesh alone. Attach the door to the base structure with C-rings or staples.
 - A wire mesh door is easier to make. However, it may become more difficult to open and close over time. A wooden door is sturdier, but takes a little longer to make.
- Consider putting a latch on the door as well. This will help prevent the possibility of escape. A simple sliding lock is the best option for a wooden door. If you have a wire mesh door, it is best to use a hook lock.
 Attach the support beams. Ask for help to turn the cage upside down again. Then use a combination of L-brackets and wood screws to attach the legs to the base. Each of the 4 corners of the base frame should have 1 leg.
Part 3 of 3: Installing and finishing the hutch
 Add roof tiles and drainage. A tile roof is not necessary for a rabbit hutch, but it will make it last longer. Attach roof tiles or metal roofing to a piece of plywood on top of the hutch. If you are concerned about drainage, let the roof tiles extend slightly over the edge of the hutch. You can also overlap them so that they have a slight downward angle.
 - If you put a layer of construction cardboard under the roof tiles, it will provide even more protection against water.
 Find a safe location for the loft. Choose a place that is not too noisy and where not many people pass by. It is best if the area is away from overgrown areas, where wildlife can live or often pass by. If you can place the hutch under a tree to protect it from direct sunlight all day long, that's even better.
 - It is also a good idea to place the loft where you can keep an eye on the loft and the residents.
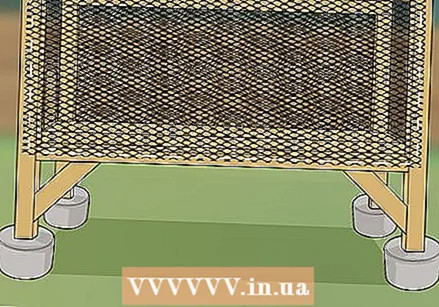 Anchor the legs with concrete. Most pens are heavy enough not to require additional stabilization. However, if you think the cage is wobbling or tipping over, you can dig 4 holes in the ground where the legs will be. Then put the legs in the ground and check that the house is level. Then add a little bit of concrete to each hole.
  Place food, water, bedding, and toys. You can place the food directly on the bottom, but it is best to hang the water bottle on the side of the cage. You can use straw or unbleached shredded paper as a bedding. This will help protect your rabbits' sensitive legs. Make sure to throw some of their favorite toys into the hutch as well.
Tips
- You can place grid panels in the open space under the loft. This allows you to use the space as storage.
- You can also create several single hutches and then attach them together for several rabbits. A multi-hutch is nice if you have multiple rabbits and may need extra space to isolate newcomers or sick animals.
Warning
- When you are all done building the cage, it is good to keep your fingers running all over the surface. Look for sharp or protruding pieces that could injure your rabbits. File or cut these pieces away.
Necessities
- Safety glasses
- High-quality work gloves
- Wood
- Galvanized wire mesh, size 14 to 16
- Wood screws
- Screwdriver
- Dremel or metal file
- Wire cutters
- Tacker and staples
- Measuring tape
- Sliding lock
- Hinges
- Plastic seals
- High-quality straw, hay or paper
- Roof tiles
- Water bottle
- Sturdy food bowl
- Lots of toys


