Author:
Charles Brown
Date Of Creation:
6 February 2021
Update Date:
26 June 2024

Content
- To step
- Method 1 of 4: Regular Magic Ring
- Method 2 of 4: Double Magic Ring
- Method 3 of 4: An alternative
- Method 4 of 4: Another alternative
- Necessities
A "Magic Ring" is an adjustable starting circle often used with amigurumi patterns and similar projects that are crocheted in rounds. You can choose a regular Magic Ring, or a Double Magic Ring to give your project extra strength. But if you find a Magic Ring too difficult, there are also other options that you can use. Read on for more information.
To step
Method 1 of 4: Regular Magic Ring
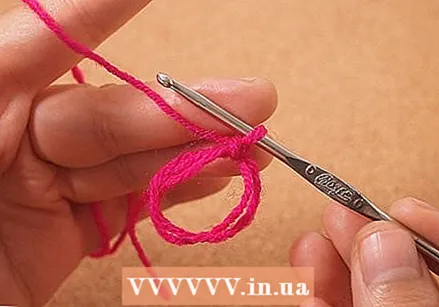
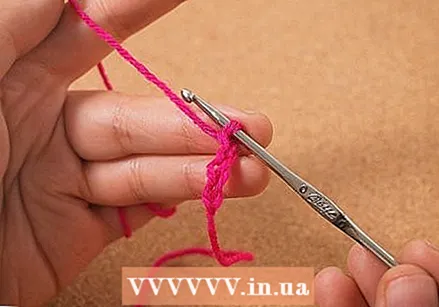
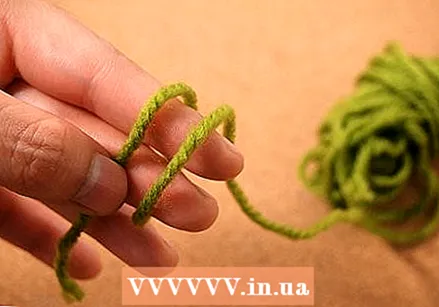 Make a loop with your yarn. You need to make a loop with the yarn around your fingers with the working thread (the end attached to your ball) on the right and the loose end on the left.
 - One more step to be clear: you can also make that loop by first making an inverted "j" with the end of the thread. Cross the loose end along the working thread at the back, and hold the yarn together with your fingers where the threads intersect; so you have your loop.
- Place the loop 2 to 3 inches (5 to 7.5 cm) from the end of the wire.
- The working thread should be at the back of the loop.
- Grasp the junction with the thumb and forefinger of your non-dominant hand.
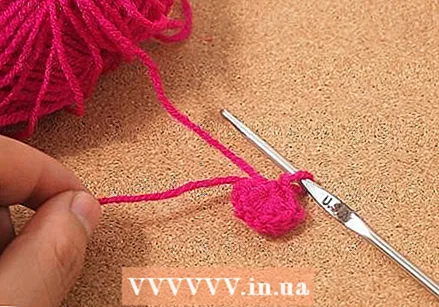
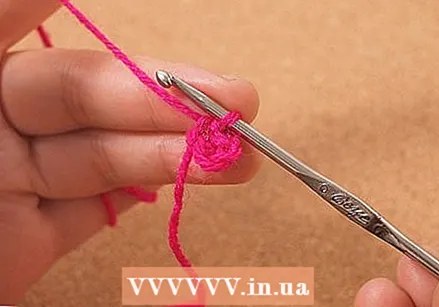
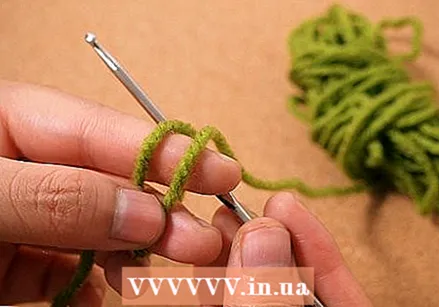 Insert the crochet hook through the ring. Insert the crochet hook through the ring from front to back.
 - Grab a piece of working thread with your crochet hook.
 Pull the yarn through the ring. Pull the piece of working thread you picked up through the ring; you now have an extra loop on your crochet hook.
 - As you pull the loop through, also make sure it reaches the top of your ring.
- NOTE: this does not count as a stitch yet.
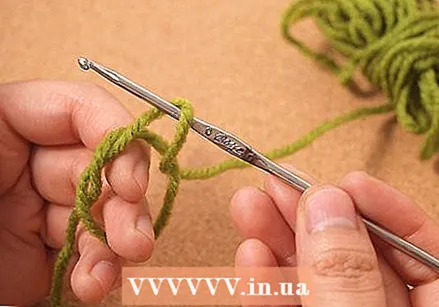
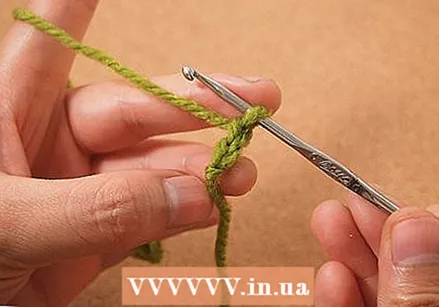
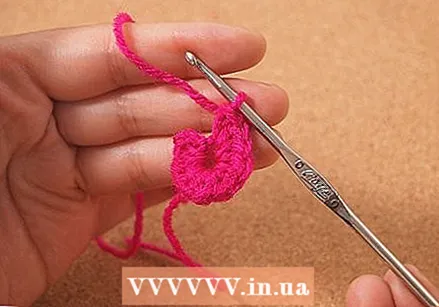
 Crochet a chain stitch. Put your crochet hook behind your working thread and pull the thread through the loop that is now on your needle. This is how you make a permanent one. Repeat this as many times as indicated in the pattern.
 - When making your first single crochet make sure that the hook is inserted in the loop so that you work around the ring and the loose end.
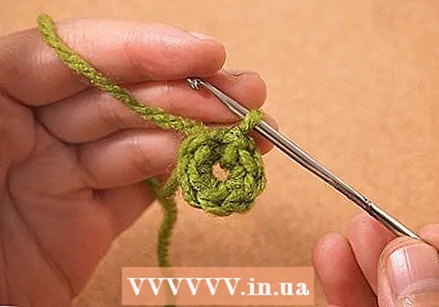
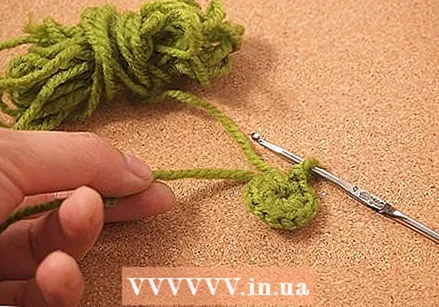 Pull the wires. Hold the working thread while pulling gently on the loose end. If you do this, the stitches in the middle will get closer together, and you close your Magic Ring.
 - When you need to close a round or start a new round, work a slip stitch in the first stitch of the Magic Ring.
Method 2 of 4: Double Magic Ring
 Wrap the thread around your fingers twice. You don't make a single loop like with the regular Magic Ring, but a double. The loose end should be in front and the working thread behind.
 - NOTE: This is very similar to the regular Magic Ring, but many people prefer a double Magic Ring for projects that will be used more often, as a double Magic Ring will wear less. Wrap the loop around the first two fingers of your non-dominant hand.
 Make a loop. Insert your crochet hook under the two strands of your double ring from front to back. Crochet the working thread and pull it forward through the ring again to make a loop on your crochet hook.
 - Even if you are making a double ring, you only need to make a single loop on your crochet hook. The “double” mainly refers to the double loop that you make at the very beginning. The rest is largely the same as with a regular Magic Ring.
 Make a loose one. Put your crochet hook behind the working thread and pull it through the loop that is now on your needle, this is how you make the first chain.
 - You usually need 1 chain stitch for a single crochet pattern, 2 for a half double crochet pattern, 2 or 3 for double crochets and 4 for treble crochets.
 Work the required number of stitches. Make as many single crochets as you need according to the pattern for the first round.
 - To complete a round and join the next round, work a slip stitch in the first stitch after pulling the ring tight. You have to wait with this until you have pulled the ring tight.
 Pull the loose wire end. Hold the working wire firmly and pull the loose end with your other hand so that you pull the double Magic Ring nice and tight.
 - Grab the loose end as close to the ring as possible before starting to pull.
- If you can't pull both rings tight at the same time, pull the front loop to tighten the back one, then the loose end to tighten the front one.
Method 3 of 4: An alternative
 Make a sliding loop. Make a loop with your yarn. With your crochet hook, take the working thread (the piece that is attached to the ball). Pull this thread through your starting loop and pull tightly; this is how you put a sliding loop on your needle.
 - Your first stitch may be scrollable, but your starting ring is not; that is why it is important that you make these as tight and small as possible by making tight and even stitches.
- You can use this alternative if you find it difficult to make a Magic Ring.
 Chain two. Chain two. Insert your crochet hook under the working thread and pull it through the loop on your needle. This way you make a loose one, and you get a new loop on your needle. Do that again to make your second chain stitch.
  Make six single crochets in the second stitch from the hook.Insert your crochet hook into the second stitch from the hook (that's the first chain you made) and make six single crochets in this stitch.
 - To make a single crochet, insert the hook through the loop and pull up the working thread with the yarn facing you on the hook. Pull the thread back through the loop, you now have two loops on your crochet hook.
- Pull up the working thread again with the yarn towards you.
- Pull this new thread through both loops on your crochet hook. When that is done you have a single loop on your crochet hook again, and your first single crochet is finished.
- If the pattern prescribes fewer or more stitches for the first round, follow the pattern directions and do not automatically make 6 stitches.
- To make a single crochet, insert the hook through the loop and pull up the working thread with the yarn facing you on the hook. Pull the thread back through the loop, you now have two loops on your crochet hook.
 Work a slip stitch in the first single crochet in the round. To close this round and start the rest of your pattern, make a slip stitch in the first stitch of your ring, then adjust the yarn to the correct height for the next round.
 - You make a slip stitch by putting the hook through the first stitch, picking up the working thread, and pulling it through the loop on your hook in one go, so that you only have one loop on your hook again.
- NOTE: This ring cannot be tightened like the Magic Ring, but you still have the starting round you need for your pattern. You may find these easier.
Method 4 of 4: Another alternative
 Make a sliding loop. Make a loop of your yarn, make sure that the loose thread end is in front and the working thread (the end that is attached to the ball) is at the back. Insert your crochet hook through the loop, pull up the working thread and pull the yarn through the loop. Pull to get the stitch tight on your needle.
 - This is another option if you find it difficult to make a real Magic Ring. You can put on this starting loop, but not the final ring.
- This method is probably better suited for stick patterns; the other alternative mentioned in this article is usually better for fasting patterns.
 Make four chains. Crochet a chain for a starting circle.
 - For each chain stitch you put the needle under the working thread. Pull the thread through the loop on your needle; this is how you make a chain and replace the loop you had on your needle with a new one.
 Make a slip stitch in the first chain stitch you made. Insert your crochet hook into the first stitch you made (so at this point the fourth from the hook) and pick up the working thread. Pull the working thread through the loop on your needle to make a slip stitch.
 - After this, you still only have one loop on your needle.
- NOTE: You will form a ring this way, but as it is quite wide you will need to make more stitches to make it closer.
 Chain three. Make three more chains in the same way as the first four.
 - This step in the process marks your first round. When referring to your pattern, you can now either make the number of stitches listed there, or follow our directions and pick up the pattern directions only in the second round.
 Make sticks in the ring. Make ten sticks in the center of the circle you just made.
 - For each double crochet, proceed as follows: wrap the thread around the hook once and then insert the needle through the center of the ring.
- Wrap the thread around the needle at the back of the hoop.
- Pull the thread back through the ring, and wrap the thread again.
- Pull the thread through the first two loops on the hook
- Wrap the hook again and pull the thread through the last two loops on the hook.
- You do this ten times in total.
- For each double crochet, proceed as follows: wrap the thread around the hook once and then insert the needle through the center of the ring.
 Make a slip stitch in the third chain stitch. Insert the hook through the third stitch of the first three chain stitches and pull up the working thread. Pull the thread through the loop on your needle; you made a slip stitch.
 - Gently pull on the loose end thread to close the center of the hoop.
Necessities
- Crochet hook
- Yarn


