Author:
Roger Morrison
Date Of Creation:
5 September 2021
Update Date:
1 July 2024
Content
- To step
- Method 1 of 3: Change the color of a text object
- Method 2 of 3: Modify multiple text objects at once
- Method 3 of 3: Change the color of specific characters
- Tips
To change the color of text in Illustrator, select the text with the selection tool, then choose the color from the palette. To change more than one text area, hold down the Shift key while selecting additional areas. You can also change the color of an individual character by selecting just that character with the Text tool.
To step
Method 1 of 3: Change the color of a text object
 Click on the first arrow in the toolbar to use the selection tool. If you are not satisfied with the color of a text object (a block of text) in your document, you can easily change it with the selection tool.
  Click to select the text area you want to change. When you click on the text you want to change, a selection box appears around it.
 - You can also select text in the Layers panel. Find the layer that contains the text you want to change, then click the circle at the end of the layer name to select it.
- If the Layers panel is not already open, press F7 to open it now.
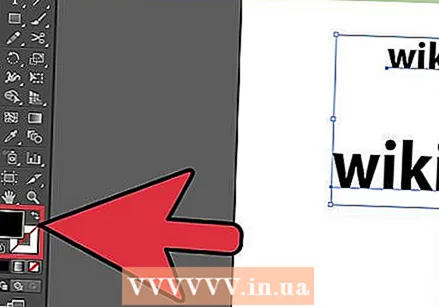
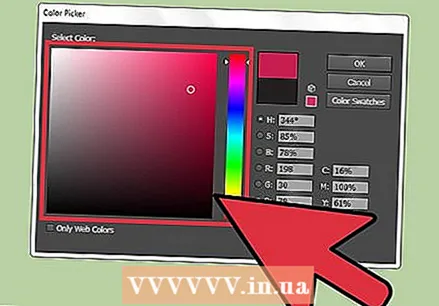
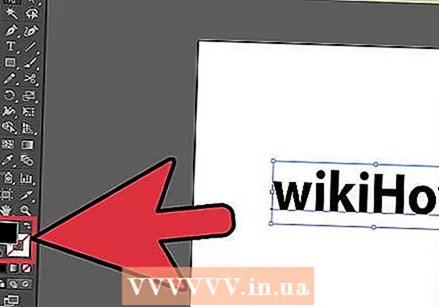 Double-click the color palette in the toolbar. The palette is represented by a box that is the same color as the currently selected text. A larger palette of different colors will appear for you to choose from.
 - To change the line thickness of the outline (the outline around the text instead of the text itself), double-click the bottom of the two boxes. It will either have a red line (if there is no outline color at the moment) or it will show as a box with a thick line around it.
 Select a color and then click "OK". The text in all selected areas will now change to the text you selected.
 - If you are not satisfied with the color, press ⌘ Cmd+Z (Mac) or Ctrl+Z (Windows) to undo the changes.
Method 2 of 3: Modify multiple text objects at once
 Click on the first arrow in the toolbar to use the selection tool. If you have multiple text areas in one document that you want to change to the same color, you can do this with the selection tool.
  Click to select a text area to change. A selection box appears around the selected text area.
 - You can also select text by selecting it in the Layers panel. Find the layer that contains the text you want to change, then click the circle to select it.
- If the Layers panel is not already open, press F7 to open it.
 Hold the key ⇧ Shift and click each additional text object. Hold the key ⇧ Shift while clicking each area. Each selected area is now also surrounded by a bounding box.
 - If you are using the Layers panel, you can select multiple layers by clicking ⇧ Shift while clicking additional circles.
- When you've selected all areas (using the Selection tool or in the Layers panel), release the key ⇧ Shift loose.
 Double-click the color palette in the toolbar. The palette is represented by a box that has the same color as the currently selected text. A larger palette will appear, with a variety of colors to choose from.
 - To change the line thickness of the outline (the outline around the text instead of the text itself), double-click the bottom of the two boxes. It will either have a red line (if there is no outline color at the moment) or it will show as a box with a thick line around it.
 Select a color and then click "OK". The text in all selected areas will now change to the text you selected.
 - If you are not satisfied with the color, press ⌘ Cmd+Z (Mac) or Ctrl+Z (Windows) to undo the changes.
- You can also change other text attributes this way, such as font and size.
Method 3 of 3: Change the color of specific characters
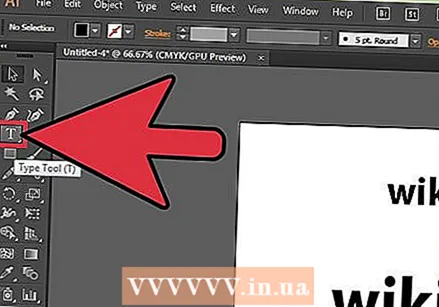 Click the Text Tool (T) in the toolbar. If you want to change an individual character (or string) without changing all of the text, you can do this by selecting the character (s) with the Text tool.
  Select the characters you want to change. The selected characters should now have a contour line.
  Double-click the color palette in the toolbar. The palette is represented by a box that is the same color as the currently selected text. A larger palette of different colors will appear for you to choose from.
 - To change the line thickness of the outline (the outline around the text instead of the text itself), double-click the bottom of the two boxes. It will either have a red line (if there is no outline color at the moment) or it will show as a box with a thick line around it.
 Select a color and then click "OK". The characters you have highlighted will change to the color you have selected.
 - If you are not satisfied with the color, press ⌘ Cmd+Z (Mac) or Ctrl+Z (Windows) to undo the changes.
- You can also change the font and font size of individual characters using this method.
Tips
- You can control which panels appear in Illustrator by selecting them from the Window menu.
- To change various default settings for Illustrator, go to Edit Preferences, and explore the different options.


