Author:
Roger Morrison
Date Of Creation:
5 September 2021
Update Date:
21 June 2024
Content
- To step
- Method 1 of 2: Using a memory stick on a PC
- Method 2 of 2: Using a memory stick on a Mac
- Tips
- Warnings
Memory sticks - more commonly known as "USB sticks or flash drives" - are miniature portable memories that can hold files, folders, photos, and even entire programs or operating systems, regardless of your computer's hard drive. You can add files to a memory stick by connecting it to the USB port on your computer and dragging and dropping files to that drive.
To step
Method 1 of 2: Using a memory stick on a PC
 Find the USB port on your PC. USB ports are rectangular with a thicker piece of plastic on the top half of the slot and an empty space on the bottom. The port is indicated by an image of three branching arrows pointing up (or down, depending on your PC).
 - If you're using a desktop, your USB ports are likely integrated into the motherboard, while a laptop's USB ports are usually on the left or right side of the case.
 Plug your memory stick into the USB port. Make sure the sturdy piece on the inside of the memory stick port is at the bottom when you plug it in.
  Wait for the memory stick interface to appear. This may take a few minutes if this is your first time installing this memory stick on your PC.
 - If the memory stick does not open automatically, double-click on "My computer" and find the name of your memory stick under the "Devices and drives" category. Double-click on the name to open the memory stick window.
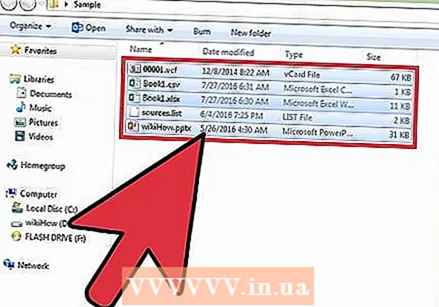 Select the files you want to add to the memory stick. If your files are all in the same place, just click on that and drag the cursor over your files until you've selected them all.
 - To search for a file on your PC, open the Start menu and type the name of the file in the search bar at the bottom of the menu. If you are using Cortana, it will say something like "Ask me anything you want".
 Likes Ctrl and then tap C. to copy your files.
- If you don't want to save the files to your computer, just click and drag to the memory stick window and drop them there.
- Some memory sticks will duplicate your files by default, leaving the original copies of the files on your computer.
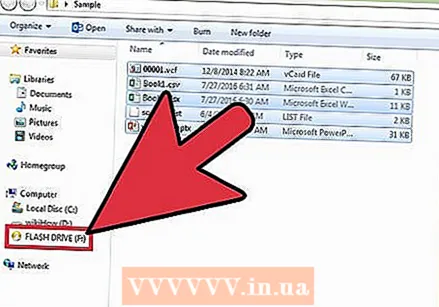 Click on the memory stick window. This will select the memory stick as the destination for your files.
 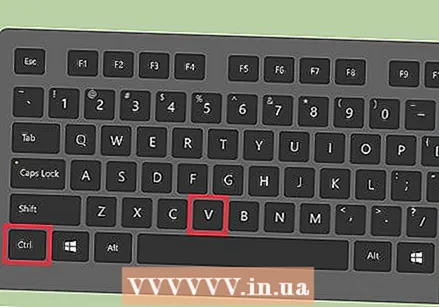 Keep Ctrl and then tap V. to paste the files. They are now put on the memory stick.
  Wait for the transfer of your files to complete. Depending on the size of your files, transferring them to the memory stick can take a few seconds to hours.
 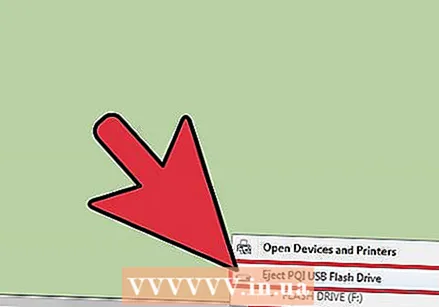 Look for the memory stick icon in the system tray at the bottom right. The system tray is in the same area as the clock. The icon resembles the outline of a memory stick with a check mark next to it, and it should show the phrase "Safely remove hardware and eject media" if you hover your cursor over it.
 - You may have to click the up arrow in the top left corner of the notification area to see the flash drive icon.
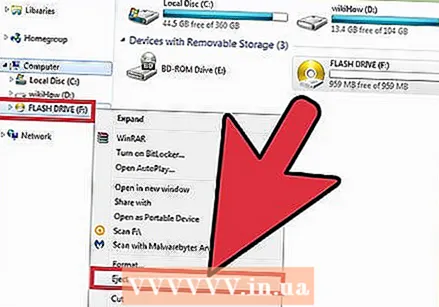 Click on the memory stick icon to eject it. It is important to eject your memory stick before physically removing it from your computer because failure to do so can damage files on both your computer and the memory stick.
 - You can also right-click on the name of the memory stick in the "My Computer" folder and select "Eject".
 Remove the memory stick from your computer. Do this carefully or you may damage the memory stick. You have now successfully added files to your memory stick!
Method 2 of 2: Using a memory stick on a Mac
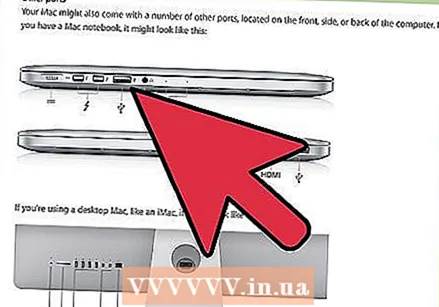 Find the USB port on your Mac. USB ports are rectangular with a thicker piece of plastic on the top half of the slot and an empty space on the bottom. The slot has an image next to it with three branching arrows pointing up.
 - If you're on a desktop, your Mac's USB ports are likely integrated into the display case, while Mac laptops have a USB port on the left or right side of the keyboard case.
 Connect your memory stick to the USB port. Make sure the thicker piece of plastic on the inside of the memory stick port is on the bottom when you plug it in.
  Wait for the memory stick icon to appear on your desktop. This may take a few minutes if this is your first time installing this memory stick on your Mac.
 - If your memory stick icon doesn't appear, open the Finder and find the memory stick name in the left side of the window. It should be under the "Devices" tab.
 Double-click the memory stick icon. This opens the memory stick interface, to which you can add files in the same way you would add files to a folder.
 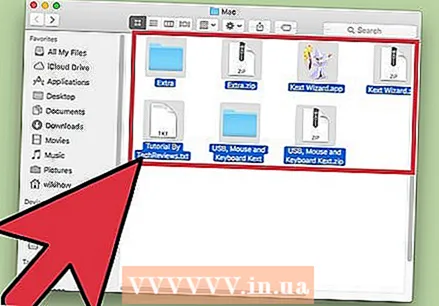 Select the files you want to add to the memory stick. If your files are all in the same location, just click on them and drag the cursor over your files until you've selected them all.
 - To find a file manually, open the Finder and type the name of the file in the search bar at the right corner of the window. You can open the Finder by clicking the word "Finder" in the top left corner of your screen, or you can click the blue face icon in your dock.
 Keep ⌘ Command and then tap C. to copy the files.
- If you don't want to save the files to your computer, just click and drag them to the memory stick window and drop them there.
- Some memory sticks will duplicate your files by default, leaving the original copies of the files on your computer.
 Click on the window of your memory stick. This selects the memory stick as the destination for your files.
  Keep ⌘ Command and then tap V. to paste the files. This will add them to the memory stick.
 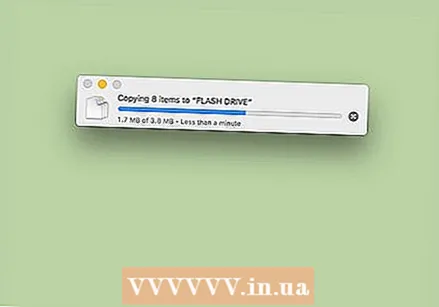 Wait for the transfer of your files to complete. Depending on the size of your files, adding files to a memory stick can take a few seconds to hours.
  Keep ⌘ Command and then tap E to eject your memory stick. It is important to eject your memory stick before physically removing it from your computer because failure to do so can damage files on both your computer and the memory stick.
 - You can also click with two fingers on the name of the memory stick in Finder or on your desktop and select "Eject [name of memory stick]".
 Remove the memory stick from your computer. Do this carefully or you may damage the memory stick. You have successfully added files to your memory stick!
Tips
- Memory sticks are also called flash drives or USB sticks.
- Your experience and settings may vary with your operating system. In this case, the documentation is often readily available - search online for the correct info.
- Memory sticks can have a few hundred megabytes of storage space up to hundreds of gigabytes - larger portable hard drives can provide up to five terabytes of storage space.
- You can delete files from your memory stick at any time by selecting all the files you don't want and pressing the button Delete to click.
- Delete unnecessary files from your memory stick - however, if your memory stick contains software files that came with the stick, keep them on the stick as they may be necessary for the memory stick to function properly.
Warnings
- Do not keep any personal information on your memory stick if you plan to take it with you to school or work. If you lose the memory stick, other people can access that information.
- Be careful with your memory stick, especially if the USB connection is unprotected - damage to the outside or inside of the memory stick may prevent you from accessing the files.


