Author:
Carl Weaver
Date Of Creation:
21 February 2021
Update Date:
28 June 2024

Content
The Winchester Model 190 is a .22 semi-automatic shotgun first produced in 1966. The rifle is reloaded through a tubular magazine located under the barrel.
Steps
Part 1 of 2: Charging
 1 Take the correct ammo. For the first time loading and firing a 190 model, you will need to use standard .22 caliber (.22 LR) rounds.
 - You can use any brand of cartridges.
- As an old shotgun, the 190 model works best with standard “no-frills” cartridges. At one time, this gun was considered "budget", so it jammed much more often than advanced weapons of the same years. This means the gun can jam if you use expanding bullets or bullets with a high muzzle velocity like stingers.
- Since there cannot be two owners of a 190 model with the same shooting experience, even if the same type of cartridges are used, it is recommended to try several brands and types of long rifle cartridges .22 caliber. Do not use ammunition of a different caliber or type that is designed for other types of firearms.
 2 Handle your gun with care. Even if you know that the weapon is not currently loaded, you should still consider it loaded and ready to fire at any moment.
 - It is especially important at this point to point the muzzle of the rifle in a safe direction. While loading the rifle, keep the barrel and magazine tube upright with the muzzle pointed towards the sky. However, you should tilt the gun slightly forward, away from other creatures and valuables, as in the event of an accidental shot, the bullet can do serious damage when it falls down.
- When loading the gun, never keep your finger on the trigger, but place it on the safety clip.
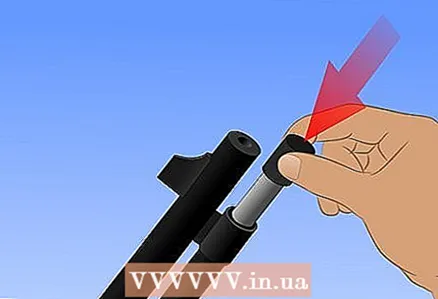
 3 Turn the cap. Find the cap on the tube magazine. Squeeze or twist the cap until you feel it open.
 - Two metal cylinders will emanate from the chamber. The upper large cylinder is the barrel, through which the bullet will fly out. The lower cylinder is a tubular magazine. The cartridges are loaded into a tube magazine, so that during the reloading process you will be working with this particular cylinder. The cap mentioned in this step should be at the entrance to the tube magazine.
- The cap is not a separate part of the gun, so you can safely squeeze and unscrew it, it will not fall off anywhere. This cap is actually attached to a hidden cylinder called a "pusher," which we'll talk about in the next step.
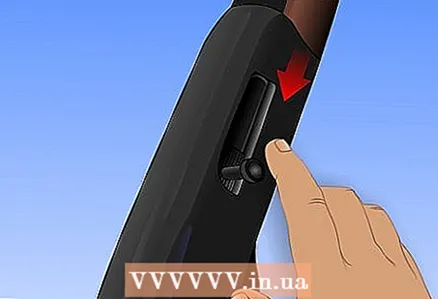
 4 Remove the pusher. Click on the store cap. By pressing on the cap, the pusher inside the tube magazine should slide out.
 - Continue to gently pull the pusher out until you have completely removed it from the magazine. Set it aside for now.
- The pusher is a hidden cylinder that fits snugly in a tubular magazine. It pushes and guides the cartridge further into the barrel so that the bullets can move properly inside the gun. You will not be able to load the gun until the pusher is in place.
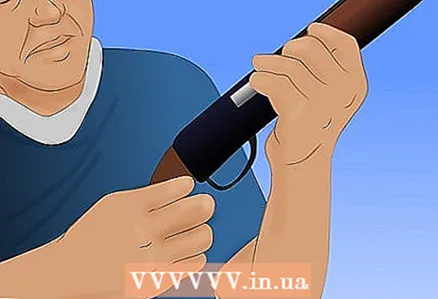
 5 Insert the cartridges into the magazine. Find the receiver window on the side of the tube magazine. Insert the cartridges into the magazine through this slot until the tube magazine is full.
 - Insert the cartridges into the magazine one at a time.
- Cartridges must be inserted with the sharp end towards the entrance to the tubular magazine, and the blunt end towards the rear of the rifle.
- You should be able to store about 15-16 rounds in the magazine.
- The connector should be at the bottom of the tube magazine. It is usually obstructed by a pusher, but removing the pusher will open access to it. If your particular 190 model does not have this connector, then you will have to load the cartridges directly into the front opening of the tubular magazine, where the cap used to be.
 6 Put the pusher back in place. Insert the pusher back into the magazine and screw in the cap to secure it.
 - Insert the open end of the pusher into the tube magazine. You should easily insert the entire pusher into the magazine. If you cannot insert the pusher completely, then you have inserted too many cartridges into the magazine.You will have to remove a few rounds by turning the tube magazine upside down. Extra cartridges will fall under the influence of gravity.
- After returning the pusher to its place, you must ensure that the cap is tightly and securely screwed on. If the cap is loose, then the pusher will dangle and not feed the cartridges correctly. If this happens, then the gun may jam or some other problem may occur.
- When the pusher is securely attached again, the rifle can be considered loaded and ready to fire.
Part 2 of 2: Discharge
 1 Handle the gun with care. When unloading your rifle, you must do so with extreme care to prevent injury or death.
 - Even if the rifle is on safety and you think it is not loaded, you should still consider it loaded.
- When unloading the rifle, keep your fingers away from the trigger. Keep your fingers on the outside of the trigger guard throughout the entire discharging process.
- Aim the muzzle of the rifle in a safe direction throughout the procedure. At different points in the process, you will need to tilt the barrel and tube magazine at different angles. But regardless of the details, you must always make sure that the gun is not aimed at living creatures or valuable property.
 2 Remove the loaded cartridge. Move the bolt to open the chamber. If there is a cartridge in the chamber, it will be removed from the rifle.
 - Even though this is a semi-automatic rifle and not a bolt action rifle, it will still have a bolt on it that you can use to manually control the chamber. The bolt on the 190 model is a small knob that sits on the side of the chamber.
- When the chamber is closed, this bolt will be closer to the front of the gun. By pulling the bolt towards the stock, you thereby open the chamber, and the cartridge inside will fly out.
 3 Look inside the chamber. Aim the muzzle in a safe direction and look inside the chamber from the back of the rifle. Make sure there are no cartridges left in the chamber or muzzle of the rifle.
 - When looking into the chamber, you must do this from the back of the rifle. Never look into the chamber from the front of a firearm.
- If there are still cartridges left in the chamber, you may have to hit the outside of the barrel to free the stuck cartridges. By freeing the cartridges, you can remove them from the extractor.
 4 Turn the cap. Squeeze or unscrew the cap on the pusher in the tube magazine to loosen it.
 - Proceed with the cap in the same way as removing the pusher during the rifle loading process.
 5 Remove the pusher. Press down on the cap. After that, the pusher should slide out of the tube magazine.
 - As with loading a rifle, you must ensure that the pusher is completely removed from the tube magazine before you can proceed to unload the rifle.
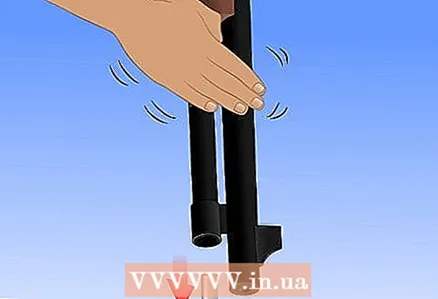
 6 Flip the rifle. Carefully tilt the rifle forward until the magazine tube is upright and the muzzle of the rifle is pointed toward the floor. Most of the ammo should fall out of the rifle by gravity.
 - You will hear the cartridges moving inside the magazine and falling out. However, do not rely on the sound of the cartridges to determine when the gun will be fully unloaded. Cartridges may not make any sound, especially if some are stuck in the tube magazine.
 7 Hit the store. While the gun is still upside down, hit the magazine from the side with your hand. This should free the stuck cartridges inside the tube magazine and then fall out.
 - Start hitting the back of the magazine or the chamber of the rifle. Move gradually to the tube magazine and then back to the chamber.
 8 Twist the shutter. Return the gun to its original, but still safe position, and jerk the bolt several times.If there are still cartridges in the gun, you can remove them by twisting the bolt.
 - Press and pull the shutter several times. There is a possibility that the cartridges can get stuck between the chamber and the magazine, and by twitching the bolt several times, you can free the jammed cartridges.
- Upon completion of this step, the 190 model's hard drive will most likely be completely discharged and pose no danger.
Warnings
- Always handle the gun as if it were loaded. Even if you know for sure that the weapon is not loaded, you should still treat it with the same care and caution as you would a loaded rifle.
- Aim the rifle in a safe direction. Never point the gun at yourself, other people, or valuable property. If you are on a shooting range, it is better to direct your gun to the range, unless, of course, there is no one there.
- Keep your finger away from the trigger. Until you make a conscious decision to shoot, your finger should be on the outside of the trigger guard, away from the trigger.
- Check the target. After you are ready to fire, make sure there is no one in the line of fire. Nothing should obstruct your target, and there should be adequate reinforcement behind it. You must also make sure that there is nothing behind the target that could die, be injured, or be damaged if the bullet passes through the reinforcement.
What do you need
- .22 LR cartridge with standard speed


