
Content
Many people have no idea how to do this enjoyable and contagious kind of handicraft. However, it is not difficult. Plastic canvas is just a variation of a regular fabric canvas, but it is much more interesting and useful to work with it, since it can be used to create voluminous objects that simply cannot be created from ordinary fabric. The things you can create with plastic canvas are limited only by your imagination.
This manual contains only basicsthat will allow you to try yourself in a new hobby that you may love for a lifetime. Your friends and family will appreciate the beautiful handcrafted items you can give them as gifts (a handmade gift from the heart). Before you begin your first experience with plastic canvas, familiarize yourself with the basics in this article to ensure a successful case.
Steps
 1 Gather the required materials.
- 2 Start working without making a knot. To keep your project looking clean from the wrong side, you should not tie knots. When embroidering a row, leave a small tail of yarn inside out as you bring the needle out to the right side. The first few stitches should be done with the tail of the yarn on the wrong side so that it cannot pop out.
- 3 Check out the recommended stitch patterns to use:
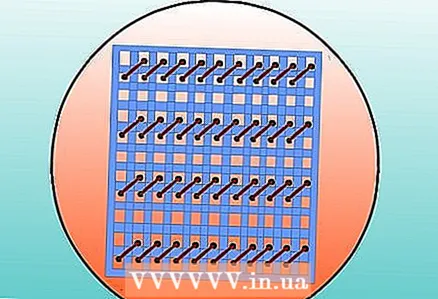
- Continental stitch... This is one of the basic stitches used in most sewing patterns. The rows are sewn from left to right. Bring the needle out to the right side at the top left point of the row. Bring it back down and back (diagonally).Continue sewing to the right side in the same way.
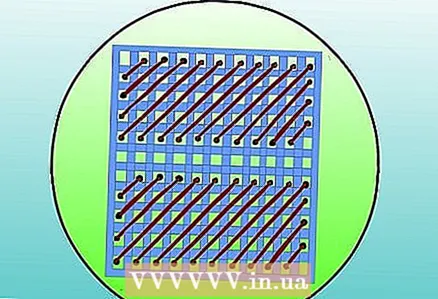
- Oblique tapestry stitch... This stitch is a variation of the regular continental stitch, but can be sewn across 2 or more threads of canvas. The first stitch of the row is the regular continental stitch described above (in this case, it is in the lower right corner of the row). The next stitch is placed side by side, but rises higher than the first, etc. to the left to the end of the row, after which the work is turned over and a new row begins.
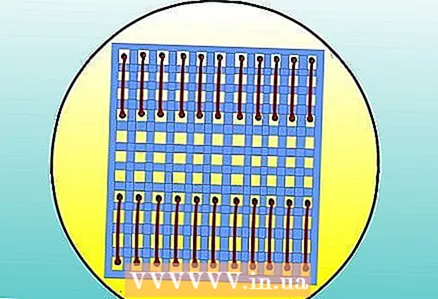
- Tapestry stitch... Stitches in a horizontal row are made vertically from top to bottom, leaving a small tail of yarn from the wrong side so that the stitches do not creep apart. The embroidery pattern you are using will tell you how many threads to use for that stitch (1 or 2). Typically 2-strand canvas stitches require the use of 2-strand embroidery yarn to better cover the canvas itself.
- Overlock stitch... This stitch is used for overcasting canvas edges. It is recommended to use 3 stitches instead of the two shown here when using it to cut corners. This same stitch is used to sew 2 separate elements of a project together, such as the sides of a box. If necessary, do not use additional stitches at the corners, if you need to close the canvas well with them. To connect 2 parts, they are folded inside out to each other and sewn on the side to be fastened.

- Continental stitch... This is one of the basic stitches used in most sewing patterns. The rows are sewn from left to right. Bring the needle out to the right side at the top left point of the row. Bring it back down and back (diagonally).Continue sewing to the right side in the same way.
 4 Learn new types of stitches as you gain experience. There are many types of stitches and their variations that you can master as you gain experience after mastering the basic stitches.
 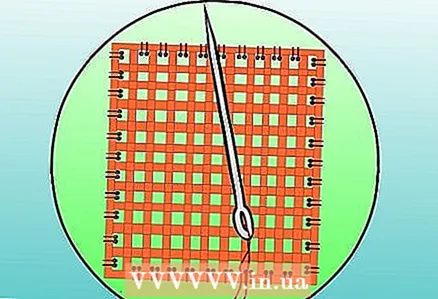 5 Completion of the series. Turn the work over to the wrong side and pass the remaining ponytail under the last 4-5 stitches. Then cut the thread. The same technique is used if the threads run out in the middle of the row. It's a good idea to use 90cm pieces of yarn for embroidery, so you don't have too many start and end points. Just remember to secure the thread under the stitches on the wrong side.
Tips
- Washing items embroidered on a plastic canvas:
- If your project gets dirty, you can clean it up by soaking it in the sink with warm water and a little dish soap. This should only be done if the threads you are using are washable and color fast. Most items embroidered with yarn can be washed. Items embroidered with embroidery threads should be tested for paint retention on the back before washing.
- Do not use hot water and do not put the item in the washer or dryer. Just soak it in the sink for a while, rinse it, and let it drain and dry in the bathroom overnight.
- Items such as bags, which are often handled, can be treated with Scotchgard protectant or other means to protect textiles from contamination.
- Do not produce dry the items and do not use cleaning solvents, as this may melt the plastic canvas. If your item is dusty, vacuum it to remove the dust.
- The canvas can be hard or soft. Any can be used, unless your embroidery design requires a specific type of canvas.
- The plastic canvas is available in various colors. Do not use a colored canvas, unless it is required in the embroidery scheme you are using, as the yarn may not completely cover the canvas, and it will be visible.
- For coarse plastic canvas, it is best to use regular, heavy, combed wool. It will be economical, the yarn comes in a variety of colors and can be bought almost anywhere. There is no need to buy yarn specially designed for working with plastic canvas, it is unreasonably expensive.
- In embroidery schemes, the size of the canvas is determined either by the number of threads or by the number of holes.Some people prefer to count the holes as this is easier.
- Check the list of required materials indicated in the embroidery chart, pay attention to the size of the canvas. The 7th canvas works well for beginners.
- The 14th canvas can be used with a variety of threads, incl. with those used on the 18th canvas. The most economical use for a given canvas size is an embroidery floss (4 or 6 threads) or mercerized cotton threads No. 5.
- Plastic canvas comes in 4 sizes:
- 5 holes per inch (2.5 cm);
- 7 holes per inch;
- 10 holes per inch;
- 14 holes per inch.
- There are various types of plastic canvas. The standard colorless version is used in most cases.
What do you need
- Several sheets of plastic canvas
- Pair of yarn needles to match the canvas
- Heavy combed yarn
- Pair of scissors


