Author:
Mark Sanchez
Date Of Creation:
4 January 2021
Update Date:
1 July 2024
Content
- Method 2 of 4: Fold the scarf like in a storefront
- Method 3 of 4: Fold the scarf up, leaving the dangling pigtail
- Method 4 of 4: Folding with a knot on the mannequin
- Tips
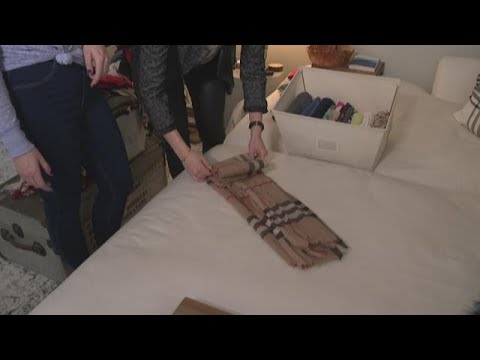
 2 Fold the scarf over. Grasp the narrow edge of the scarf at one end. Fold this edge of the scarf until it lines up with the other end. Straighten the edges of the fabric so that they lie flat.
 - To make it clearer - you need to make a scarf shorter, but not already.
3 Roll it up again in the same way. Grasp the folded end of the scarf.Fold it over the top of the scarf until it lines up with the open end, exactly as you did in the previous step. 4 Roll up the same way one more time. Grasp the folded corner and fold it over the top of the scarf again. Straighten the corners so that they lie flat. When you're done, your scarf should look like a small half-sheet of paper. 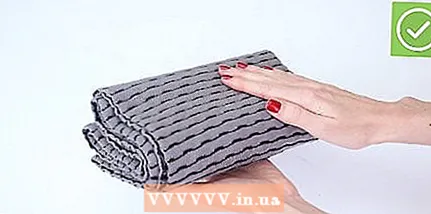 5 Store your scarf like this. That's all! Now you can store your scarf in a closet, closet, pocket, or wherever you need to put it. A simple yet comfortable fold will keep the scarf clean and wrinkle-free until you want to wear it again.
 Method 2 of 4: Fold the scarf like in a storefront
- 1 Spread out your scarf. Have you ever wondered how shops manage to present their scarves and mufflers so beautifully in the window? With this folding method, you will be able to present your scarf in the best possible light, as if it were brand new. First, fully align the scarf as described above.
- It is also important for this method to straighten out any tassels or fringe at the ends of the scarf (and keep them that way throughout the folding) so that your work will look more professional when finished.
- 2 Fold in half lengthwise. When your scarf is straightened, grasp one of the long ends and fold it so that it is in line with the other end. Your scarf should now resemble one long, thin strip. Try to keep all tassels or fringes flat and straight after folding.
- 3 Fold the scarf over. Next, fold the scarf over so that both open ends are in line. To make it clearer, your scarf should become shorter, but not already.
- 4 Repeat once or twice, folding the fabric into an accordion fold. Finally, fold the scarf either backward or forward one or two more times (depending on how compact you want it to look). Change the folding direction each time to create an accordion fold. When you're done, line up the edges of the scarf so the tassels hang straight and loosely across the corner of the fold.
- This type of folding is convenient because your scarf will not only look elegant and attractive, but it is also very easy to unroll so that you can throw it on in a hurry.
Method 3 of 4: Fold the scarf up, leaving the dangling pigtail
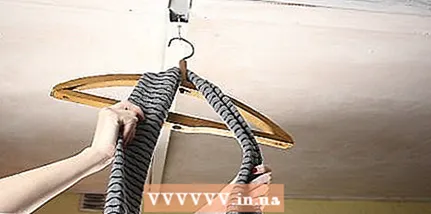 1 Loosely fold the scarf in half. This braid-like folding is an attractive and compact way to store scarves on a simple clothes hanger. To get started, you just need to fold the scarf in half. However, unlike the above method, you do not need to align the ends - as long as there is approximately the same amount of material on each side of the fold.
 - 2 Pull the ring into the folded scarf. With this folding method, you can either tie the scarf directly to the hanger, or tie it to a metal or plastic ring and then hang it on the hanger. If you want to use a ring, get one before you start - scarf rings are available in many fashion stores and online specialty boutiques, but you can use metal connecting rings. Regardless of which ring you are using, slip the scarf through it so that the ring is in the folded section before proceeding.
- If you are not using a ring, simply slide the hanger between the two ends of the scarf and up to the crease. In this case, ignore all references to the ring in the remaining instructions for this method.
- 3 Twist the scarf until it is tight. Take your loosely folded scarf and twist each end in the opposite direction. After a few twists, the scarf should become stiffer, like a tourniquet. Continue twisting - you need to get the scarf pretty tight.
- Most scarves are flexible enough for this fold.However, if you notice that the scarf is starting to rip or pull too tight, stop and try another folding method - you don't want to ruin it.
- 4 Continue twisting. Once the scarf is tight enough, it will begin to wrap on its own with each subsequent twist. After a few more twists, your scarf will resemble a long, knotted, braided strand of hair. The ring should be in the crease on top of the rolled scarf - if it slips off, just slide it up again.
- 5 Tie the bottom ends together. Finally, take the two ends of the scarf and tie them with a base knot. This will keep your "pigtail" taut and twisted. Congratulations - you now have a fairly compactly folded "pigtail" with a convenient ring that can be hung on a hanger along with the rest of the scarves that you want to place there.
Method 4 of 4: Folding with a knot on the mannequin
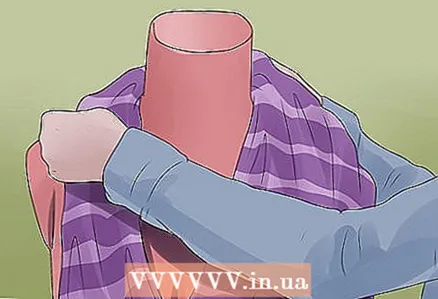 1 Wrap the scarf nicely over the shoulders of the mannequin. Like other garments, scarves are often displayed on mannequins in stores. If you have a mannequin (or similar display item), you can wear a scarf over it using this easy folding method. First, place the scarf over the shoulders of the mannequin (or wrap it around the stand) so that it hangs down on either side.
 - Note that this style will suit you too - our instructions will help you to beautifully show the scarf on the mannequin, but after completing them, you can easily wear the scarf in this way on yourself.
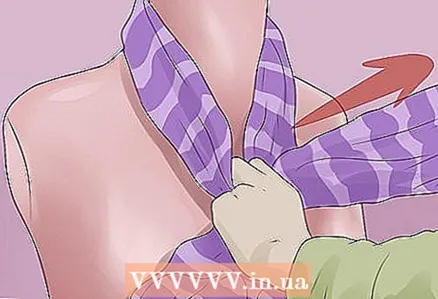 2 Flip the right side over the left. The scarf should now hang roughly the same on each side of your mannequin. Grasp the end of the scarf on the right and pull it through the end on the left. The scarf will fold into an X.
 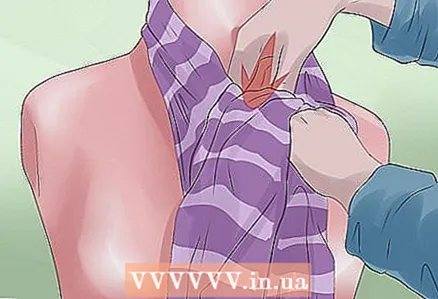 3 Run the end of the scarf underneath and over the top of the loop. Then take the right end of the scarf that you moved in the last step. Tuck it up and down the left end. Let the tail hang over the top of the loop you just formed. You should now have a very loose knot or tie around the center of the mannequin's chest.
  4 Tie a knot however you like. At this point, you can pull on either end of the scarf to tighten the center knot. While doing this, try to keep both ends of the scarf at approximately the same level to maintain symmetry.
Tips
- Pet lovers, be careful: If you have a cat or dog, do not fold these folds next to them. Animals love to gnaw, scratch, and bite the ends of the scarf while you try to fold it.


