Author:
Mark Sanchez
Date Of Creation:
8 January 2021
Update Date:
1 July 2024

Content
- Steps
- Method 1 of 4: Fixed Angle (45 Degree) Inclinometer
- Method 2 of 4: Using a Fixed Angle Inclinometer
- Method 3 of 4: Protractor Inclinometer
- Method 4 of 4: Using a Protractor Inclinometer
- Tips
- Warnings
- What do you need
An inclinometer, also called a clinometer, is an instrument that measures the vertical inclination, i.e. the angle between the earth's surface on which the observer is located and the top of a tall object, such as a tree or building. This angle is sometimes called the ascent angle. The inclinometer can also measure the angle of descent in relation to the low point when the observer is at an altitude. Inclinometers are widely used in astronomy, surveying, engineering and forestry. You can purchase a clinometer from a store, but it is very easy to make yourself. In this article you will find a detailed guide to making an inclinometer yourself.
Steps
Method 1 of 4: Fixed Angle (45 Degree) Inclinometer
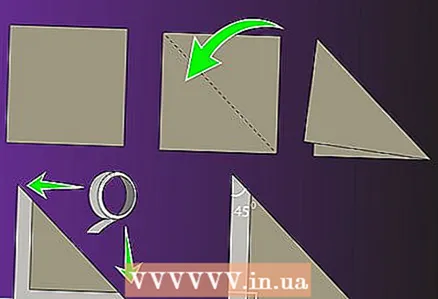 1 Fold a square piece of paper in half diagonally. You will end up with a right-angled triangle with one 90-degree angle and two 45-degree angles. Glue both halves of the sheet with glue or tape them together so that the sheet does not straighten out in the future. Please note: the inclinometer will last longer if you use heavier paper, such as cardboard or whatman paper. The sheet should be square so that both sides of the triangle (called legs) are of equal length.
 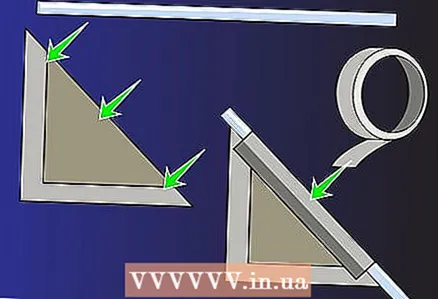 2 Attach a drinking straw to the hypotenuse. Place the straw along the hypotenuse (the longest side of the triangle) so that one tip protrudes slightly from under the paper, and secure it in this position with tape or glue. Through this straw you will be looking. Be careful not to bend it, and also make sure it is straight along the hypotenuse.
  3 Poke a small hole in the paper near the corner between the hypotenuse and the leg. Naturally, the hypotenuse forms an angle with both legs. Better to pierce the corner where the straw protrudes less from under the paper. This angle will be the tip of the inclinometer.
  4 Pass a string or string through the pierced hole and tie it in a knot or tape to prevent it from slipping out of the hole. Use a string that is long enough so that the free end hangs below the tip of the inclinometer by at least 10 centimeters (several inches).
 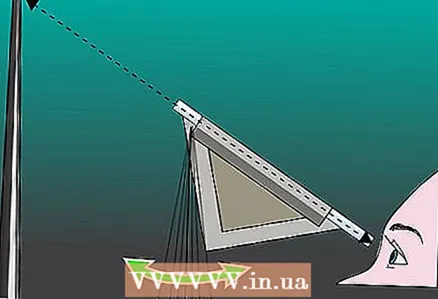 5 Tie a washer or other small weight to the free end of the thread. This sinker should hang 7-10 centimeters (a few inches) below the bottom edge of the inclinometer in order to swing freely. Covering one eye, look with the other through a straw at the top of some tall object (tree, tower, etc.).
 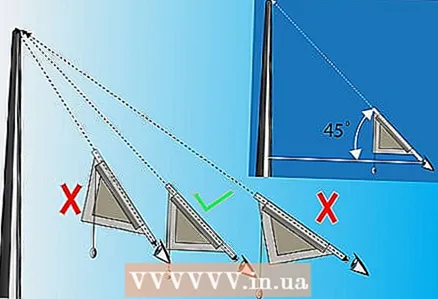 6 By looking at the top of an object through a straw, you can move closer or further away from it. In this case, the thread with the weight is always vertical, and as soon as it becomes parallel to one leg of the inclinometer and perpendicular to the second, this will mean that the angle of rise at this point is 45 degrees. In other words, the angle between the line that connects your eye to the top of the object (the hypotenuse line) and the horizontal line (the earth's surface) is 45 degrees.
Method 2 of 4: Using a Fixed Angle Inclinometer
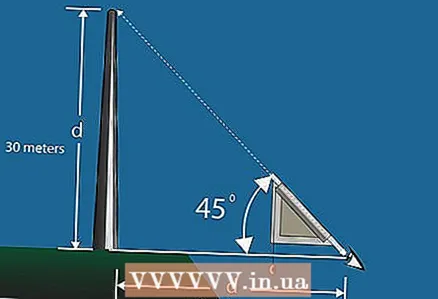 1 Measure pole height. Distance d from a point with an angle of rise of 45 degrees to the base of the vertical pole is equal to the height of this pole (i.e. the height of the pole is also equal to d), since two legs in any right-angled triangle with angles of 45-45-90 degrees are always equal. Let's say you measured d (the distance from the point of observation to the base of the pole), and it turned out to be 30 meters - in this case, the height of the pole will also be 30 meters.
 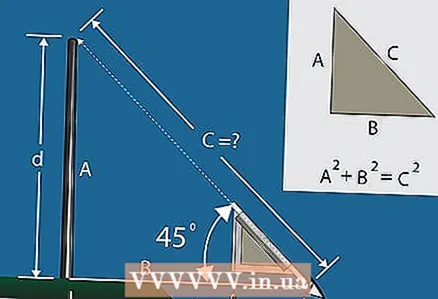 2 Find the length of the cable stretched at an angle of 45 meters to the ground (parallel to the hypotenuse of the inclinometer). This is the distance from the 45-degree elevation point to the top of the pole. Use the Pythagorean theorem (A + B) = C, where A and B are the lengths of the legs of a right-angled triangle.
 - (A + B) = C, and since A = d and B = d.
- (d) + (d) or = (d X d) + (d X d) = C.
- Make sure you square the lengths d (or, equivalently, multiply d x d) before than to fold them.
- Take the square root of C for the length of your cable.
- If the distance to the base of the pole is 30 meters, then
- 30 + 30 or = (30 X 30) + (30 X 30) =
- 900 + 900 = 1800.
- Now, using the calculator, we extract Square root out of 1800 =
- approximately 42.4 meters. Cable length - 42.4 meters.
Method 3 of 4: Protractor Inclinometer
 1 Take the right angle protractor (180-angle protractor).
 2 Tape a drinking straw near the straight edge of the protractor so that it crosses both the zero marks and the hole.
 3 Pass the thread through a small hole on a 90-degree line exactly in the middle and perpendicular to the line joining the two zero marks of the protractor. If the protractor does not have a hole in this place, or if the hole is not located there (this often happens with cheap protractors), pierce it in the right place, or simply attach the thread to it with tape or glue. It is necessary that the thread hangs below the protractor by 10 centimeters (several inches).
 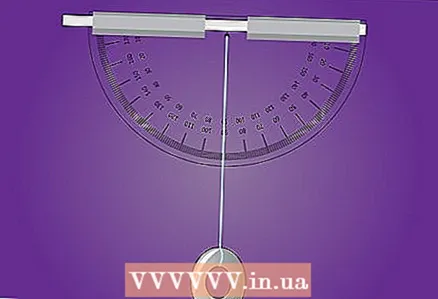 4 Attach a washer or other small weight to the free end of the thread.
 5 Take a look at the top of the tall object through a straw.
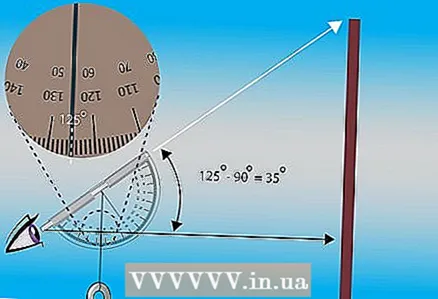 6 Note the angle of the protractor at which the thread crosses its scale - this will be the angle of elevation between your eye and the observed vertex of the object. On most transports, two scales are indicated, in this case the angle you need will be equal to the difference between bOin larger numbers and 90 degrees. Note that if you are too close to an object, the elevation angle will approach 90 degrees, but it cannot exceed this value. 90 ° is if you are looking straight up.
Method 4 of 4: Using a Protractor Inclinometer
 1 With a 30 degree ascent angle, the corresponding descent angle is also 30 degrees.
- Suppose you are in a boat among a lake or sea and observe a rock on the shore, looking up at it (ascent angle). At the same time, someone standing on top of the cliff will look down at your boat (descent angle).

- For example: shooting from a weapon from a boat at the top of the cliff will be done at the ascent angle, and shooting from the top of the cliff at the boat at the angle of descent.
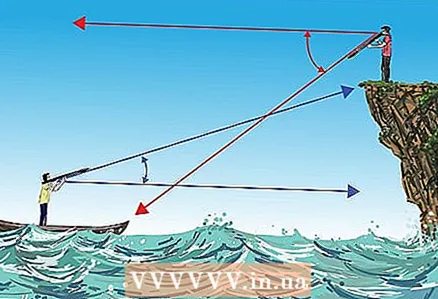
- Imagine this situation: at an angle of elevation of 40 °, you can shoot upward with a small weapon, and you can further increase the angle of fire by swimming closer to the rock, while firing back fire from the rock from a massive weapon (tank, fortress gun, etc. .) will be difficult or even impossible at such large angles of descent (for example, a turret tank will not be able to lower its cannon to a large angle).

- Suppose you are in a boat among a lake or sea and observe a rock on the shore, looking up at it (ascent angle). At the same time, someone standing on top of the cliff will look down at your boat (descent angle).
Tips
- It is much easier to use the inclinometers described above if there are two of you. In this case, one person observes the object through a straw, and the second fixes the position of the thread.
- Once you know the elevation angle, you can determine the height of the observed object.
Warnings
- If you need more accuracy in determining the angle, use an electronic inclinometer.
- If the earth's surface is uneven (the object is elevated or deeper than the observation point), or the object is tilted, your calculations will be inaccurate without considering these factors.
What do you need
- A sheet of paper (or protractor)
- Drinking straw or metal tube
- Thread (twine)
- Washer or sinker for fishing


