Author:
Joan Hall
Date Of Creation:
28 July 2021
Update Date:
1 July 2024
Content
- Method 2 of 3: Mixing different colors of varnishes
- Method 3 of 3: Using the Kit to Create Your Own Nail Polish
- Tips
- Warnings
- What do you need
- Application of colorless varnish and eyeshadow
- Mixing varnishes of different colors
- Using the kit to create your own nail polish
 2 Crush the eyeshadow in a zip-lock bag. If you have powder eyeshadow skip this step. However, the compressed eyeshadow will need to be crushed beforehand. Place them in a zip-lock bag and knead with a spoon, makeup brush handle, or rolling pin. Work until you get a fine, homogeneous powder without lumps.
 - Complete this step well. If the powder is not sufficiently homogeneous, then when it gets into a colorless varnish, it will not mix well with it.
- Be careful not to accidentally pierce the bag.
3 Cut off one corner of the bag. You need to create a small hole in the bag, so only cut off the very corner of the shadow bag. - Alternatively, you can make a small paper funnel and pour the eye shadow from the bag into the bottle of varnish through it.
4 Pour the eyeshadow into a bottle of clear nail polish. Open the bottle of colorless nail polish. It only needs to be three-quarters full or less to leave room for shadows. Place the cut corner of the bag over the neck of the bottle, but don't dip it into the varnish. - The amount of shadows added to the varnish will depend on how rich and dark the varnish color you want to create. Add shadows little by little until you get the tone you want.
- Alternatively, you can use white nail polish for a less translucent colored nail polish.
5 Replace the cap of the vial and shake it. Shake the vial until the contents are evenly colored. To prevent the ingredients of the varnish from straying, shake the bottle regularly, especially before direct use. If possible, buy small steel balls for mixing ingredients, or take balls from bearings and add one or two balls to the bottle of varnish. - The steel balls help to mix the varnish and increase its shelf life. Special balls for mixing varnish can be purchased through online stores in the amount of one hundred pieces at a price of just over one hundred rubles.
- Some eyeshadow will make the polish look very matte. If that doesn't quite suit your style, simply dab a clear glossy finish on top of your painted nails to keep them smooth and shiny.
Method 2 of 3: Mixing different colors of varnishes
 1 Take at least two polish colors. It's best to experiment with cheap varnishes in case the result is not what you imagine it to be. However, varnishes of similar composition should be mixed, for example, two varnishes of the same brand. Choose colors that guarantee good mixing results.
 - For example, take a silver glitter polish and a deep purple polish.
- Alternatively, you can give the orange varnish a richer color by adding a little red and yellow varnish.
- 2 Pour some of the first nail polish into a small plastic cup. Start with a darker color and add a lighter color to it. Alternatively, you can use a paper plate to mix the varnishes, but then it will be more difficult for you to pour the finished varnish into the bottle.
- 3 Add a little varnish of a different color there and mix. If you're mixing multiple colors, add the rest of the varnish to the cup as well. Use a nail polish brush, paint brush, or toothpick to blend colors.
- Correct the resulting color by adding a little more of the specified varnish to the cup and mixing again.
- You can even add glitter to the polish to give it a shine.
 4 Store new polish in its own bottle. Pour the contents of the cup into a clean, empty nail polish bottle. If you have steel mixing balls or bearing balls, add one or two to the bottle to help mix the polish before applying to your nails.
Method 3 of 3: Using the Kit to Create Your Own Nail Polish
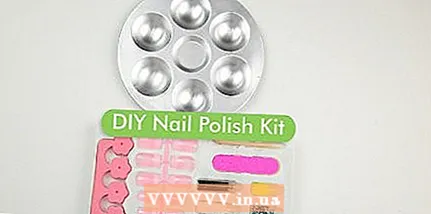 1 Choose the appropriate set. Some companies, such as D'legend, make special DIY varnish kits that include dyes, glitters, varnish base and scoop, funnel and palette accessories. The price for such sets ranges from 1.5-2.5 thousand rubles. Try to find a suitable kit in a cosmetics store or order one from an online store.
 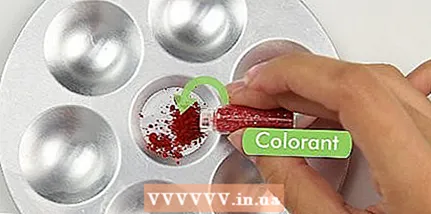 2 Pour the dye into the palette. Open the jar with the dye you are going to use. Pour some dye powder into a separate compartment on the palette.
 - 3 Open the bottle of varnish base and insert a funnel into its neck. The set usually contains several bubbles at once with a base for varnish, one of which you should use. A small funnel should also be available.
- 4 Add the dye to the base, screw on the cap and shake. Using the supplied scoop, pour the dye through the funnel into the base. Then remove the funnel from the vial and screw the cap back on. Shake the bottle vigorously to mix the color with the base.
- 5 Adjust the color if desired. If you are not satisfied with the resulting color, open the bottle and add more of the required dye to it. Close the lid again and shake the vial. Continue working until you create the perfect shade.
Tips
- Write down the names of colors, brands and the number of shadows used, so that later you will have the opportunity to repeat the experiment if you manage to create your favorite varnish color.
- If you don't feel like ruining an entire bottle of clear nail polish, mix some nail polish and eyeshadow in a one-to-one ratio in a small container, such as a spice jar or empty makeup container. Stir the ingredients with a toothpick and apply the resulting polish to your nails with a painting brush.
Warnings
- Keep nail polish out of reach of children and pets.
What do you need
Application of colorless varnish and eyeshadow
- Eyeshadow of your choice
- Zip bag
- Spoon, makeup brush or rolling pin
- Scissors
- A bottle of colorless or white nail polish (three-quarters full or less)
- 1 or 2 small steel balls from the bearing
Mixing varnishes of different colors
- Nail polish in two or more different colors
- Plastic cup for mixing varnishes
- Varnish brush, painting brush, or toothpick
- Clean empty bottle of nail polish
- 1 or 2 small steel balls from the bearing
Using the kit to create your own nail polish
- One set to create your own nail polish


