Author:
Florence Bailey
Date Of Creation:
19 March 2021
Update Date:
1 July 2024

Content
Looking for the best way to dress up your Halloween decor? Do you "miss" the main part of your next Halloween party? Try to build this little coffin. It's reliable enough to host kids in costume and guests who are dying to attend your party. Since it is made of plywood, it can be reused for the next Fear Festival and is easy and cheap to build.
Steps
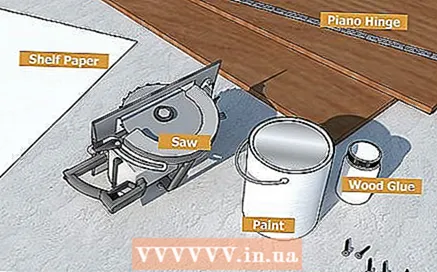 1 Collect materials (see. "What you need" below). All materials are inexpensive and can be purchased at your local hardware store.
  2 Create your template. Use plywood or other large pieces of paper (plain white back of gift wrapping, or newspaper rolls if you're saving money) and glue the pieces together so that you have one sheet large enough to fit the design for the coffin. Note that this is not a template for a base, which will be slightly smaller, but rather a template for a coffin with sides attached to the outer edges of the base. This template will allow you to get the correct dimensions for the sides of the coffin and the correct angles to trim. See Figure 1 for the dimensions of the coffin. Using a racer or carpenter's square, first draw two perpendicular lines in the middle. Then draw the top and bottom sides, at the end connect the end points of the lines to form the sides as shown.
 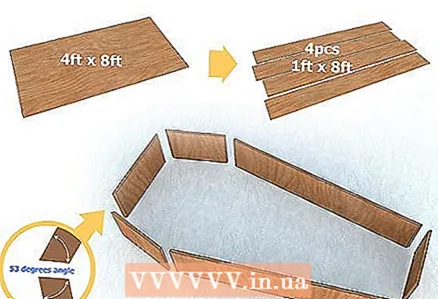 3 Cut off the sides of the coffin. The sides of the coffin will be 0.3 m high, so take one of the 1.2 x 2.4 m plywood panels and cut it lengthwise into four 0.3 x 2.4 m pieces (you will need three of these to creation of parties). Use a circular saw to cut the sides according to the measurements in figure 1. Make sure you cut the edges of the sides at the correct angles so that they line up. For example, the side at the top of the "coffin" should be 60 cm (0.6 m) wide, and the edges should be trimmed at 53 degrees.
  4 Draw a template for the base of the coffin. The side panels will be nailed to the outside edges of the base, so the base is slightly smaller (2cm less on each side if you are using 2cm thick plywood) than the outline you drew earlier. Glue the pieces of paper together as you did in step 2 and draw the base - again draw two perpendicular lines - according to the dimensions in Figure 2.
  5 Cut out the base of the coffin. Attach the paper template to the remaining 1.2 x 2.4m plywood sheets so that the top of the widest area of the coffin touches the edge. Use a circular saw to cut the base of the coffin from the template.
  6 Cut out the coffin lid (optional). Use this step only if you want a coffin lid. Place the base on what is left of the 1.2 x 2.4 m sheet of plywood so that it fits exclusively on the wood. Circle around the edges and then remove the base. Cut out the top of the coffin along the line you drew.
 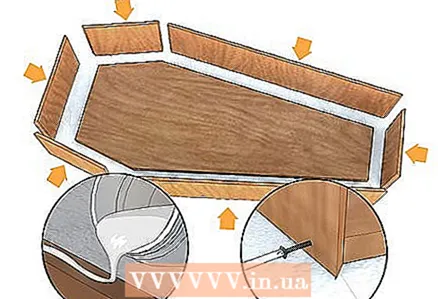 7 Collect the coffin. Now it's time to put everything together.
 - Fit the sides of the coffin together and towards the base. Just substitute the sides to make sure they fit together before glueing the pieces together.
- Glue or screw the side panels to the base and to each other. The bottom edge of each side panel should be flush with the bottom of the base. Screw 50cm screws through the side panels and into the base, and use glue, screws, or plywood butt caps to secure the sides together.
 8 Finish the coffin. If there are any holes or dents in your plywood, fill them with wood plugs or filler. After that color the tree or paint it however you like. You can be as creative as you like with your design. If you want, you can line the inside of the coffin with drapery or other fabric, you don't have to worry about staining the inside. Just glue the fabric to the inside.
  9 Attach the coffin lid. If you are using the coffin for funeral purposes, you can simply nail down the lid. Or, attach hinges to one of the long edges of the coffin and pull the rod towards the lid.
Tips
- Hiding in it (make it soft), or opening the lid and sitting in it when you hear someone approaching, will make them freak out.
- You can sprinkle flour and debris on the coffin to give it an ancient look, and hang artificial spider webs to add more fear to its look.
- Cover all screw holes for additional reinforcement.
- When carving wood, make sure you select the correct blade when installing according to the instructions. For example, to trim strips 30 centimeters wide, you will probably need to set at 31 centimeters.
- This coffin can be easily converted into a bookcase by adding shelves. See the source page mentioned below for specific instructions.
- This design can be expanded (for a larger coffin), or it can be made smaller (for a pet coffin, for example) by shrinking or enlarging it. As long as the dimensions are proportional, the corners will remain the same.
- Plywood is great for supporting the holiday, but if you want to make a coffin for "more serious" purposes, you'll need natural wood. A wide variety of trees are used to create the coffin, including pine, oak, and cedar.
- Dress up like a vampire.
Warnings
- Be careful when using a saw or other tools. Follow the manufacturer's instructions and heed all warnings.
- Use paint, varnish or paint only in a well-ventilated area. Follow the manufacturer's instructions and warnings.
What do you need
- Two 1.2 x 2.4 m sheets of 2 cm plywood (or other suitable wood if desired)
- Circular saw (or a regular wood saw if desired [this will take longer])
- Wood glue and 50 cm screws
- Thick paper or other large sheets of paper
- 1.2m piano hinge for opening the lid
- Wood plugs and / or wood filler
- Cloth or drape (optional)
- Wood paint or regular paint


