Author:
Sara Rhodes
Date Of Creation:
18 February 2021
Update Date:
28 June 2024
![How To Transfer iTunes Library To A New Computer [Tutorial]](https://i.ytimg.com/vi/Dy-FW7R0zKY/hqdefault.jpg)
Content
- Steps
- Method 1 of 3: Method One: Using Home Sharing
- Method 2 of 3: Method Two: Using an External Hard Drive
- Method 3 of 3: Method Three: Using iTunes Match
So you have acquired a new computer and are waiting for how to get into it? So how, one wonders, to enjoy a computer without music? The entire iTunes library is still on the old one, but it's not difficult to transfer everything to a new computer, in this article you will learn how to do it.
Steps
Method 1 of 3: Method One: Using Home Sharing
 1 Check if you have met the requirements for the so.n. "Home sharing". To use home sharing between two computers, you need to: install iTunes on both computers, both computers must be connected to the same home network (wired or WiFi), and you also need to have an Apple ID linked to your iTunes account.
  2 Open iTunes on both computers. Make sure 1) both are online and 2) both have the latest version of iTunes.
 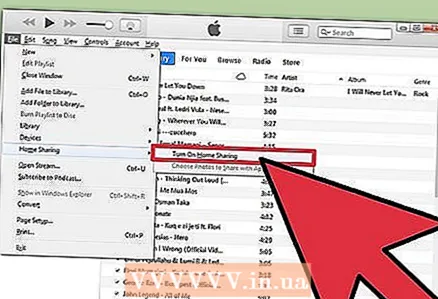 3 On the first computer, select the "Home Sharing" icon. It is located in the left menu, in the same place as "Music". If the “home sharing” icon is not there, click on the File menu and then select home sharing. Select "enable home sharing".
 - If home sharing is not enabled on both computers, this icon will not appear.
 4 Enter your Apple ID and password. After entering this information, click on the "Create Home Sharing" button.
  5 Authorize the second computer. On the computer you are transferring the library to, click on the storage menu and select "authorize computer". The program will ask you to enter your Apple ID and password.
  6 Select the "home sharing" icon on the left. All libraries on the first computer will be listed under the icon. Select what you want to copy, or click "edit" and select "select all" to copy everything at once.
 - You can copy individual files, playlists, or the entire library.
 7 Click on the "import" button. Copying files to the new computer starts. Copying will take some time, depending on the size of the library and the speed of the network.
Method 2 of 3: Method Two: Using an External Hard Drive
 1 Consolidate your entire iTunes library. Before copying all the files to your external hard drive, you can make things much easier by simply collecting them into one folder.
 - Open "preferences". On a Mac, click iTunes and then select "preferences." On Windows, respectively, click "edit" and then select "preferences".
- Click on the "other" tab. Mark where the iTunes Media folder is located on your computer. Close the "preferences" window.
- Click on the file and drag the cursor to the Library. Select "organize library", then "consolidate files". A message will appear stating that all files will be copied to the iTunes Media folder and this is irreversible.
- Click "Consolidate". The library files will be copied from their folders to the iTunes Media folder. If the library is large, this may take a while.
 2 Connect an external hard drive. There should be enough space on it to burn the entire iTunes Media folder. The size of a folder can be checked by right-clicking on the folder and selecting "properties".
 - Make sure your external hard drive is formatted. Mac formatted hard drives only work on Mac, f Windows formatted hard drives can be used on both Windows and Mac.
- You can use an iPod or iPhone, of course, if there is enough free space.
 3 Click on the iTunes Media folder and drag it to your external hard drive. You can find out where the iTunes Media folder is in Step 1. Copying files to your external hard drive will begin. The larger the library, the longer it will take.
  4 Unplug your external hard drive. At the end of the copying process, right-click on the hard drive and click "disconnect". You can now safely disconnect the hard drive from your computer.
  5 Open iTunes on the second computer. Follow the instructions in Step 1 to locate the iTunes Media folder. Connect an external hard drive with iTunes library to your computer.
 - If you already have some music on this computer and you would like to keep it, make a copy and save it somewhere else on your computer, at least on your desktop.
 6 Copy the iTunes folder from your hard drive. Replace the existing iTunes folder. The larger the library, the longer it will take to copy. When copying is complete, iTunes will automatically reload all information for songs, ratings, playlists, and other settings.
 - If you need to add an existing library back to iTunes, click "file" and select "add folder to library". Navigate to the folder where you want to add music and click OK. This should be done after the library has finished loading from the hard disk.
Method 3 of 3: Method Three: Using iTunes Match
 1 Register for iTunes Match. You must pay an annual fee to use iTunes Match.This service stores all music files through iCloud, including all files that you did not purchase through iTunes, including files from disks and files downloaded from somewhere. If you have a lot of music that you did not buy through iTunes, then the service will be very useful.
 - To register for iTunes Match, click on the Store menu and select “Enable iTunes Match”. After that, you will need to enter your Apple ID and password, after which you will be taken to the order page.
- iTunes Match will only download songs that it doesn't match in your iTunes library. If a match is found, then this file takes the place of the one that would have been uploaded. This speeds up the download process and you get better versions of songs (or lower quality if the original was super high quality).
 2 Wait while iTunes Match scans your library. When you finish searching for matches between songs in your library and those available in iTunes, the remaining songs will be uploaded to iCloud. You can store up to 25,000 files, as well as all those songs for which matches were found.
 - If you have a lot of songs without matches, the upload process will take a significant amount of time. The speed of the process also depends on the speed of your internet connection.
 3 You can access the songs through any iTunes registered to you. When all matches are found and everything is uploaded, you will see an iCloud icon next to each song. In the future, songs will work by default, but by clicking on the icon next to a song, you can also download it.
 - Using your iPhone, you can access iTunes Match by going to Settings, selecting Music, and toggling the iTunes Match slider.
- The iTunes used to access songs must be authorized on the Apple ID.


