Author:
Mark Sanchez
Date Of Creation:
4 January 2021
Update Date:
27 June 2024
Content
- Steps
- Method 1 of 4: Upgrade instructions for a 32-bit system:
- Method 2 of 4: Upgrade instructions for a 64-bit system:
- Method 3 of 4: Editing the System File:
- Method 4 of 4: Point the system to an updated version of Oracle Java:
- Optional: How to enable Oracle Java in your browser
- Google chrome
- Instructions for a 32-bit system:
- Instructions for a 64-bit system:
- Reminders:
- Mozilla Firefox
- Instructions for a 32-bit system:
- Instructions for a 64-bit system:
- Reminders:
This article will teach you how to upgrade Oracle Java JDK / JRE on Ubuntu Linux. Oracle releases Java JDK / JRE updates frequently to address bugs and improve security.
- Attention: This article assumes that you already have a 32- or 64-bit version of Oracle Java 7 installed located in / usr / local / java and would like to upgrade to the latest versions of Oracle Java. If not, read the following article:
- How to Install Oracle Java on Ubuntu Linux
Steps
 1 Download the binaries of the new Oracle Java. Make sure to select the appropriate binaries for your Ubuntu Linux system (32- or 64-bit) (they have the tar.gz extension):
 - jdk-7u40-linux-i586.tar.gz (32-bit)
- jre-7u40-linux-i586.tar.gz (32-bit)
- or
- jdk-7u40-linux-x64.tar.gz (64-bit)
- jre-7u40-linux-x64.tar.gz (64-bit)
Method 1 of 4: Upgrade instructions for a 32-bit system:
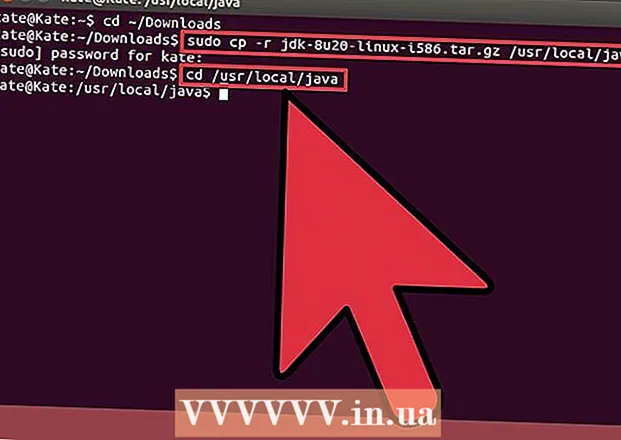
 1 Log in to the system and copy the downloaded Oracle Java archive binaries from the download folder to / usr / local / java
 - Type / Copy / Paste: cd / home /"your_user_name"/ Downloads
- Type / Copy / Paste: sudo cp -r jdk-7u40-linux-i586.tar.gz / usr / local / java
- Type / Copy / Paste: sudo cp -r jre-7u40-linux-i586.tar.gz / usr / local / java
- Type / Copy / Paste: cd / usr / local / java
 2 Next, unpack the binaries of the new version to / usr / local / java
 - Type / Copy / Paste: sudo tar xvzf jdk-7u40-linux-i586.tar.gz
- Type / Copy / Paste: sudo tar xvzf jre-7u40-linux-i586.tar.gz
Method 2 of 4: Upgrade instructions for a 64-bit system:
 1 Log in to the system and copy the downloaded Oracle Java archive binaries from the download folder to / usr / local / java
 - Type / Copy / Paste: cd / home /"your_user_name"/ Downloads
- Type / Copy / Paste: sudo -s cp -r jdk-7u40-linux-x64.tar.gz / usr / local / java
- Type / Copy / Paste: sudo -s cp -r jre-7u40-linux-x64.tar.gz / usr / local / java
- Type / Copy / Paste: cd / usr / local / java
 2 Next, unpack the binaries of the new version to / usr / local / java
 - Type / Copy / Paste: sudo tar xvzf jdk-7u40-linux-x64.tar.gz
- Type / Copy / Paste: sudo tar xvzf jre-7u40-linux-x64.tar.gz
- 3At this point, in / usr / local / java, you should have two new folders for Java JDK / JRE called:
jre1.7.0_40
Together with:
jdk1.7.0_25
jre1.7.0_25

Method 3 of 4: Editing the System File:
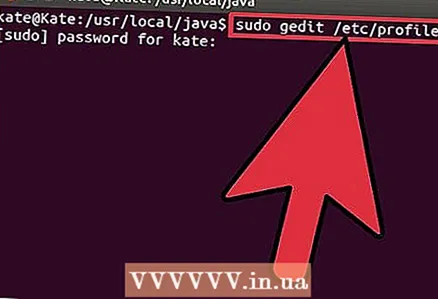 1 Edit the system file / etc / profile and add the following system variables. As root, use gedit, nano or any other text editor to open / etc / profile
 - Type / Copy / Paste: sudo gedit / etc / profile
- or
- Type / Copy / Paste: sudo nano / etc / profile
- 2Go to the end of the / etc / profile file and add the following lines at the very end (you will now change the Oracle Java version numbers from old to new; you do this in the system / etc / profile file):
Edit the / etc / profile file:
JAVA_HOME = / usr / local / java /jdk1.7.0_25
PATH = $ PATH: $ HOME / bin: $ JAVA_HOME / bin
JRE_HOME = / usr / local / java /jre1.7.0_25
PATH = $ PATH: $ HOME / bin: $ JRE_HOME / bin
export JAVA_HOME
export JRE_HOME
export PATH
Change to:
JAVA_HOME = / usr / local / java /jdk1.7.0_40
PATH = $ PATH: $ HOME / bin: $ JAVA_HOME / bin
JRE_HOME = / usr / local / java /jre1.7.0_40
PATH = $ PATH: $ HOME / bin: $ JRE_HOME / bin
export JAVA_HOME
export JRE_HOME
export PATH
Save the file and close it

Method 4 of 4: Point the system to an updated version of Oracle Java:
 1 Point the system to the location of the updated version of Oracle Java JRE / JDK (the system will now switch to Oracle Java 1.7.0_40):
- Type / Copy / Paste: sudo update-alternatives --install "/ usr / bin / java" "java" "/ usr / local / java /jre1.7.0_40/ bin / java "1
- Type / Copy / Paste: sudo update-alternatives --install "/ usr / bin / javac" "javac" "/ usr / local / java /jdk1.7.0_40/ bin / javac "1
- Type / Copy / Paste: sudo update-alternatives --install "/ usr / bin / javaws" "javaws" "/ usr / local / java /jre1.7.0_40 / bin/ javaws "1
 2 Tell your system that Oracle Java JRE 1.7.0_40 will be the new default Java version.
- Type / Copy / Paste: sudo update-alternatives --set java / usr / local / java /jre1.7.0_40/ bin / java
- Type / Copy / Paste: sudo update-alternatives --set javac / usr / local / java /jdk1.7.0_40/ bin / javac
- Type / Copy / Paste: sudo update-alternatives --set javaws / usr / local / java /jre1.7.0_40/ bin / javaws
 3 Reload the system file / etc / profile with the following command:
- Type / Copy / Paste: / etc / profile
- Note that the / etc / profile file will reload after a system reboot.
 4 Verify the correct installation of the new version of Oracle Java using the following commands (look at the number of the current Java version).
- Type / Copy / Paste: java -version
- this command will display on the screen the Java version number that is currently running
- Type / Copy / Paste: java -version
 5 You will see the following message:
- java version "1.7.0_40"
Java (TM) SE Runtime Environment (build 1.7.0_40-b08) Java HotSpot (TM) 64-Bit Server VM (build build 25.1-b02, mixed mode) - Type / Copy / Paste: javac -version
- This command lets you know that you can now compile Java programs in the terminal.
- You will see the following message:
- javac 1.7.0_40
- java version "1.7.0_40"
 6 You can now uninstall the old version of Oracle Java JDK / JRE by deleting the old version file folders.
- Type / Copy / Paste: cd / usr / local / java
- Type / Copy / Paste: sudo rm -rf jdk1.7.0_40
- Type / Copy / Paste: sudo rm -rf jre1.7.0_40
 7 Reboot the system and it will be ready to work with Java programs.
Optional: How to enable Oracle Java in your browser
- To enable the Java plugin in your browser, you must link from the browser plugins folder to the location of the Java plugin included with your Oracle Java distribution.
Google chrome
Instructions for a 32-bit system:
- Enter the following commands.
- Type / Copy / Paste: sudo mkdir -p / opt / google / chrome / plugins
- This will create a folder / opt / google / chrome / plugins
- Type / Copy / Paste: cd / opt / google / chrome / plugins
- This will take you to the google chrome plugins folder; make sure you are in this folder before creating the link.
- Type / Copy / Paste: sudo ln -s /usr/local/java/jre1.7.0_40/lib/i386/libnpjp2.so
- This will create a link between Java JRE (Java Runtime Environment) plugin libnpjp2.so and Google Chrome browser
- Type / Copy / Paste: sudo mkdir -p / opt / google / chrome / plugins
Instructions for a 64-bit system:
- Enter the following commands.
- Type / Copy / Paste: sudo mkdir -p / opt / google / chrome / plugins
- This will create a folder / opt / google / chrome / plugins
- Type / Copy / Paste: cd / opt / google / chrome / plugins
- This will take you to the google chrome plugins folder; make sure you are in this folder before creating the link.
- Type / Copy / Paste: sudo ln -s /usr/local/java/jre1.7.0_40/lib/amd64/libnpjp2.so
- This will create a link between Java JRE (Java Runtime Environment) plugin libnpjp2.so and Google Chrome browser
- Type / Copy / Paste: sudo mkdir -p / opt / google / chrome / plugins
Reminders:
- Attention: Sometimes, when entering the above commands, the following message may appear:
- ln: creating symbolic link `./libnpjp2.so’: File exists
- To fix this error, remove the previous link with the following command:
- Type / Copy / Paste: cd / opt / google / chrome / plugins
- Type / Copy / Paste: sudo rm -rf libnpjp2.so
- Make sure you are in the / opt / google / chrome / plugins folder before entering this command.
- Restart your browser and open Java Tester to test if Java is working correctly in your browser.
Mozilla Firefox
Instructions for a 32-bit system:
- Enter the following commands.
- Type / Copy / Paste: cd / usr / lib / mozilla / plugins
- This will take you to the / usr / lib / mozilla / plugins folder; if such folder does not exist, create it
- Type / Copy / Paste: sudo mkdir -p / usr / lib / mozilla / plugins
- This will create the / usr / lib / mozilla / plugins folder; make sure you are in this folder before creating the link.
- Type / Copy / Paste: sudo ln -s /usr/local/java/jre1.7.0_40/lib/i386/libnpjp2.so
- This will create a link between Java JRE (Java Runtime Environment) plugin libnpjp2.so and Mozilla Firefox browser
- Type / Copy / Paste: cd / usr / lib / mozilla / plugins
Instructions for a 64-bit system:
- Enter the following commands.
- Type / Copy / Paste: cd / usr / lib / mozilla / plugins
- This will take you to the / usr / lib / mozilla / plugins folder; if such folder does not exist, create it
- Type / Copy / Paste: sudo mkdir -p / usr / lib / mozilla / plugins
- This will create the / usr / lib / mozilla / plugins folder; make sure you are in this folder before creating the link.
- Type / Copy / Paste: sudo ln -s /usr/local/java/jre1.7.0_40/lib/amd64/libnpjp2.so
- This will create a link between Java JRE (Java Runtime Environment) plugin libnpjp2.so and Mozilla Firefox browser
- Type / Copy / Paste: cd / usr / lib / mozilla / plugins
Reminders:
- Attention: Sometimes, when entering the above commands, the following message may appear:
- ln: creating symbolic link `./libnpjp2.so’: File exists
- To fix this error, remove the previous link with the following command:
- Type / Copy / Paste: cd / usr / lib / mozilla / plugins
- Type / Copy / Paste: sudo rm -rf libnpjp2.so
- Make sure you are in the / usr / lib / mozilla / plugins folder before entering this command.
- Restart your browser and open Java Tester to test if Java is working correctly in your browser.


