Author:
Randy Alexander
Date Of Creation:
3 April 2021
Update Date:
1 July 2024
Content
Depending on whether your network is a connection cable or a DSL service, the setup process will be different. Click here for instructions on setting up a wired network and click here for instructions on setting up a DSL connection. If you are unsure about the type of connection you use, you need to contact your network service provider.
Steps
Method 1 of 2: Set up a wired network
Plug the modem cable into the computer. Make sure your computer is located near a wall outlet.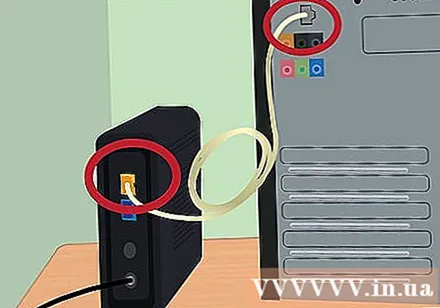

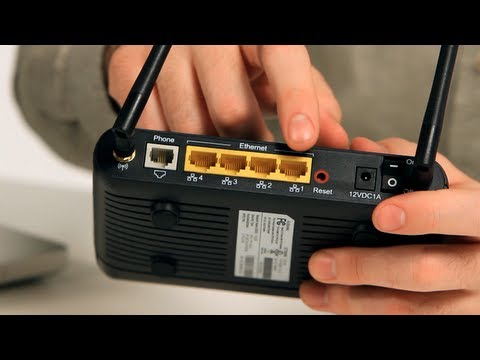
Plug the modem cable into the network wall outlet.
Plug the modem in. Most modulators do not have an On / Off switch. To turn on / off the device, you just need to plug and unplug it.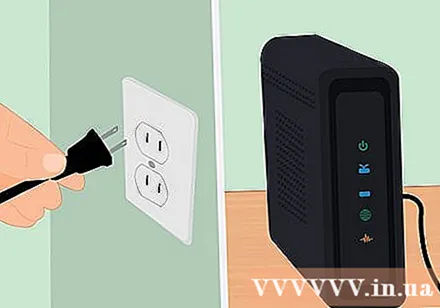
- Once enabled, the modem will go through the boot process. If the light on the modem is low and stops flashing, the device has finished booting. Usually only one lamp will continue to blink.
- Usually, it takes about 30-60 seconds for the modem to be fully turned on.
- If it's a new modem, you'll need to call your carrier and provide modem information as they won't be able to support it if the device isn't linked to your account. Look for the serial number and MAC address of the modem printed below or on the side of the modem.

Check internet connection. Open a browser and go to any website you have visited recently, the web page will be loaded from the cache. If the website is loaded successfully, you are able to access the network. If not, complete the rest of the process.- Searching for certain keywords on a search engine is also a good way to check the internet.
Method 2 of 2: Set up a DSL network
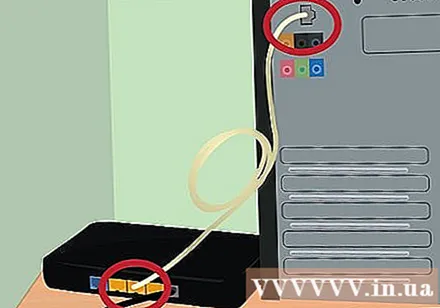
Plug the DSL modem into your computer. Make sure your computer is located near a wall outlet.
Plug the cable of the DSL modem into the network wall socket.
Plug in the DSL modem. Most modulators do not have an On / Off switch. To turn on / off the device, you just need to plug and unplug it.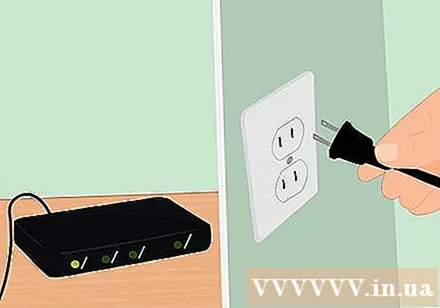
- Once enabled, the modem will go through the boot process. If the light on the modem is low and stops flashing, the device has finished booting. Usually only one lamp will continue to blink.
- Usually, it takes about 30-60 seconds for the modem to be fully turned on.
- For new modems, you'll need to call your DSL service provider to ask to associate the modem with the network user account and password. If you do not know this information, call your service provider to ask.
Log in to the modem administrator screen. Open a web browser. In the address field, enter the modem's IP address (usually printed on the device or in the user manual).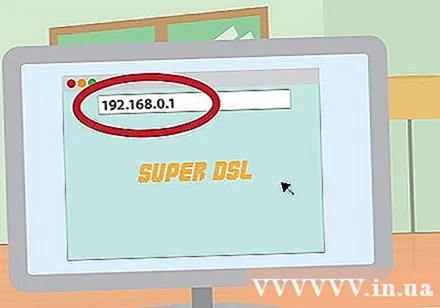
- Common IP addresses are 192.168.0.1 and 192.168.1.1. Click here to see a list of specific IP addresses.
Enter the DSL network user account and password. Once you are connected to the administrator screen of the modem, look for the PPPoE field. Enter your username and password in the PPPoE field. Username is usually an email address.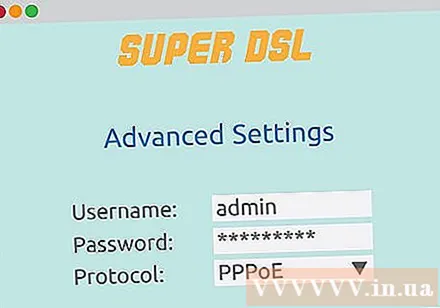
- If you do not know the user account name and password, contact your DSL operator.
Save settings. Save the settings after setup is complete. The internet light on the modem will turn green, indicating that you are online.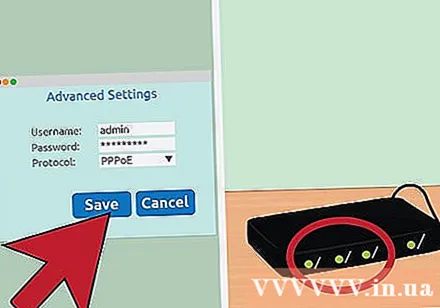
Check internet connection. Open a browser and go to something you have visited recently, the page will be loaded from the program memory. If the website is loaded successfully, you are able to access the network. If not, complete the rest of the process.
- Searching for certain keywords on a search engine is also a good way to check the internet.
IP addresses are some common modems and routers
- Alcatel SpeedTouch Home / Pro - 10.0.0.138 (no default password)
- Alcatel SpeedTouch 510/530/570 - 10.0.0.138 (no default password)
- Asus RT-N16 - 192.168.1.1 (default password is "admin")
- Billion BIPAC-711 CE - 192.168.1.254 (default password is "admin")
- Billion BIPAC-741 GE - 192.168.1.254 (default password is "admin")
- Billion BIPAC-743 GE - 192.168.1.254 (default password is "admin")
- Billion BIPAC-5100 - 192.168.1.254 (default password is "admin")
- Billion BIPAC-7500G - 192.168.1.254 (default password is "admin")
- Dell Wireless 2300 - 192.168.2.1 (extension.1 is * fixed *) router
- D-Link DSL-302G - 10.1.1.1 (Ethernet port) or 10.1.1.2 (USB port)
- D-Link DSL-500 - 192.168.0.1 (default password is "private")
- D-Link DSL-504 - 192.168.0.1 (default password is "private")
- D-Link DSL-604 + - 192.168.0.1 (default password is "private")
- DrayTek Vigor 2500 - 192.168.1.1
- DrayTek Vigor 2500We - 192.168.1.1
- DrayTek Vigor 2600 - 192.168.1.1
- DrayTek Vigor 2600We - 192.168.1.1
- Dynalink RTA300 - 192.168.1.1
- Dynalink RTA300W - 192.168.1.1
- Netcomm NB1300 - 192.168.1.1
- Netcomm NB1300Plus4 - 192.168.1.1
- Netcomm NB3300 - 192.168.1.1
- Netcomm NB6 - 192.168.1.1 (default username is "admin," default password is "admin")
- Netcomm NB6PLUS4W - 192.168.1.1 (default username is "admin," default password is "admin," default WEP key code is "a1b2c3d4e5")
- Netgear DG814 - 192.168.0.1
- Netgear DGN2000 - 192.168.0.1 (default username is "admin," default password is "password")
- Web Excel PT-3808 - 10.0.0.2
- Web Excel PT-3812 - 10.0.0.2


