Author:
Louise Ward
Date Of Creation:
8 February 2021
Update Date:
1 July 2024
Content
The chest muscles are the muscle groups that need to be noticed in any exercise program. A muscular body without proper pectoral muscles will look odd and out of proportion. For men as well as women, strong chest muscles make it easier for them to do everyday tasks, such as pushing heavy objects like lawn mowers. Most muscle groups such as thighs, calves, arms and abs can be easily exercised without weights or other equipment, but many people assume that chest training must also go to the gym. However, there are many chest exercises that you don't need to use equipment for, or just use furniture.
Steps
Method 1 of 3: Do push ups
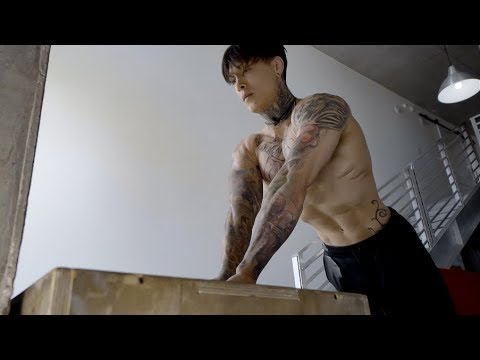
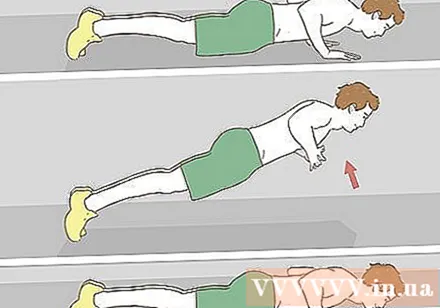
Basic push ups. There are many variations of push-ups that can help develop chest muscles, but for beginners, pushups are basically perfect. But when you start doing push ups, avoid lowering your chest too close to the ground. Lowering yourself too close to the floor can tear the shoulder muscles. You will gradually lower your body to the ground more during the exercise.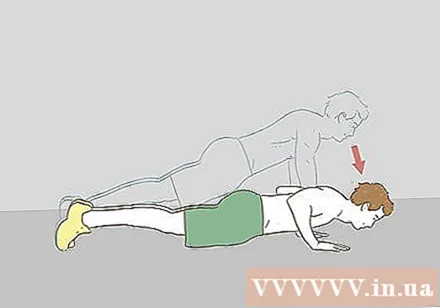
- Lie on your stomach with your hands on the floor just below your shoulders. Keep your back straight so that your feet and shoulders form a solid line.
- Fold your arms at a 90 degree angle, then straighten your arms and push your body upwards to complete a beat.
- Slowly, steadily raise and lower your body. Do as many times as possible.
- If you are just starting out, you may need to do push-ups with your knees on the floor, but keep your back and hips straight.
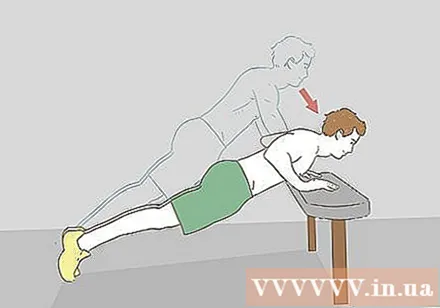
Do push up the slope. Similar to basic push ups, but rest your hands on furniture so that your body lies on its side, like a bench, chair, or desk.- Lie on your stomach with your hands on the bench. Keep your hands slightly wider than shoulder-width apart, feet hip-width apart, with your toes resting on the floor. Try to keep your back and legs as straight as possible.
- Then lower slowly and steadily so that the chest is only a few centimeters from the chair.
- Return to the starting position by straightening your arms and repeat.
- The uphill push-ups are an easy-to-practice variation that is great for beginners.
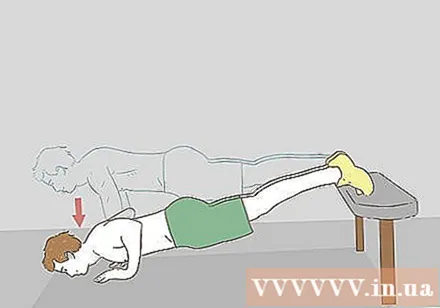
Anti-push down slope. Find a sturdy chair or bench that won't slip on the ground and can bear your weight. Then get into the basic pushup position but place your feet on the chair instead of the ground. Keep your back straight so that your feet and body form a line parallel to the floor.- Place the chair close to the wall for increased stability.
- Fold your arms at a 90 degree angle, then straighten your arms to push yourself upwards to complete a beat.
Anti-push clapping. To do clap pushups, start low in the basic pushup position. Then quickly pushed his hand up and knocked his body off the ground. Clap your hands on your chest or clap your hands together and then quickly bring your hands back to the starting position.- The clap push-ups are a harder push-up variation. Don't try this until you can do many basic push ups with ease.
One-leg push-ups. Start in a basic pushup position with your feet hip-width apart or wider. Raise one leg so it floats on the ground, then do the same as with a basic pushup.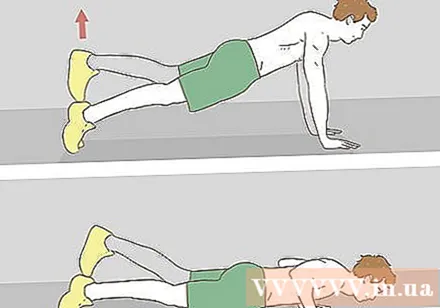
- After doing a few beats, switch legs. For example, try doing five push-ups with your left leg up, then another five with your right leg raised.
- Tighten your buttocks during exercise.
- If you want, you can do leg exercises in push-ups by bringing the knees of your outstretched legs toward your elbows while pushing up, and switching legs for each beat. Some people call this "reptile" or "lizard" push-ups.
- The wider your feet, the more difficult it is to do push ups because the more weight of your body is pushed back to one arm.
- Single-leg pushups are one of the toughest variations to do. It may take a while to practice this variation.
Anti-push backpack. If the basic pushups and its variations begin to get too easy, you can increase the weight and pressure of the movement to make the workout harder. A simple way is to wear a backpack when doing the exercises mentioned above.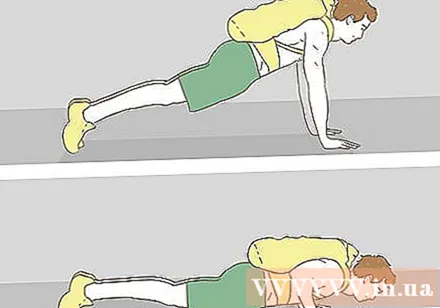
- You can gradually gain weight as your muscles grow by packing heavier objects in your backpack.
Method 2 of 3: Dip the biceps
Find something to support. This exercise is easiest with parallel bars in the gym. However, you can improvise with a sturdy chair. The stairs or the edge of the tub can also be used.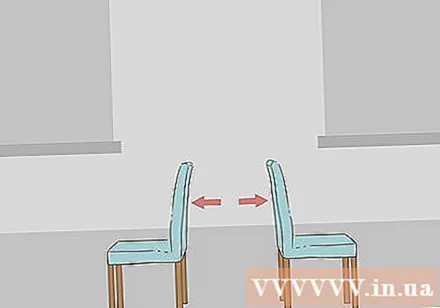
- Make sure the chair is sturdy and stable. If it breaks or moves while exercising, you could be injured.
- Do not try to work on hardwood floors or slippery surfaces that can cause the chair to slip easily.
Start dipping biceps. Sit on the edge of a chair or armrest. Place the heels of your hands on the edges of the chair, your fingers hug the edge of the chair. Lower yourself until your arms are at a 90 degree angle, then lift yourself up until arms are straight.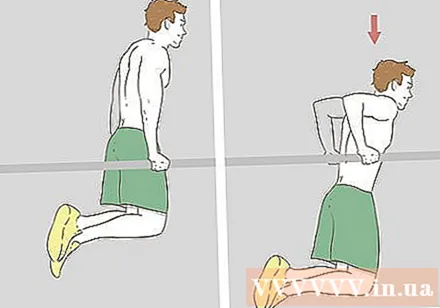
- Dipping your biceps is a great way to work out the inner chest muscles, which are less commonly practiced in push-ups.
- Beginners can practice biceps dipping by placing hands on the top of the chair, legs stretched out in front of and the back of the heels touching the floor.
- When you first start dipping, be careful how deep you want to dip. Gradually increase this range until you can lower your torso and form a 90 degree angle at your elbow. Never bend the elbow less than 90 degrees, otherwise shoulder injury may result.
Dip biceps when wearing a backpack. When conventional biceps dipping becomes easy, you need to increase the weight and pressure of the exercise. Wearing a backpack is an easy and simple way, and you can gradually increase the weight of your backpack to meet your training needs.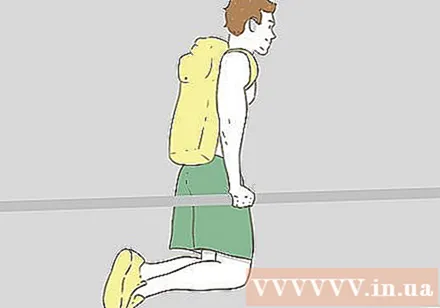
Change the position of your foot. You can increase the difficulty of the exercise by changing the position of your feet. The easiest way is to rest your feet on the chair. You can also lift one leg off the ground while dipping your arms. advertisement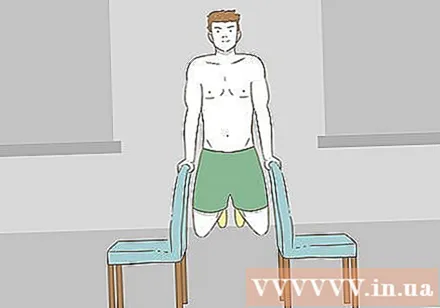
Method 3 of 3: Do muscle stretching exercises
Stretching the chest muscles. Stand with arms outstretched in front of you and hands clasped together. Keep your elbows straight and quickly bring your arms back as far as possible, then return your arms to the starting position.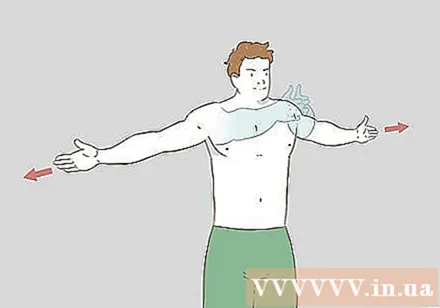
- Do 10 reps and increase your pace after each beat.
- This exercise also works for the back.
Back-elbow exercises. Stand up straight, hands on lower back. The fingers are pointing down and the elbows are pointing out. Gently move your elbows backwards and inward as far as possible, as if you want to touch your elbows. Then return to the original position and repeat.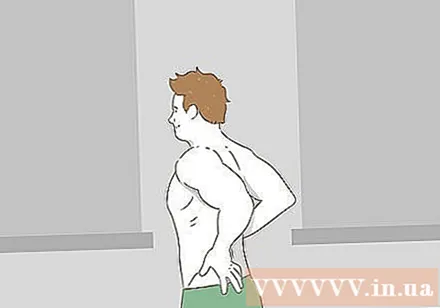
- This exercise also works for the shoulder.
Stretch your muscles with your hands behind your head. Sit upright on the floor with your support person standing behind you. Place your hands behind your head and push your elbows back as far as you can. Then have your partner hold your elbows while you gently pull your elbows forward, keeping your hands still.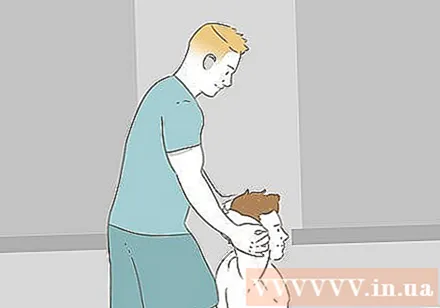
- Each beat should last about 10 seconds.
- The support person is not allowed to let the elbow move while you are pulling the elbow forward.
- After each beat, relax, and have your partner pull your elbows back to stretch your chest muscles, but only as far as you can feel comfortable.
- To avoid injury, let your support person know when to stop pulling.
- This exercise also works for the shoulder.
Advice
- Pay attention to your posture. The wrong posture can cause the chest muscles to shrink over time as the shoulders slump forward.
- Strong chest muscles aren't just for cosmetic purposes. They make it easier for you to push lawn mowers, supermarket trolleys or strollers, and improve your ability to compete in ball-throwing sports, as well as swimming and tennis.
Warning
- When using a backpack or any other tool to increase weight during workouts, always start with minimum weight and increase gradually. This means starting with an empty backpack and gradually increasing your backpack's weight. If you misjudge the difficulty and start off with too much weight, you may not be able to bear the weight and cause muscle injury or tear.
- Don't overdo it. These exercises may cause a bit of muscle pain but will not hurt joints or other parts of the body. If pain persists from exercise, stop exercising and consult your doctor.
- Gradually increase the intensity of chest exercises to prevent injury. The shoulder is susceptible to injury and also recovers very slowly.
- Doing push ups often and too much can cause wrist injuries, especially if you have an underlying problem like carpal tunnel syndrome. If you experience pain while doing push ups, seek advice from your doctor or do push ups on your fists or on a bar to keep your wrists straight.


