Author:
Lewis Jackson
Date Of Creation:
6 May 2021
Update Date:
25 June 2024

Content
Dead toenails can be inconvenient and painful, making you less likely to wear sandals or expose your toes. Dead toenails can be caused by a variety of causes, among which include trauma (for example, a foot repeatedly stuck to the front of the running shoe) and toenail fungus. Even if the toenail is dead and has stopped growing completely, you can still remove the toenail and treat the underlying infection. Removing the toenail will prevent infection and help the nail heal from the injury. With proper care, toenails will return to normal in 6-12 months. To be sure of the condition of the toenail, you should consult a medical professional for advice before removing the nail.
Steps
Part 1 of 3: Taking care of blisters

Pay attention to the presence of blisters. Dead toenails often form when blisters (blood blisters) develop under the nail. The blister can cause the skin under the nail to die and the nail to peel off the toe.- If the toenail dies for another reason, including a fungal infection, there is usually no blister to drain. You can skip this step to continue reading "Toenail Removal" and proceed with the nail removal and post-removal process. In the event of a fungal infection, you need to see your doctor for a prescription of the right antifungal cream.
- Do not attempt to drain the blister under your nail if you have diabetes, peripheral artery disease, or have any problems with your immune system. These problems can cause the infection to take a long time to treat and the wound not to heal properly due to a weakened immune system and a lack of blood circulation needed for healing. In that case, you must consult a doctor.

Clean the toe. You need to wash your toenails and toes clean with soap and water. Wash both hands with soap and water. It is very important that your toe and hands are disinfected before attempting to poke the blister or remove the toenail. The presence of bacteria increases the risk of infection.- Consider wiping your toenails and surrounding skin with iodine. Iodine is shown to help kill bacteria that cause infections.

Sterilize and heat straightened staples or paper clips. Use Isopropyl alcohol to wipe and disinfect clean, sharp pins or paper clips. Heat the tip of the pin or paper clip over an open flame until it turns red.- To best avoid infection, you should perform disinfection under the supervision of a medical professional. Performing even the simplest of the simplest medical procedures at home, increases the risk of an infection or a painful or dangerous accident. So it's best to see a doctor for a toenail removal rather than doing it yourself at home.
- Note that you can use a blunt-tip metal clip instead of a staple if you feel uncomfortable going through the blister with a pointed pin. If you have never tried draining a blister, use a paperclip to be safe. Be sure to have sterile pins ready in case you need to get through the blister.
- Only heat the pin tip. The rest of the pin will be warm, and only the tip will be red hot. Be careful not to burn your hands while handling.
Pierce the pin through the nail. Place the heated pin on the nail, just above the blister. Hold it firmly and let the high heat melt a hole through the nail.
- If you can reach the blister by inserting the pin under the tip of the nail, you won't need to melt a hole through the nail. Then simply drain the fluid from the blister by passing through the hot pin.
- Since there are no nerves in the nail, it will not cause pain to pierce a hot pin. However, avoid pressing forcefully when poking the pin through the nail so as not to burn the skin underneath.
- Depending on the thickness of the nail, you may need to reheat the tip several times and repeat the step through the nail at the same place on the nail.
Through the blister. After you've made a hole in the nail, you can poke the blister with the tip of the pin and let the fluid drain.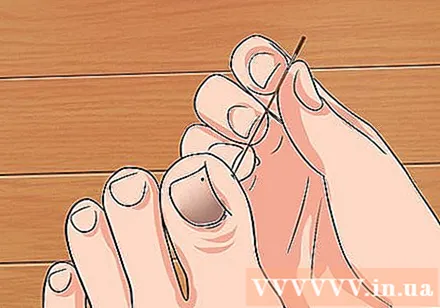
- To reduce the discomfort or pain, allow the pin to cool down to the level of heat you can tolerate before passing it through the blister.
- If possible, pierce the pin around the outer edge of the blister. Try not to touch the skin below. Absolutely do not touch the skin under the nail to avoid infection.
Take care of the wound. Immediately after draining the blister, soak your toenail in warm, soapy water for about 10 minutes. Continue soaking your toenails in soapy water 3 times a day for 10 minutes each time, until the blister has healed. After soaking in the water, apply an antibiotic ointment or ointment to the blister and wrap it up with a clean bandage. This step helps prevent infection.
- Depending on the size and severity of the blister, you may need to drain the fluid several times until it is completely gone. Try to drain any remaining fluid from the blister from the same hole you made on your toenail last time.
Part 2 of 3: Toenail Removal
Wash the skin around the toes. Before removing part or all of the toenail, wash it with warm soapy water. Wipe dry before moving on to the next step. Cleaning your feet, toes, and toes before removing the toenails will help prevent infection. In addition, you need to wash your hands well to reduce the risk of germs.
Trim as much of the top of the nail as possible. Cut off the nail that is on top of the dead skin to prevent dirt and bacteria from getting stuck under the dead nail. Nail removal also helps the skin under the nail to heal faster.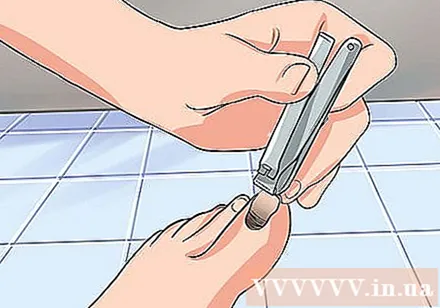
- To reduce the risk of infection, you need to disinfect nail clippers with Isopropyl alcohol before use. Using a sharp nail clipper is better than blunting because blunting can crack your nail during removal.
Check the nail before pruning. If the nail has started to die, you should be able to pull the dead nail out of the skin easily. The part of the nail that can pull out of the skin without pain is the part you need to remove.
Wrap your toenails. After removing the upper part of the nail, wrap it in place with a non-stick gauze pad. The newly exposed skin will look like raw meat and soft, so wrapping the toenail will help reduce discomfort. In addition, you should apply antibacterial ointments to aid in healing and reduce the risk of infection.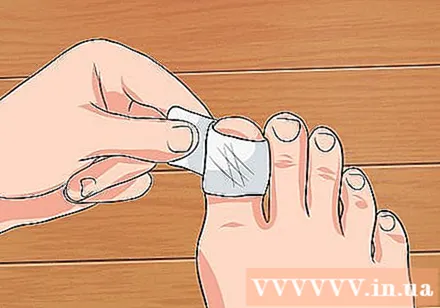
Wait before removing the rest of the nail. Although it is different, usually you need to wait a few days (preferably 2-5 days) before removing the remaining nail. The toenail will slowly die and be much less painful if you wait a few days before removing it.
- While you wait for the bottom of the nail to die to remove, keep your toenail as clean as possible. This means that you will need to gently wash your nails with soap and clean water, apply antibiotic ointment and wrap the bandage loosely.
Remove the rest of the nail. When the rest of the nail is dead, you can grab and pull the nail out using a left-to-right motion. As you pull, you should feel the nail ready to be pulled. Stop pulling if it hurts.
- You may see bleeding if the nail is stuck to the corner of the cuticle, but the bleeding pain isn't severe.
Part 3 of 3: Care after removing dead toenails
Keep your toe clean and bandaged. After you have completely removed the nail and exposed the raw flesh, you need to clean your toes with warm water and mild soap. In addition, you should apply antibacterial ointment and wrap a loose bandage around your toe. Remember that this is a wound, so be sure to treat it gently until new skin develops.
Give the skin time to "breathe". It's important to keep your toe clean and protected though. But you also need to expose the new skin to air to give it time to heal. While watching TV with your feet up on your feet, you can remove the bandage to expose your toe to the air. However, when you are walking in the street, especially when wearing open-toed shoes, you must cover your toe.
- Change the bandage every time you wash the wound. Also, you will need to change the bandage every time it becomes dirty or wet.
Treat open skin. Apply an antibiotic ointment or cream to the wound at least once a day to prevent infection and continue until young skin forms. An over-the-counter cream is sufficient in most cases, but you may need a prescription cream prescribed by your doctor if you have an infection.
Rest your feet. Rest your feet as much as possible for the first few days after removing the nail, especially since it will be quite painful at this time. Once your leg pain and swelling subsides, you can gradually resume your normal activities, including exercise. However, do not force yourself to do things that cause pain in your legs.
- If possible, raise your legs while sitting or lying down. Raising your legs above the heart helps reduce swelling and pain.
- Avoid wearing shoes that are tight or tight while your nail grows back. Wearing shoes should be worn to protect the nail bed during recovery, especially when participating in outdoor physical activities.
Know when to see a doctor. Severe pain could be an infection. There are also other signs of infection such as swelling, warmth around the nail, discharge from the nail, red streaks radiating from the wound, fever. Don't wait until the infection is serious; you should see a doctor as soon as you notice signs of uncertainty. advertisement
Warning
- Don't try to get rid of your dead toenail. If you need to remove the nail for any reason, you should consult your doctor about having a medical professional remove the nail either surgically or without surgery.
- Do not drain fluid from a blister or remove toenail when you have diabetes, peripheral artery disease, or other diseases that negatively affect your immune system.
What you need
- Warm water
- Soap
- Clean towel
- Pointed pins and / or blunt paper clips
- Cotton pad
- Isopropyl alcohol
- Turn on the selection (gas lighter) or similar fire source
- The gauze is not sticky
- Nail clippers
- Antibiotic ointment


