Author:
Christy White
Date Of Creation:
10 May 2021
Update Date:
25 June 2024

Content
- To step
- Part 1 of 3: Performing System Restore
- Resolving problems
- Part 2 of 3: Restoring the laptop to factory settings
- Resolving problems
- Part 3 of 3: Using a recovery or installation disc
- Resolving problems
If your Gateway laptop keeps crashing or failing to boot into Windows, it may be time to recover the machine. You can try a System Restore first, which attempts to restore your computer to an earlier state, with the machine still working fine. It is recommended to try this first so that you don't lose any of your data. If this doesn't work, you can use the Recovery Manager or a Windows installation disc to reset your Gateway to factory settings.
To step
Part 1 of 3: Performing System Restore
 Understand what the System Restore feature does. This process will revert your system settings, programs and drivers to a previous date. You can use it to restore your system to another time when it was still working fine. System Restore has no effect on your data or documents, but it removes programs installed between now and the restore point you choose.
 - This is the first step you will need to take to restore your computer as you don't have to worry about backing up your data.
 Restart your laptop and hold down the.F8test pressed. Make sure to hold it down immediately as soon as the computer boots up. This will load the "Advanced Boot Options" menu.
 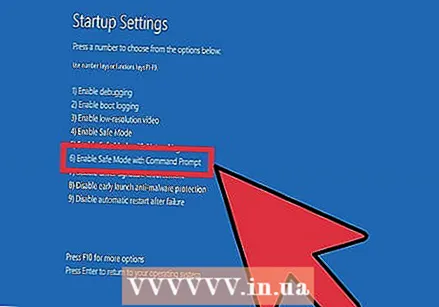 Select "Safe Mode with Command Prompt" from the list of options. A number of files will be loaded and after a while the command prompt will open.
  Open the System Restore utility. The command is slightly different if you are using Windows XP.
 - Windows 7, 8 and Vista - Typ rstui.exe and hit Enter.
- Windows XP - Type % systemroot% system32 restore rstrui.exe and hit Enter.
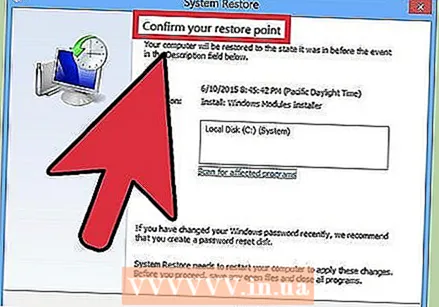
 Select your restore point. A list of available restore points is displayed along with the time and date, along with a brief summary of why the point was created. Choose a restore point from a date and time before your computer started to malfunction. Click Next> after selecting a restore point.
 - You can see the points that Windows thinks are not very relevant by clicking "Show more restore points".
 Wait for the recovery process to finish and your computer to restart. The recovery process may take several minutes to complete. You will be notified when Windows has successfully restored the system.
 - Do not forget that any program you have installed between now and the selected restore point will have to be reinstalled. Be careful, one of those programs could be the culprit!
Resolving problems
 I cannot open the "Advanced Boot Options" menu. This is usually the case if you have a computer with Windows 8, as this system often boots too fast to open the menu.
 - Open the Charms menu in Windows by swiping from right to left across the screen, or holding your mouse in the bottom right corner of the screen.
- Click on the Settings option and click or tap "On / Off".
- Hold down Shift and select "Restart". Your computer will restart in the Advanced boot menu.
 I don't have a restore point that fixes the problem. If you don't have a restore point that goes back far enough in time, or none of the restore points solve the problems, you will likely need to reset the laptop to factory settings. See the next section for instructions.
Part 2 of 3: Restoring the laptop to factory settings
 If possible, back up your data. Restoring your Gateway to factory settings will erase all data from the hard drive, so make sure to back up your data if there are any files that are important to you. Check wikiHow for some tips on backing up.
 - If you are unable to boot into Windows, you can use the Linux Live CD to access your files and copy them to an external drive. See wikiHow for instructions on how to create a Live CD and how to use it.
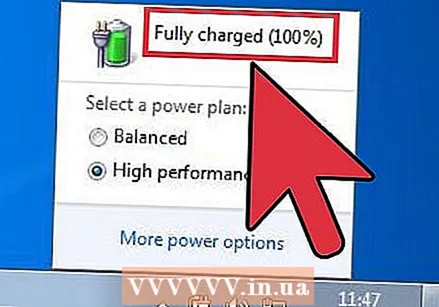 Connect your laptop to the wall socket. Restoring the laptop to factory settings may take a while. If there is no power supply in the meantime, serious problems can result. Make sure the machine is plugged in before continuing.
  Restart your computer and press.Alt + F10as soon as the logo of the Gateway or Acer appears. You may have to press the keys repeatedly before they are registered. After this, the Recovery Manager will be loaded.
 - Press Enter when prompted by the Windows boot menu.
 Select "Restore Operating System to Factory Defaults". You will be asked several times to confirm that you wish to proceed. Starting the recovery will erase all data from the drive and then restore Windows and your laptop's default programs. The recovery process can take up to an hour to complete.
 - There is an option to keep the user's files and save them on the computer, but this is not recommended as some of those files can cause the computer to malfunction.
 Create your account and start using your computer. When the recovery process is complete, the laptop will behave as if it is starting up for the first time. You will be asked to create a Windows account and configure your personal settings.
Resolving problems
 I cannot access the Recovery Manager. If you previously formatted the hard drive or installed a new hard drive, the recovery partition will most likely be gone. You will need to use a recovery disc, or Windows installation disc, to erase the computer and reinstall Windows. See the next section for instructions on using one of these drives.
  Restoring the computer did not solve the problem. If you completely wiped the laptop and reinstalled Windows with a factory reset, but the problem persists, the cause is probably a hardware component.
 - Installing a new hard drive or adding new RAM are both easy to do and can solve your problems with the computer. If this does not help either, please contact Gateway technical support.
Part 3 of 3: Using a recovery or installation disc
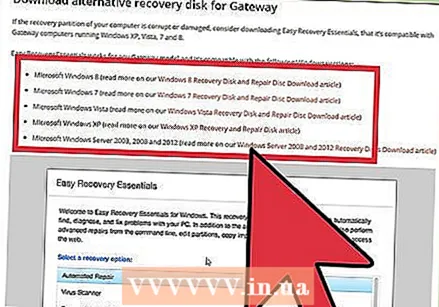 Get your recovery drive if you have one. Laptops often require a number of specific drivers and the recovery disk is the easiest way to ensure those drivers are reinstalled when resetting the laptop. If you cannot use the Recovery Manager because the recovery partition has disappeared, try the recovery drive. You can order a new recovery disk from Gateway.
  If you do not have the recovery disc, find or create a Windows installation disc. If you don't have a recovery disc for your laptop, you can use a Windows installation disc to erase and restore the laptop. You need a disc for the same version of Windows currently installed.
 - If you have Windows 7 and you have a valid product key, you can create a disc here. You need a blank DVD or USB stick with at least 4 GB of free sliding space.
- If you have Windows 8 and you have a valid product key, then you can here. create a disc. You need an empty DVD or USB stick with at least 4 GB of free sliding space.
 Restart your computer and press F12 repeatedly. On a Gateway you open the boot menu. Press this button several times as soon as the Gateway logo or Acer logo appears.
 Change the boot order. In order to use the recovery drive or install Windows from the disc, your computer will need to be set up to boot from the DVD drive first and then from the hard drive. You can change the boot order in the boot menu.
 - If you created a USB stick with the installation files, select the USB stick as the first boot device.
 Save your settings and restart the machine. Make sure the Windows installation disc or USB stick is inserted.
  Press a key when prompted. This will start the Recovery Manager (if you are using a recovery disc), or Windows setup (if you are using a Windows installation disc).
 - If you are using the Recovery Manager, please refer to the previous section for instructions on how to recover your laptop.
- If you're using a Windows installation disc, read on.
 Set your language preference and choose "Install Windows" or "Install Now". The installation process will erase all data from the hard drive and start from the beginning.
  Select "Custom (Advanced)" installation, when prompted. This ensures that you are going to delete everything.
  Delete any partitions. When asked to choose where to install Windows, you will be presented with all partitions on your hard drive. Select each partition and click "Delete". This will delete all files in the partition.
  Select the remaining partition as the destination for the installation. The installer will automatically format it to the correct file system and start installing the Windows files.
  Wait for the installation to complete. The Windows installation procedure usually takes about half an hour to complete. You can monitor the progress on the screen.
  Complete the installation and enter your product key. After the installation is complete, you will be asked to enter the Windows product key. The product key is 25 characters long and is usually on a sticker on the bottom of your laptop or in your computer's documentation. If you cannot find the product key, please contact Gateway.
  Download the necessary drivers for your laptop. Laptops have a lot of specialized hardware and therefore require a number of special drivers to get the best performance from the components. Go to support.gateway.com and select the "Driver downloads" section. Enter the details of your laptop and download all recommended drivers and software.
Resolving problems
 Restoring the computer does not solve the problem. If you completely wiped the laptop and reset Windows to factory settings, but the problem is not resolved, the cause is most likely a hardware component.
 - Installing a new hard drive or adding new RAM are both easy to do and can solve your problems with the computer. If this does not help either, please contact Gateway technical support.


