Author:
Judy Howell
Date Of Creation:
28 July 2021
Update Date:
1 July 2024

Content
Making a wallet out of duct tape
Whether you are a lover of special accessories, an enthusiastic do-it-yourselfer, or if you just like to tinker, get that roll of duct tape out of the closet and turn it into something useful. In this guide we used silver duct tape, but of course you can use any color you want. You can even make a zigzag pattern or any other pattern. It will be your wallet, so be creative and have fun!
To step
Method 1 of 3: Basics of the wallet
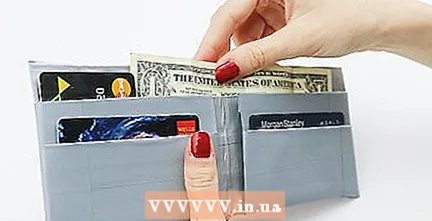 Put your money, ID card and cards in your wallet. You can of course also give or sell the wallet as a gift.
  Your wallet is ready.
- When you use the wallet for the first time, it may not be closed by itself. You can solve this by putting the wallet under a pile of heavy books for a few hours.
Tips
- Have some banknotes and cards handy when you start making the wallet. This way you can check during the process whether all your boxes are the right size.
- Once you get the hang of making these wallets, you can make money by selling them. A reasonable profit margin (the price you add to the material cost) would be about $ 2.50 per wallet. For example, you could sell them at school camps.
- If you want to cut the tape with scissors, it is best to use non-stick scissors.
- You can personalize your wallet in many different ways, such as:
- Add a coin compartment in the bills compartment, or an extra flap above the inner compartments to prevent your cards from falling out of the wallet.
- Experiment with different colors. Duct tape comes in many colors. You could use a different color for the side pockets. Instead of duct tape, you can also use black bookbinding tape for a casual look.
- Use clear tape. To add structure and color, you can stick photos or colored paper between the layers of tape.
- Use paper, fabric, fishing net or decorative tape.
- Stick your favorite stickers on the wallet.
- You can personalize the wallet by cutting the first letter of your name from duct tape and sticking it on the front.
- If there are air bubbles under the tape, you can remove them by poking a hole with a pin and gently pushing the air out.
- Stick the tape slowly and press it gently. This prevents air bubbles and folds from forming.
- Instead of cutting, pasting and turning the tape over and over, you can cut all the strips first and put everything together in one go. That is much faster!
- To make a cover that protects your banknotes, you can take a piece of tape that is as long as the width of the wallet. Stick it along the top edge, making sure that a quarter of the tape is stuck to the wallet. Then fold the strip in half lengthwise so that the adhesive sides stick together. Fold the flap towards the inside of the wallet. That way your money cannot fall out.
- To give your wallet more character, you can use a different color tape for each strip.
- You can buy ready-made sheets of duct tape.
- Don't use your best scissors to cut duct tape. The scissors will stick and will therefore cut less well in the long run.
- Tips for trimming:
- If you cut the duct tape with scissors, it is best to make short cuts rather than cutting large pieces in one go.
- You can spread butter or margarine on your scissors. This will make cutting the tape smoother.
- If you are using a knife, it is best to use a metal ruler or a ruler with a metal edge.
- You can also make flowers and bows from duct tape.
- You can expand the wallet by making extra compartments.
- The duct tape is difficult to peel off once two adhesive sides stick together.
- You can also use a pen knife.
- Duct tape is available in many different colors and patterns. Take advantage of the wide range to create a wallet that fits your style exactly.
- Make sure the edges are straight.
- You can make the banknote compartment a bit higher to make it easier to open.
- To make the wallet more sturdy, you can make a skeleton out of cardboard and wrap the tape around it. This way the wallet has more structure.
- You can also add paper inside so that the wallet is not so sticky.
- If you put aluminum foil in the base of the wallet, it protects your credit cards from being cloned.
Warnings
- Duct tape sticks to your fingers. So be careful if you have sensitive skin.
- Measure carefully. If one of the boxes turns out to be too small, your banknotes or your cards will not fit and you will have to start all over. To be on the safe side, you can take the dimensions a bit wider.
- Keep the wallet out of the heat or bright sunlight. If it gets too hot, it can become tacky and the adhesive can damage your belongings.
- Be careful when cutting duct tape. Always cut yourself off. As you cut, keep removing the adhesive from the scissors to keep it clean.
Necessities
- Duct tape (color of your choice)
- Ruler (to measure)
- Knife or scissors
- Piece of wood or cutting board (do not use material that will stick to the duct tape)


