Author:
Roger Morrison
Date Of Creation:
24 September 2021
Update Date:
21 June 2024
Content
- To step
- Part 1 of 3: Choosing an external hard drive
- Part 2 of 3: Installing an external hard drive in Windows
- Part 3 of 3: Installing an external hard drive on the Mac
- Tips
- Warnings
This wikiHow shows you how to choose, connect, and format an external hard drive for your Windows or Mac computer.
To step
Part 1 of 3: Choosing an external hard drive
 Understand how to connect an external hard drive to your computer. While some external hard drives can be used immediately after connecting to an available USB port on your computer, most external hard drives must first be formatted to work with your computer's specific file system.
 - Formatting is a quick process that you can perform through your computer's operating system.
 Check the connections of your computer. Most computers have USB 3.0 ports - rectangular holes in the side or the front of your computer's case - but modern Macs and some Microsoft Windows computers use USB-C connectors instead:
 - USB 3.0 - A rectangular port found on most pre-2017 computers. Most current external hard drives use USB 3.0 connectors.
- USB-C - An oval port found on MacBooks and some Microsoft laptops. If you have a USB-C port, you will need to buy a USB 3.0 to USB-C adapter or find an external hard drive with a USB-C cable.
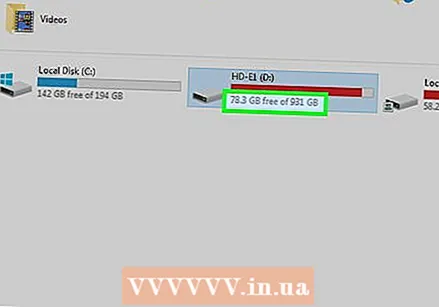 Wonder how big the hard drive should be. External hard drives are usually available in storage sizes ranging from 512 gigabytes to several terabytes. Make sure to buy a hard drive that has more space than you think you need.
 - In general, it is not much more expensive to buy a terabyte (1024 gigabyte) hard drive than a 512 gigabyte hard drive. Storage also gets cheaper the more you buy (for example, a two terabyte hard drive costs significantly less than two one terabyte hard drives).
 Choose between a traditional hard drive and a solid state drive. Solid-state drives (SSDs) are significantly faster than traditional external hard drives, but they are also much more expensive. However, if you plan to run an operating system or edit software from the external drive, an SSD will be more responsive than a traditional hard drive.
  Know which brands to look for. Storage is cheap, but you'll still want to make sure you're buying a reputable brand. Some popular external hard drive manufacturers are:
 - Western Digital
- Adata
- Buffalo
- Seagate
- Samsung
 Buy an external hard drive that meets your requirements. Once you have purchased your drive from a tech department or online retailer, you can proceed to install it on your Windows computer or Mac.
Part 2 of 3: Installing an external hard drive in Windows
 Find the USB port on your computer. Typically, your computer's USB 3.0 or USB-C ports are located on one side of the case, although on a desktop, they can also be found on the front or side of the case.
 - Make sure you connect the external hard drive directly to a USB port on your computer, not to a hub or USB port for the keyboard.
 Connect one end of the external hard drive cable to the USB port. If the cable uses a USB 3.0 connection, it would only fit one way. USB-C plugs can be plugged into the corresponding port in any way.
 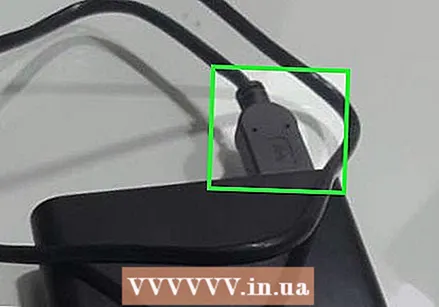 Plug the other end of the cable into your external hard drive. The other end of the cable will usually be its own connector that fits only one port on the external hard drive.
  Open Explorer
  click on This PC. It's on the left side of the window, although you may have to scroll up or down the left pane to find it.
 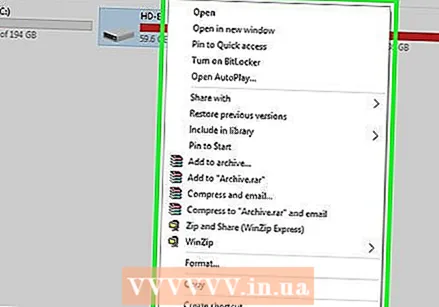 Right click on the name of your external hard drive. You should see it under the heading "Devices and drives". A drop-down menu will appear.
 - If you don't see anything under the heading "Devices and drives", double-click the heading to expand it.
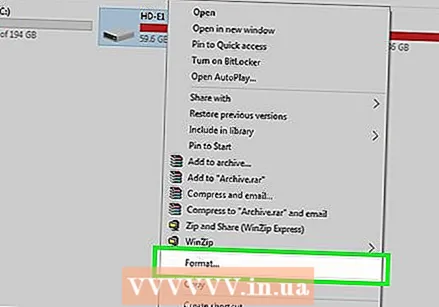 click on Format. It's in the drop-down menu. The Format window opens.
  Click the "File System" menu. It's in the center of the Format window. A drop-down menu will appear.
  Select a file system. Click one of the following options in the drop-down menu:
 - NTFS - Select this option if you only want to use the hard drive with Windows computers.
- exFAT - Select this option if you want to use the hard drive with both Windows and Mac computers.
- FAT32 - Select this option if you want to use the hard drive with both computers and other devices. Some Linux computers or installations require a FAT32 disc.
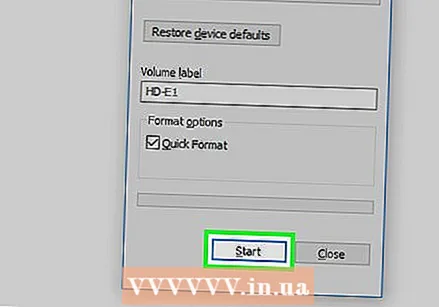 click on Start. It's at the bottom of the window. When you do this, Windows will ask for a confirmation to begin formatting your external drive.
 - If the drive is used, consider unchecking the "Quick format" box first. This will take significantly longer to format, but it will also completely overwrite the hard drive.
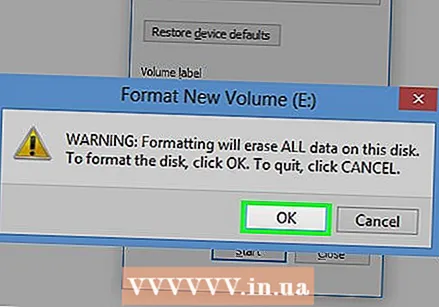 click on OK when prompted. This is at the bottom of the window. Doing this will close the "Format" window - the drive should now be formatted.
Part 3 of 3: Installing an external hard drive on the Mac
 Find the USB port on your Mac. You can usually find the USB port on the side of the housing (MacBook) or on the back of the display (iMac).
  Plug one end of the external hard drive cable into the USB port. If the cable has a USB 3.0 plug, it will only fit one way. USB-C connectors can be plugged into the port in any way.
  Plug the other end of the cable into your external hard drive. The other end of the cable will usually be its own connector that fits only one port on the external hard drive.
  Open Spotlight
 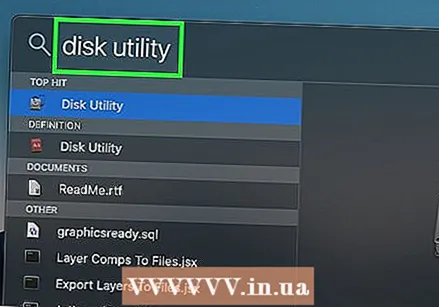 Open Disk Utility. Type disk utility and then double click Disk Utility if it appears in the search results. The Disk Utility window will appear.
 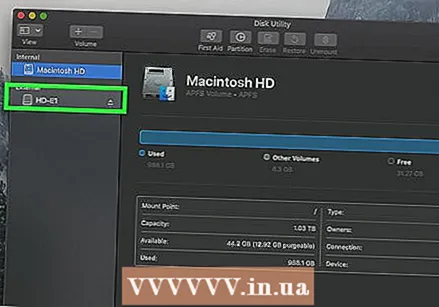 Select your external hard drive. In the top left corner of the Disk Utility window, click the name of your external hard drive.
 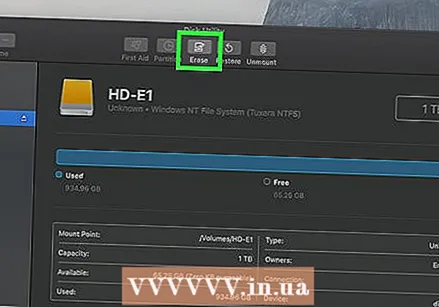 click on Erase. It's a tab at the top of the Disk Utility window. This will open a popup window.
 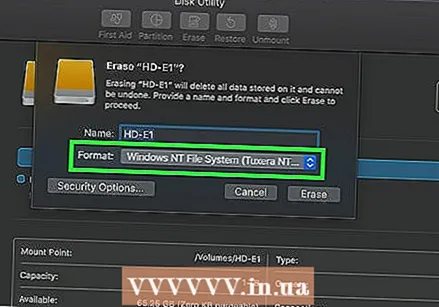 Click the "Format" drop-down menu. You can find this in the middle of the pop-up window.
  Select a file system. Click on one of the following options:
 - Mac OS Extended (Journaled) - Select this option if you only want to use your external hard drive with a Mac computer.
- ExFAT - Select this option if you want to use your external hard drive with both Windows and Mac computers.
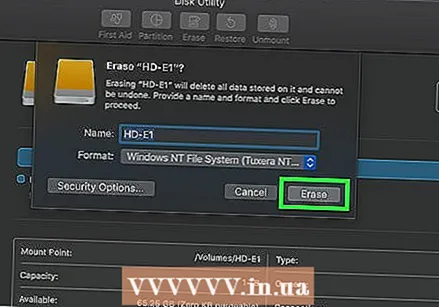 click on To clear. This option is at the bottom of the window.
  click on To clear when requested. When you do this, the system will ask for a confirmation so that formatting the external drive can begin. Once the format is complete, you can proceed to use your drive as you wish.
Tips
- All devices, other than computers, that can work with external hard drives (eg consoles), offer an option to format a storage medium from the "Storage" section in the "Settings" menu.
- Always have an external hard drive safely ejected before removing it from your computer. This ensures that the files on your hard drive are definitely stored.
Warnings
- Not all file systems are compatible with every computer. If you are using a specific file system (eg. NTFS on a Windows computer), attempting to add the external hard drive to a device or computer running on another system will produce an error.
- Formatting a disk will erase its contents.


