Author:
John Pratt
Date Of Creation:
12 April 2021
Update Date:
1 May 2024

Content
- To step
- Method 1 of 2: Method 1: Plain twisted braid
- Method 2 of 2: Method 2: French twist braid
- Tips
- Warnings
- Necessities
Do you also like those twisted braids, but you don't know how to make it yourself? With long hair and some twists you can make such a braid in no time! A nice and distinct twisted braid actually looks a lot more complicated than it is, and here's how to do it. Read more!
To step
Method 1 of 2: Method 1: Plain twisted braid
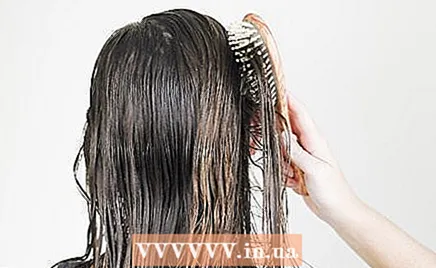 Start with clean, combed hair. Damp hair is ideal, because it is easier to distribute.
  Make a base (optional). For a tighter, more textured twisted braid, start by putting the hair in a ponytail. If you want a messier braid, then move on to the next step and just start the braid on your neck.
  Divide the hair into two equal parts. Now wrap each part around your fingers, or pinch the top part of the section, twist, go down a few inches, twist again, and so on. Both parts must be turned clockwise.
 - You can twist as you braid, or you can try twisting and then braiding the entire section. Both methods work.
 Place the right section over the left section.
 Keep braiding until the braid is the desired length.
 Secure the braid with a rubber band.
 Apply hairspray and you're done!
Method 2 of 2: Method 2: French twist braid
 Start at the front hairline. Decide whether you want to divide the hair into different sections for multiple French braids, or simply want one braid down the middle. For this example, we'll put one braid through the center. Start at the front at the hairline. Take a small section of the hair, separated horizontally from the rest of the hair.
  Divide your hair into two equal parts. Twist each strand to the right, or clockwise. For a French braid, twist the hair as you work, so don't worry if only the base of the strand is now twisted.
  Now lay the twisted right strand over the twisted left strand.
 Take the section of hair immediately below where you started the braid. Wrap that new section around the right strand. It may take a few twists and turns to make it one.
  Now lay the larger right strand over the smaller left strand.
 Take the piece of hair immediately below the piece you just took with you.
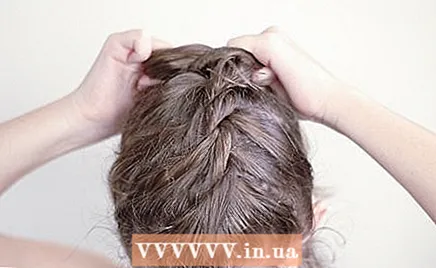 Add the new section to the right strand. Again, it may take a few turns for it to be a good solid assembly. Keep adding and twisting new sections until you reach the desired length.
 - When you get to the nape and want to braid even further, just keep twisting the strands around each other clockwise.
Tips
- Have patience. Hold the twisted sections firmly so that they do not unravel or become too loose.
- Especially curly hair or hair with blow is easier to handle when it is damp.
- Practice on someone else first before doing it on yourself.
- If you want a messy braid, comb your hair first to give it some volume.
- This style works best if you have long hair. It is more difficult to do on medium length hair.
Warnings
- Never use rubber bands in your hair - they can break your hair.
- Make sure your hair is wet.
Necessities
- Brush or wide comb
- Rubber bands
- Hair clips to keep it in place (optional)


