
Content
- Steps
- Method 1 of 2: Paper Vane for Simple Experiments
- Method 2 of 2: Cardboard and Plasticine Weather Vane
- Tips
- What do you need
- Paper vane for simple experiments
- Weather vane made of cardboard and plasticine
Weather vane helps determine the direction of the wind. As a rule, they are installed on the roofs of buildings, where various obstacles do not interfere with the wind. You can make a simple paper weather vane as a homework assignment to determine the direction of the wind. For such a weather vane, it is enough to use paper and a straw. If you want a stronger and more durable weather vane, make it out of cardboard, a tin can, and plasticine.
Steps
Method 1 of 2: Paper Vane for Simple Experiments
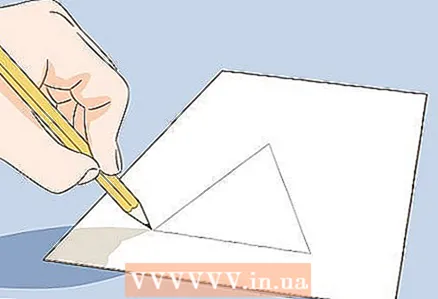 1 Draw a triangle on a piece of thick paper and cut it out. Use a ruler to mark a 4 centimeters (4 cm) line on the paper to form the base of the triangle. Then, place a ruler at the middle of the line perpendicular to it and draw a line 5 centimeters long to form an inverted "T". After that, connect the ends of the bottom line with the apex of the perpendicular. Take scissors and cut out the resulting triangle.
 - You can use a folder, cardstock, Whatman paper, cardboard, or an old cereal box.
- Use colored paper or color in the cut triangle to make the weather vane prettier.
- It is enough to roughly measure the length of the segments.
- The apex of the triangle will indicate the direction of the wind.
 2 Draw a square on thick paper and cut it out. Make sure that the sides of the square are about 7 centimeters long, and the opposite sides are approximately parallel to each other. You can do without much precision, but try to make the square larger than the triangle. Take scissors and cut out a square - it will serve as the second end of the weather vane arrow.
 - Try tracing a square in the corner of the paper so you don't have to cut two sides. Measure with a ruler 7 centimeters on the side of the sheet and draw a line. Then measure 7 centimeters from the bottom and draw another line that crosses the first and forms a square with it. Cut out the resulting square with scissors.
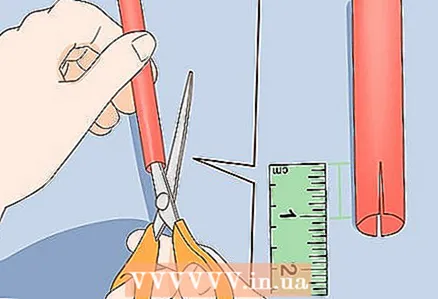 3 Make one centimeter long incisions at both ends of the drinking straw. Take a pair of scissors and make parallel cuts at each end of the straw so you can insert the paper. Although you can do without much precision, the cuts should be about 1 centimeter long and parallel to each other so that you can insert paper into them.
 - Cut both sides of the straw at both ends.
- If you are using a bendable straw, cut off the bendable part of it.Then cut the ends of the remaining straight section.
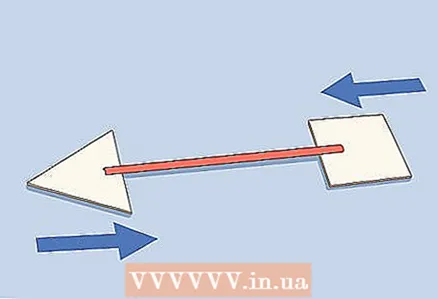 4 Insert the triangle and square into the notches in the straw to form an arrow. Insert a triangle into one end of the straw so that its top protrudes outward. Insert a square into the other end. As a result, you get an arrow.
 - If the triangle or square doesn't hold in place, apply a drop of glue to the paper before sticking it into the straw. Then hold the paper in place for 1-2 minutes to dry the glue. You can also secure the triangle and square with tape.
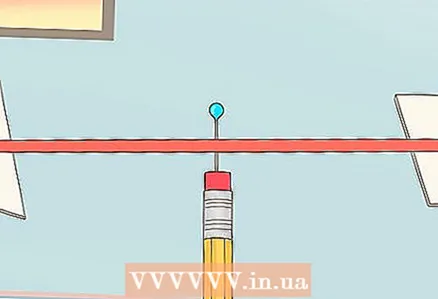 5 Pierce the center of the straw with a pin and insert it into the eraser at the end of your pencil. Find the center of the straw and thread a straight pin through it. Poke through the straw so that the pin pops out from the back. Then stick a pin into the center of your pencil eraser.
 - Be careful with the pin to avoid injury. If you find it difficult to pierce an eraser with a pin, ask an adult to help you.
- Make sure that the straw does not touch the eraser. For the weather vane to work properly, the straw must rotate freely.
- If the straw won't rotate when you blow on the paper square, or if it falls, remove the pin and stick it in a different place. Try to poke the straw as close to the center as possible. If that doesn't work, cut the paper from the end where the straw falls. For example, you can make the square smaller.
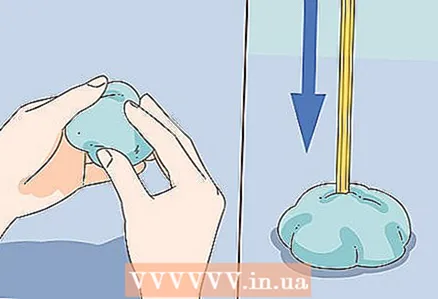 6 For convenience, use a large piece of soft plasticine as a stand. Roll a ball out of plasticine and stick the tip of a pencil into it. Heavy plasticine will prevent the weather vane from falling under the gusts of wind.
 - If the pencil falls off, use more plasticine.
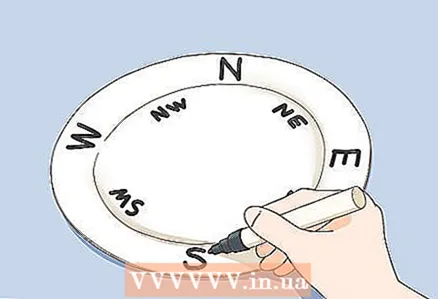 7 Write the 4 main directions and 4 intermediate directions on a paper plate. At the top of the plate, write C (north). Then, moving clockwise, write B (east) on the right, S (south) below and Z (west) on the left. Optionally add NE (northeast) midway between north and east, SE (southeast) midway between east and south, SW (southwest) midway between south and west, and NW (northwest) midway between west and north.
 - Mark the directions with initial letters so they fit on the plate.
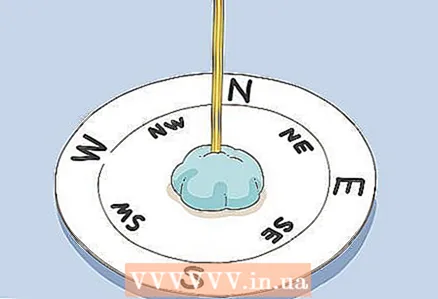 8 Press a plasticine ball into the center of the plate to hold it securely in place. Press the bottom edge of the plasticine ball into the middle of the plate. Use your fingers to stick the sides of the balloon to the plate. This will securely fix the weather vane in the center of the saucer and will be able to determine the direction of the wind with it.
 - If you wish, you can add some plasticine around the edges of the ball to stick it to the plate more securely.
Option: You can also thread the pencil through a plastic cup to hold it in place. Turn the glass upside down and pierce the bottom with a pencil. For added stability, half-fill the glass with pebbles and sand, and then secure it with tape.
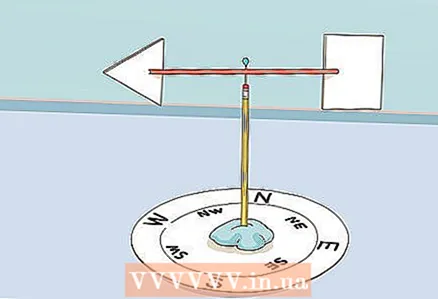 9 Take your weather vane outside to determine the direction of the wind. Determine the north direction using the compass and position the north end of the weather vane plate accordingly. Move away from walls and large buildings to keep the wind out. Watch the wind vane turn. He will indicate the direction from which the wind is blowing.
 - Remember that if you move the weather vane to a new location, you will need to use the compass again and determine the north direction in order to correctly orient the weather vane.
Method 2 of 2: Cardboard and Plasticine Weather Vane
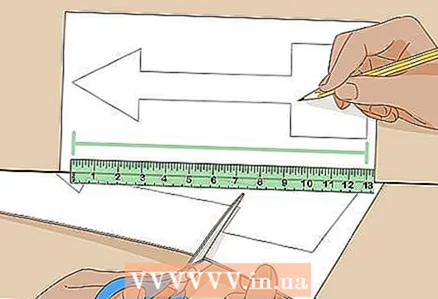 1 Draw a 13 cm arrow on a piece of cardboard and cut it out. Try to keep the arrow straight, but don't try to make it perfect. Draw a triangle at one end of the arrow and a rectangle at the other. Make the rectangle larger than the triangle. Then take the scissors and cut out the arrow.
 - If you want the weather vane to look prettier, use colored cardboard or paint it.
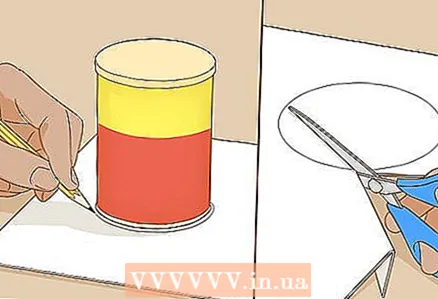 2 Trace the rim of the can and cut the resulting circle out of the cardboard. Place a coffee or soup can on a piece of cardboard and trace around the bottom with a pencil. After that, cut the cardboard along the drawn line - as a result, you will get a cardboard circle slightly larger than a can.
 - Any medium to large can will do. It is easiest to use a can of coffee or soup, as they are large enough and have an open top.
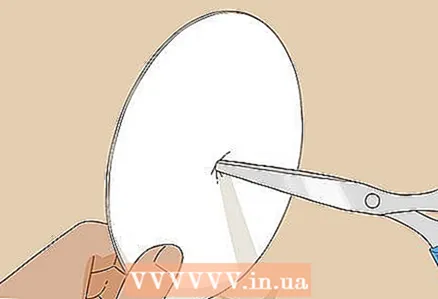 3 Make a pencil-sized hole in the middle of the cardboard circle. Using scissors, carefully poke through the center of the cardboard circle. It's okay if the hole is slightly smaller than the diameter of the pencil, as you can widen it as you insert the pencil.
 - Be careful: if the scissors slip off, you could cut yourself. It is best to ask an adult to help you make the hole.
Option: if you want to make an original or colorful weather vane, paint and decorate the circle at this stage. Use paint or felt-tip pens for this. You can also glue the circle over with colored paper.
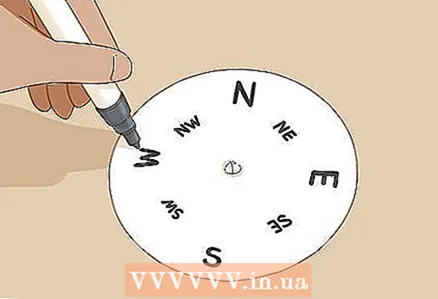 4 Write 4 main directions and 4 intermediate directions on the circle. At the top of the circle, write N (north). Then, moving clockwise, write B (east) on the right, S (south) below and Z (west) on the left. Optionally add NE (northeast) midway between north and east, SE (southeast) midway between east and south, SW (southwest) midway between south and west, and NW (northwest) midway between west and north.
 - For convenience, label the directions with the appropriate initial letters.
 5 Pass the eraser end of the unsharpened pencil through the circle. Place the end of a pencil with an eraser to the center of the cardboard circle and push it through the hole. Take your time, or the hole may widen too much.
 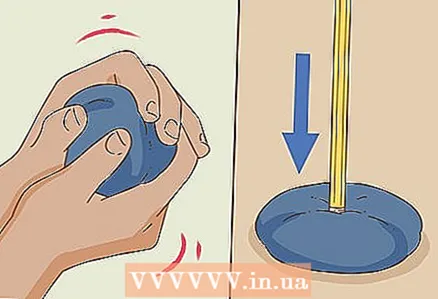 6 Roll a small ball out of plasticine and stick it onto an eraser. Roll a plasticine ball with your fingers and press the pencil eraser into it. Place plasticine over the edges of the eraser to hold it in place.
 - Heavy plasticine will hold the pencil upright.
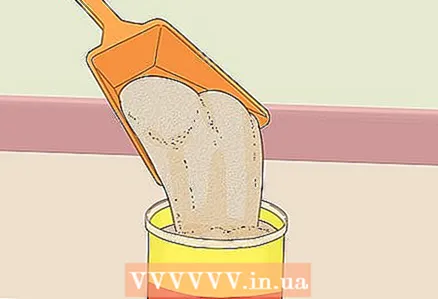 7 Pour sand or gravel into the jar to avoid being knocked over by the wind. Fill the jar about halfway with sand or gravel. This will increase the weight of the can and make it more stable.
 - The weight of the can can be increased by using any sufficiently heavy object. For example, coins or glass beads will also work.
Advice: If you want to make the weather vane more beautiful, you can paint or decorate it before pouring sand or gravel into the jar.
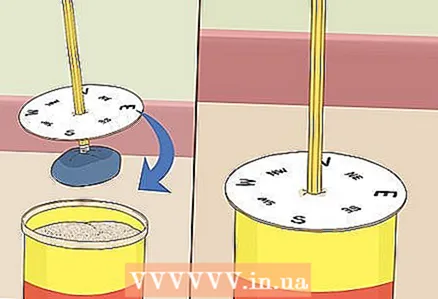 8 Insert the plasticine ball into the sand or gravel and lower the circle onto the jar. Take the pencil by the top, near the unsharpened end. Dip the end with the plasticine ball into the jar so that the plasticine touches the sand or gravel. Then slowly lower the cardboard circle with your free hand so that it rests on the rim of the can.
 - If you wish, you can immerse the plasticine ball in sand or gravel to give the weather vane additional stability.
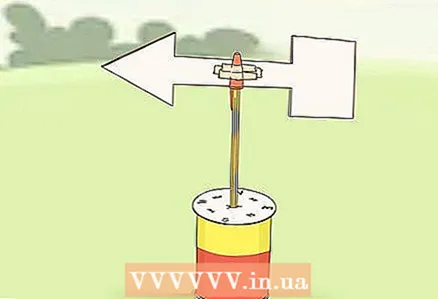
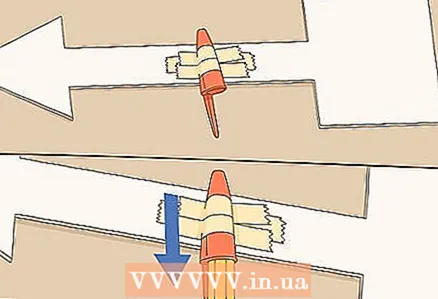 9 With tape, attach the pen cap to the arrow and put it on the end of the pencil with the eraser. Place the handle cap in the center of the arrow so that it is vertical. Glue it to the arrow with 3-4 strips of tape. Finally, place the cap over the top end of the pencil. In this case, the arrow should rotate freely in the horizontal plane.
 - Attach the pen cap securely to the cardboard arrow.
- The needle should rotate freely, so do not apply tape or glue to the cap before placing it on the pencil.
 10 Take your weather vane outside to check the direction of the wind. Determine the north direction using the compass and position the north end of the weather vane accordingly. Watch how the weather vane turns under the influence of the wind. He will indicate the direction from which the wind is blowing.
 - If you move the weather vane to a new location, you will need to use the compass again and determine the north direction in order to correctly orient the weather vane.
Tips
- The weather vane indicates the direction from which the wind is blowing.For example, if the arrow points north, it means the wind is blowing from north to south.
- If you want to measure wind speed, make an anemometer out of plastic cups.
What do you need
Paper vane for simple experiments
- Thick paper (such as a folder, cardstock, or whatman paper)
- Pencil for drawing
- Scissors
- Drinking straw
- Paper plate
- Plasticine
- Pencil with eraser for the axis of the weather vane
- Pin
- Glue
- Waterproof marker
- Compass
Weather vane made of cardboard and plasticine
- Cardboard
- Pencil for drawing
- Scissors
- Not sharpened pencil for the axis of the weather vane
- Plasticine
- Empty coffee or soup can
- Sand or gravel
- Waterproof marker
- Compass
- Scotch
- Handle cap


