Content
This article will guide the installation of Oracle Java 7 32-bit and 64-bit (current version is 1.7.0_45JDK / JRE on 32-bit and 64-bit Ubuntu operating systems. You can apply this guide to Debian and Linux Mint.
If you have installed Oracle Java 7 on your operating system but want to upgrade, please refer to the Oracle Java upgrade tutorial on Ubuntu Linux.
With people just If you want to install Oracle Java JRE to run Java applications, not to develop Java programs, please refer to the Oracle Java JRE installation tutorial on Ubuntu Linux.
For those who want to install Oracle Java JDK to develop Java programs and applications (Oracle Java JRE including Oracle JDK) use the following method:
- How to install Oracle Java JDK on Ubuntu Linux
To activate / upgrade Oracle Java on a web browser, please refer to the Oracle Java activation tutorial in web browser.
Steps
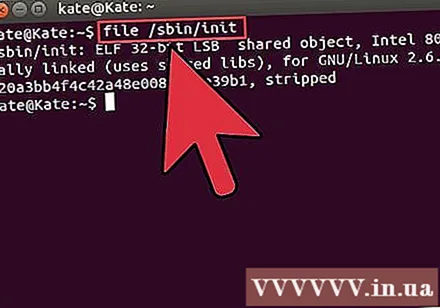
Check if your Ubuntu Linux operating system is 32-bit or 64-bit, open a terminal and run the following command.- Type / Copy / Paste: file / sbin / init
- Note if your Ubuntu Linux version is 32-bit or 64-bit.
- Type / Copy / Paste: file / sbin / init
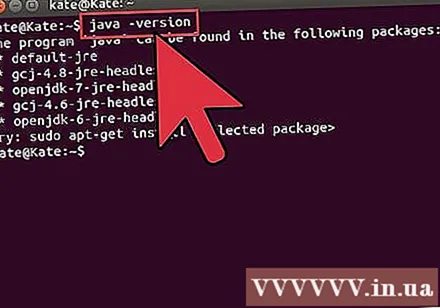
Check if Java is installed on the system. To test, run the Java version command in the terminal.- Open terminal and enter the following command:
- Type / Copy / Paste: java -version
- If OpenJDK is installed on the system, you will see the message:
- java version "1.7.0_15"
OpenJDK Runtime Environment (IcedTea6 1.10pre) (7b15 ~ pre1-0lucid1)
OpenJDK 64-Bit Server VM (build 19.0-b09, mixed mode)
- java version "1.7.0_15"
- If OpenJDK is installed on the system then this is not the vendor version mentioned in this article.
- Open terminal and enter the following command:
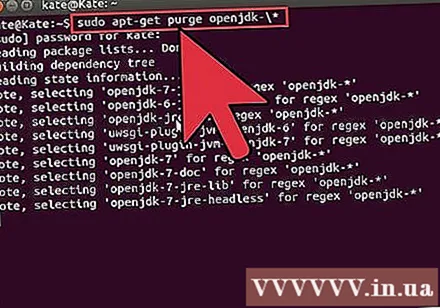
Completely remove OpenJDK / JRE on the system and create a directory to store Oracle Java JDK / JRE binaries. This is a way to avoid system conflicts and confusion between 2 different versions of Java of different vendors. For example, if you have OpenJDK / JRE installed on your system, you can remove it with the following command:- Type / Copy / Paste: sudo apt-get purge openjdk - *
- This is the command to completely remove OpenJDK / JRE on the system.
- Type / Copy / Paste:sudo mkdir -p / usr / local / java
- This is a command to create a new directory for storing Oracle Java JDK and JRE binaries.
- Type / Copy / Paste: sudo apt-get purge openjdk - *
Download Oracle Java JDK / JRE for Linux. Definitely choose exactly Compressed binaries for 32-bit or 64-bit operating systems (ending in tar.gz).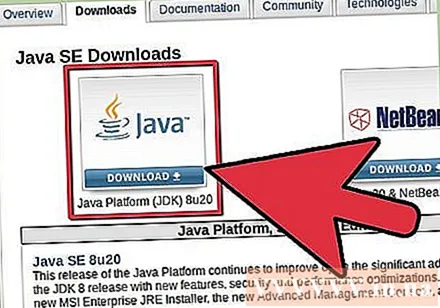
- For example, if using 32-bit Ubuntu Linux, download 32-bit Oracle Java binaries.
- For example, if you're using Ubuntu Linux 64-bit, download the 64-bit Oracle Java binaries.
- Option, Download the Oracle Java JDK / JRE documentation
- Select jdk-7u40-apidocs.zip
- Important Information: Oracle Java 64-bit binaries do not work on 32-bit Ubuntu Linux, many system error messages will appear if you deliberately install 64-bit Oracle Java on Ubuntu Linux 32-bit.
Copy the Oracle Java binary to the / usr / local / java directory. In most cases, the Oracle Java binary is downloaded: / home /"username"/ Downloads.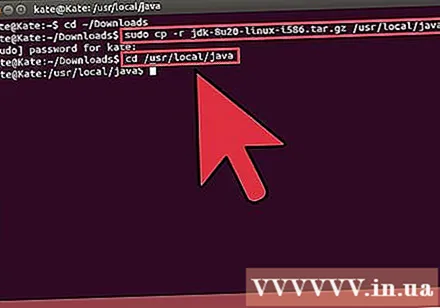
- How to install Oracle Java 32-bit on Ubuntu Linux 32-bit:
- Type / Copy / Paste: cd ~ / Downloads
- Type / Copy / Paste: sudo cp -r jdk-7u45-linux-i586.tar.gz / usr / local / java
- Type / Copy / Paste: sudo cp -r jre-7u45-linux-i586.tar.gz / usr / local / java
- Type / Copy / Paste: cd / usr / local / java
- How to install Oracle Java 64-bit on Ubuntu Linux 64-bit:
- Type / Copy / Paste:cd ~ / Downloads
- If you download the JDK then Type / Copy / Paste: sudo cp -r jdk-7u45-linux-x64.tar.gz / usr / local / java
- Or if you download JRE then Type / Copy / Paste: sudo cp -r jre-7u45-linux-x64.tar.gz / usr / local / java
- Type / Copy / Paste: cd / usr / local / java
- How to install Oracle Java 32-bit on Ubuntu Linux 32-bit:
Extract the Java binary archive in the / usr / local / java directory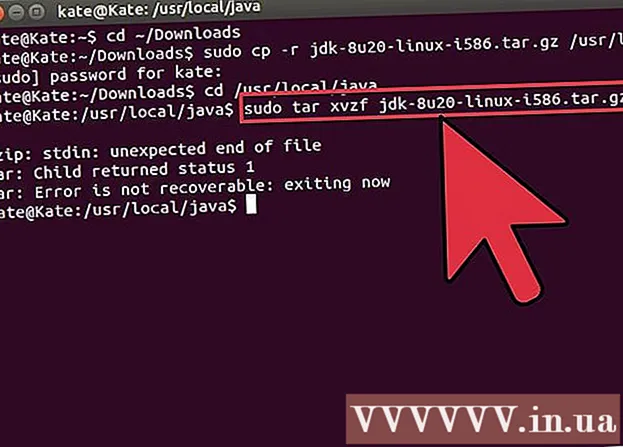
- How to install Oracle Java 32-bit on Ubuntu Linux 32-bit:
- Type / Copy / Paste: sudo tar xvzf jdk-7u45-linux-i586.tar.gz
- Type / Copy / Paste: sudo tar xvzf jre-7u45-linux-i586.tar.gz
- How to install Oracle Java 64-bit on Ubuntu Linux 64-bit:
- If you download the JDK then Type / Copy / Paste: sudo tar xvzf jdk-7u45-linux-x64.tar.gz
- If you download JRE then Type / Copy / Paste: sudo tar xvzf jre-7u45-linux-x64.tar.gz
- How to install Oracle Java 32-bit on Ubuntu Linux 32-bit:
Check the directory again. At this step you should have a unzipped Java JDK / JRE directory at / usr / local / java listed like this: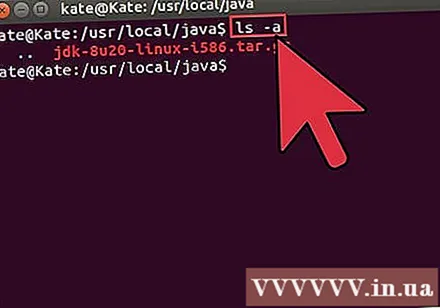
- Type / Copy / Paste: ls -a
- jdk1.7.0_45
- or jre1.7.0_45
Edit the / etc / profile file path and add the following system variables to the path. Use nano, gedit or any other text editing software and open / etc / profile.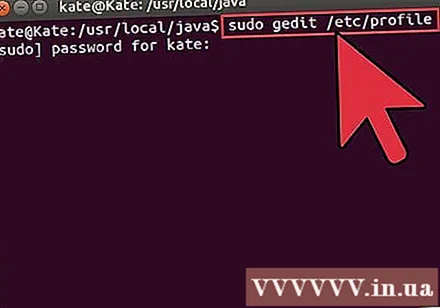
- Type / Copy / Paste: sudo gedit / etc / profile
- or
- Type / Copy / Paste: sudo nano / etc / profile
Use the arrow keys to scroll to the bottom and add a line after the file:
- If you installed the JDK Type / Copy / Paste:
JAVA_HOME = / usr / local / java /jdk1.7.0_45
JRE_HOME = $ JAVA_HOME / jre
PATH = $ PATH: $ JAVA_HOME / bin: $ JRE_HOME / bin
export JAVA_HOME
export JRE_HOME
export PATH - If you have JRE installed Type / Copy / Paste:
JRE_HOME = / usr / local / java /jre1.7.0_45
PATH = $ PATH: $ JRE_HOME / bin
export JRE_HOME
export PATH - Save the / etc / profile file and exit.
- If you installed the JDK Type / Copy / Paste:
Inform the Ubuntu Linux system the location of the Oracle Java JDK / JRE. The command will inform the system that a new version of Oracle Java is ready for use.
- If you installed the JDK Type / Copy / Paste: sudo update-alternatives -install "/ usr / bin / java" "java" "/usr/local/java/jdk1.7.0_45/jre/bin/java" 1
- If you have JRE installed Type / Copy / Paste: sudo update-alternatives -install "/ usr / bin / java" "java" "/usr/local/java/jre1.7.0_45/bin/java" 1
- This is the command that informs the system that the Oracle Java JRE is ready for use.
- Only if you install the JDK Type / Copy / Paste:sudo update-alternatives -install "/ usr / bin / java" "java" "/usr/local/java/jdk1.7.0_45/bin/java" 1
- This is the command that informs the system that the Oracle Java JDK is ready for use.
- Type / Copy / Paste:sudo update-alternatives -install "/ usr / bin / javaws" "javaws" "/usr/local/java/jre1.7.0_45/bin/javaws" 1
- This is a command that informs the system that Oracle Java Web is ready for use.
Tell the Ubuntu Linux system that Oracle Java JDK / JRE is your default Java.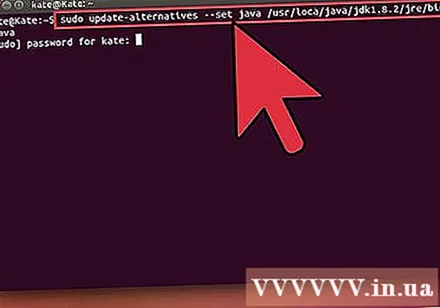
- If you installed the JDK Type / Copy / Paste: sudo update-alternatives -set java /usr/local/java/jdk1.7.0_45/jre/bin/java
- If you have JRE installed Type / Copy / Paste:sudo update-alternatives -set java /usr/local/java/jre1.7.0_45/bin/java
- This is the command to set up java runtime system for the system.
- Only when installing the JDK Type / Copy / Paste: sudo update-alternatives -set java /usr/local/java/jdk1.7.0_45/bin/java
- This is the command to set up java compiler for the system.
- If you installed the JDK Type / Copy / Paste: sudo update-alternatives -set javaws /usr/local/java/jdk1.7.0_45/bin/javaws
- Or if you have JRE installed Type / Copy / Paste: sudo update-alternatives -set javaws /usr/local/java/jre1.7.0_45/bin/javaws
- This is the command to set Java Web to boot on the system.
Reload the / etc / profile system path by entering the following command:
- Type / Copy / Paste:. / etc / profile
- Note down the system path / etc / profile file will reload after restarting Ubuntu Linux system.
Check if Oracle Java is installed correctly on the system or not. Run the following command and record the Java version: If the 32-bit Oracle Java installation is successful, you will see the message: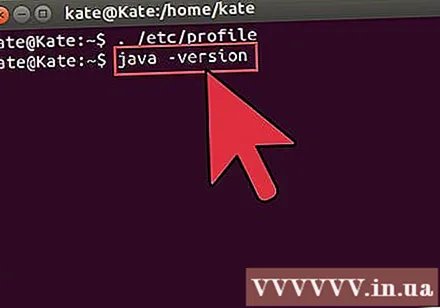
- Type / Copy / Paste: java -version. This is the command to show the java version on the system. You will see the message: java version "1.7.0_45"
Java (TM) SE Runtime Environment (build 1.7.0_45-b18) - Java HotSpot (TM) Server VM (build 24.45-b08, mixed mode)
- Type / Copy / Paste: java -version. This is a command notifying that you can now compile Java programs from the terminal. You will get the following message: java 1.7.0_45. A successful installation of Oracle Java 64-bit will display:
- Type / Copy / Paste: java -version. This is the command to show the java version running on the system. You will get the following message: java version "1.7.0_45"
Java (TM) SE Runtime Environment (build 1.7.0_45-b18) - Java HotSpot (TM) 64-Bit Server VM (build 24.45-b08, mixed mode)
- Type / Copy / Paste: java -version. This is a command notifying that you can now compile Java programs from the terminal. You will get the display message: java 1.7.0_45
- Type / Copy / Paste: java -version. This is the command to show the java version on the system. You will see the message: java version "1.7.0_45"
Congratulations, you have successfully installed Oracle Java on your Linux system. Now just reboot the system. The system will then be fully configured to run and develop Java programs. Then you can try compiling and running your own Java program. advertisement
Method 1 of 3: Optional: How to enable Oracle Java on the Web Browser
To enable Java plug-ins in a web browser, you must create a symbolic link from the browser's plug-in directory to the location where the Java plug-in is located in the Oracle Java partition.
- Important Note: You should be cautious when enabling Oracle Java 7 on your web browser because of the fact that Java has a multitude of vulnerabilities and exploits. More importantly, when activating Oracle Java 7 on your web browser, if there is a security vulnerability or exploit, this is a weakness for bad guys to invade and harm your system. For more information about Java vulnerabilities and exploits, visit the website: Java Tester
Method 2 of 3: Google Chrome
Oracle Java 32-bit Tutorial:
Execute the following command.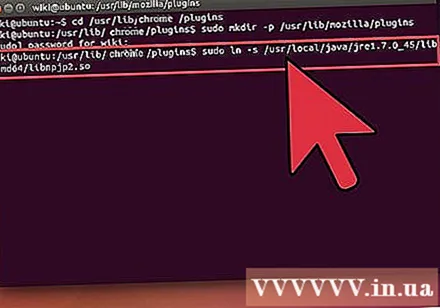
- Type / Copy / Paste: sudo mkdir -p / opt / google / chrome / plugins
- This is the command to create / opt / google / chrome / plugins directory
- Type / Copy / Paste: cd / opt / google / chrome / plugins
- This is the command that takes you to google chrome plugin directory, remember to go to this directory before creating the icon link
- Type / Copy / Paste: sudo ln -s /usr/local/java/jre1.7.0_45/lib/i386/libnpjp2.so
- Here is the command to generate symbolic link from Java JRE plugin (Java Runtime Environment) libnpjp2.so to Google Chrome browser.
- Type / Copy / Paste: sudo mkdir -p / opt / google / chrome / plugins
Oracle Java 64-bit Tutorial:
Execute the following command.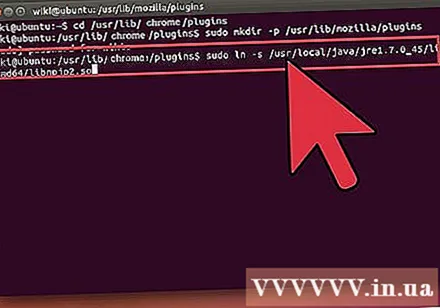
- Type / Copy / Paste: sudo mkdir -p / opt / google / chrome / plugins
- This is the command to create / opt / google / chrome / plugins directory
- Type / Copy / Paste: cd / opt / google / chrome / plugins
- This is the command that takes you into the google chrome plugin directory, make sure you get into the directory before creating the icon link.
- Type / Copy / Paste: sudo ln -s /usr/local/java/jre1.7.0_45/lib/amd64/libnpjp2.so
- Here is the command to generate symbolic link from Java JRE (Java Runtime Environment) plugin. libnpjp2.so to Google Chrome browser.
- Type / Copy / Paste: sudo mkdir -p / opt / google / chrome / plugins
Remind:
Note: Many times when you execute the above commands, you will receive the following message: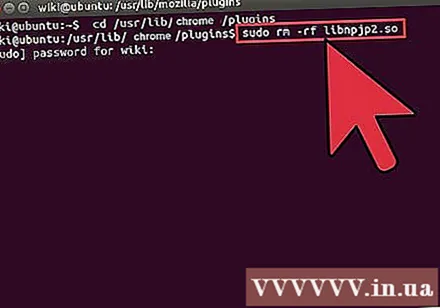
- ln: creating symbolic link `./libnpjp2.so ': File exists
- To fix this problem, simply remove the link earlier using the following command:
- Type / Copy / Paste:cd / opt / google / chrome / plugins
- Type / Copy / Paste:sudo rm -rf libnpjp2.so
- Make sure you are in the / opt / google / chrome / plugins directory before executing the command.
Restart your web browser and go to Java Tester to check if Java is working or not. advertisement
Method 3 of 3: Mozilla Firefox
Oracle Java 32-bit Tutorial:
Execute the following command.
- Type / Copy / Paste: cd / usr / lib / mozilla / plugins
- This is the command that will take you to the plugin / usr / lib / mozilla / plugins directory, create this directory if you don't have one.
- Type / Copy / Paste: sudo mkdir -p / usr / lib / mozilla / plugins
- Here is the command to create / usr / lib / mozilla / plugins directory, make sure you are in the directory before creating the symbolic link.
- Type / Copy / Paste: sudo ln -s /usr/local/java/jre1.7.0_45/lib/i386/libnpjp2.so
- Here is the command to generate symbolic link from Java JRE (Java Runtime Environment) plugin. libnpjp2.so to the Mozilla Firefox web browser.
- Type / Copy / Paste: cd / usr / lib / mozilla / plugins
Oracle Java 64-bit Tutorial:
Execute the following command:
- Type / Copy / Paste: cd / usr / lib / mozilla / plugins
- This is the command that will take you to / usr / lib / mozilla / plugins, create this directory if you don't have one.
- Type / Copy / Paste: sudo mkdir -p / usr / lib / mozilla / plugins
- Here is the command create directory / usr / lib / mozilla / plugins, make sure you are in the directory before creating the symbolic link.
- Type / Copy / Paste: sudo ln -s /usr/local/java/jre1.7.0_45/lib/amd64/libnpjp2.so
- Here is the command to generate symbolic link from Java JRE (Java Runtime Environment) plugin. libnpjp2.so to the Mozilla Firefox web browser.
- Type / Copy / Paste: cd / usr / lib / mozilla / plugins
Remind:
Note: Sometimes you execute the above commands and get the message:
- ln: creating symbolic link `./libnpjp2.so ': File exists
- To fix this problem simply remove the previous link with the following command:
- Type / Copy / Paste: cd / usr / lib / mozilla / plugins
- Type / Copy / Paste: sudo rm -rf libnpjp2.so
- Make sure you are in / usr / lib / mozilla / plugins directory before executing the command.
- Restart your web browser and visit the page Java Tester to check if Java is working in the browser. advertisement
Advice
- With Ubuntu Linux, you can choose between OpenJDK, the free, open source Java programming language; or Oracle Java JDK and JRE. Some people like to use Oracle Java (since this is the most updated version of Java and comes from Java technology maintainers) but also different.
- Keep in mind that Oracle upgrades security, fixes bugs, and improves performance with every Oracle Java update. When installing Oracle Java on your system, pay attention to the version number. Refer to the Oracle Java upgrade tutorial on Linux.
- Note that this article is constantly revised because Oracle sometimes changes the Java JDK / JRE binary installation method.


