Author:
Roger Morrison
Date Of Creation:
28 September 2021
Update Date:
1 July 2024

Content
The overhand knot is a simple, quick knot that is good to use with ropes that do not have great force. The knot is popular among sailors, climbers and packers because of the dexterity and ease of knotting. The overhand knot, one of the easiest knots available, still proves to be strong enough for most common applications. Best of all, anyone can learn to tie a square knot in just a few steps.
To step
Method 1 of 3: Make a standard square knot
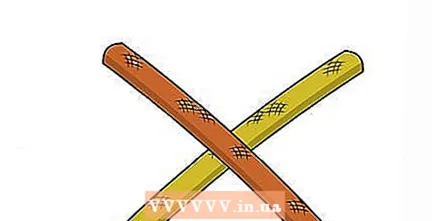 Take two ropes and put the right rope over the other.
- To make this knot you will need two ropes, wires, etc. Alternatively, you can take both ends of a single rope.
- In our example, we will lay the rope in the right hand (the orange one in the picture above) over the rope in the left hand (the yellow one). However, if you put the rope in the left hand over the one in the right hand instead, you can still tie a square knot if you do the following directions the other way around.
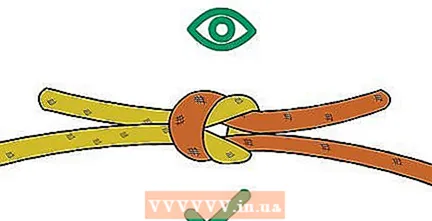 Check your square knot.
- From the front, your square knot should look like the image above. You can also find good images for reference at AnimatedKnots.com and other button sites.
- If you have tightened the knot correctly, you should see that it forms a neat, even knot of two loops, one loop around the base of the other loop.
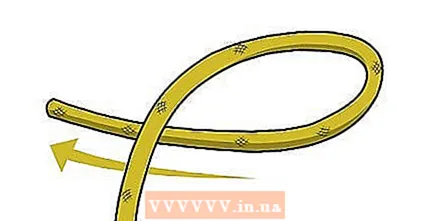 Make a loop with the rope in your left hand.
- Start with a rope in both hands (just like in the method above) and fold the rope in the left hand into a big loop.
- With this method you will make a knot that is identical to the knot in the method above.
- As above, you can also make a loop with the rope in your right hand and follow the directions the other way around to get the same knot.
 Try to use loops (instead of single ropes) for the entire knot.
- If you have long lengths of string to use (such as if your shoelaces are too long), you can try making an overhand knot with loops rope (also eye splitting called) instead of a few pieces of string.
- To tie this variation, simply start with a loop in each hand and treat the loops as if they were single ropes in the standard overhand knot instructions. In other words, the right loop becomes the right rope and the left loop becomes the left rope and you follow the instructions in the same way.
Tips
- This is a good button to tie boxes and bundles because it is flat and does not stick out.
- After you have tied the first half of the knot, an easy way to remember which way the rest is going is by remembering that the end on top will remain on top after that, over the other (see the yellow end in the picture in step 3 above).
- If you have a hard time learning this knot, it can help you tell them apart by using two different colors (just like in the pictures).
- A helpful reminder to remember the steps for tying an overhand knot is: Right over left and left over right.
Warnings
- This calls for repetition: the square knot is not designed to be used under great force; a strong force applied to either side will pull the knot loose. Other knots like the lap stitch or the fisherman stitch can handle stronger loads.
- This knot works because the tension between both ends holds the knot together. Therefore it is usually not suitable for slippery ropes such as nylon.


