Author:
Helen Garcia
Date Of Creation:
17 April 2021
Update Date:
14 May 2024

Content
1 Decide on the size. The first thing to do before creating a lightbox is to decide on the size of the box. Most lightboxes are made from boxes. If you plan to photograph mostly small items like flowers, collectible china or toys, the size of the box can be relatively small (about 28 cc); for large items (kitchen utensils), a proportionally large box is required.- In general, choose a box that is about twice the size of the items you intend to photograph. Of course, the larger the box, the better, but remember that a large box also takes up a lot of space. Choose according to your requirements and constraints.
 2 Collect materials. By far the easiest way to make a lightbox is from a corrugated cardboard box. It is possible to make a lightbox from more durable materials, but if you do not intend to carry it often, then this does not make any sense. In addition to the box, you will also need: a stationery knife, a ruler, scotch tape, bright white paper for the printer.
 - If the sides of the box are significantly larger than the two sheets of printer paper folded together, then you will need larger material to make the box white. A piece of clean white cloth from a new sheet will do; you can also use a large white Whatman paper or a projector screen.
3 Cut off the unnecessary. Start by cutting off the top of the box. - Use a ruler width to indicate the distance to each edge on one side of the box.

- Cut out the cardboard on this side, leaving the measured edges intact.
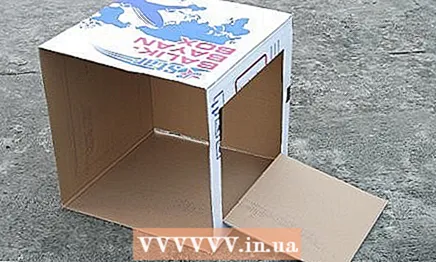
- Do not cut the other three sides and bottom.

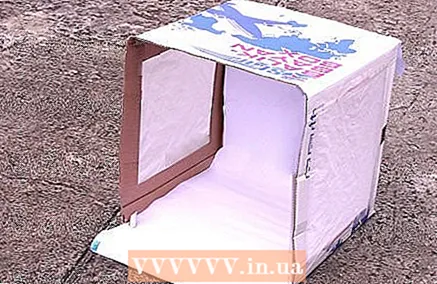
4 Turn the box over and paper over. Rotate the box so that the cut-out side faces the ceiling and the top of the box faces you. This is the correct position for your lightbox. Place the sheets of printer paper so that they overlap the edges of the cutout hole and secure them with tape. The inside of the box should be completely white. 5 Secure the backing sheet. To hide the back bottom corner and create a seamless, even background for your photos, you need to clip a curved sheet of paper over it. If you are using a small box, place a sheet of paper on the back wall as if it were "sitting", partially covering the bottom and back of the box. Do not bend it, let it bend naturally. Loosely secure the sheet with tape at the top. - For large boxes, a white poster board or similar material with the desired gloss level is ideal.

- If you don't want the background to be white, the backing sheet can be any color. It will not be firmly attached to the box, so you can replace it at any time.
 6 Lightbox lighting. Now that the box is ready, it needs to be brightly lit. For smaller boxes, flexible table lamps can be used, for larger boxes, clip-on lamps or larger flexible table lamps can be used. Aim the two bulbs so that they shine directly into the lightbox, one on each side. Turn on both lamps and set the subject to the lightbox for a test shot.
 - Use the brightest light bulbs available for optimal brightness in your photos. Adjust the lamps so that no shadows are formed around the test subject.

- If using a larger box, a third top lamp can be added. Experiment for optimal results without harsh shadows.
Method 2 of 3: Three-lamp lightbox
 1 Make more cuts. To make a three-lamp lightbox that uses more ambient light, you need to cut three sides of the box instead of just one. Be sure to leave some space around the edges to keep the box in shape.
 - 2 Glue the sides of the box evenly. Using a bright, blank sheet or roll of bright white paper, glue all three sides firmly and evenly, securing the sides with tape or glue. Make sure there are no wrinkles or ridges in your coating.
- 3 Add inner cover. Rotate the box so that it is on the uncut side with the top facing you. At the top edge of the back of the box, use a utility knife to make a full-width cut. Use a long piece of heavy paper as a backing sheet by sliding it through the cut. Push the paper through until it reaches the bottom of the box.
- If the paper does not completely cover the bottom of the box where you will be taking pictures, place a second sheet of paper underneath.
- 4 Lightbox lighting. Use one lamp on each side and one for the top of the lightbox. Light will be diffused through the paper-sealed sides of the box, creating bright, even lighting inside.
- To prevent overheating of the lightbox, do not place lamps too close to the box.
Method 3 of 3: Taking pictures of people
- 1 You will need a lot of space. Following the principle of "the space should be larger than what you photograph", the "lightbox" for people should be quite large. At a minimum, you need an entire room in your home; if you find more space than 6m x 6m x 3m, that's even better.
- A clean, empty garage is ideal.
- 2 Buy the materials you want. To begin with, you cannot use paper for the bottom of the lightbox, so you need a white liner sheet instead. Purchase enough material to cover an area of 3m x 3m or more. Next, buy a roll of seamless paper (available at specialty stores), some sturdy uprights, and A-clips to hold the paper in place. You will also need three identical bright lanterns on high stands (adjustable, at least 3 m high). Finally, get some white roll-up folding doors from your building supplies store.
- Alternatively, you can buy a folding folding door and attach a white cladding sheet to one side.
- Such surroundings are suitable for creating high-quality photographs. Don't expect it to be cheap and fast to create. For standard photographs of people, you can hang up seamless paper and play around with multiple bright light sources until you get decent quality pictures.
- 3 Installation of light. Set your main light high and point it to where the seamless paper will hang. Place a screen in front of it to diffuse the light a little.Place the other two light sources on the stands on the sides and in front of the main light source, point them in the center. Use a tilt-up folding door on the inside in front of the side lamps to prevent direct light from entering your subject. Fold them so that the corners are inward and the white side is toward the lamps. Leave 2.7 m of space between them, which will be illuminated by the main light.
- 4 Set a white background. Lay two sections of white backing sheet from the camera to where the seamless paper will hang on the floor. Cover the section on the paper side slightly with the section closer to the camera so that the protrusion is not visible in the photographs. Hang a roll of seamless paper on the racks and pull the paper down, partially overlapping the cover sheet and allowing it to hang naturally. Secure the paper with A-clips.
- 5 Lighting and photography. There are many more tricks that can help you get the perfect shot with this setup, but at this point we've laid out the basics. Set the object in front of and between the folding folding doors, close to the seamless paper. Turn on all three lights and start shooting between and behind the folding doors.
- 6 Ready.
Tips
- Experiment with bulbs. Different shades and materials give different effects in the lightbox. Try different bulbs - clear, soft white, halogen, or whatever catches your eye - until you find the quality of light that works for your projects.
- Get ready to edit your photo. The undoubted plus of lightbox is that it provides crisp, clean photographs of objects without background clutter. However, depending on the quality and settings of your camera, the light used, and the smoothness of the space inside, you will still have to quit using image editing programs to get the best quality.


