Author:
William Ramirez
Date Of Creation:
21 September 2021
Update Date:
8 May 2024

Content
- Steps
- Method 1 of 3: Collecting the Materials Needed
- Method 2 of 3: Installing the frame
- Method 3 of 3: Covering the wigwam
- What do you need
The traditional plains (TP) "teepee" is a spacious and sturdy structure, large enough to make a fire and comfortably accommodate several people. It is suitable for living in hot or cold weather and, with all the necessary materials, it is relatively easy to install, disassemble or move to another location, making it ideal for a nomadic lifestyle. If you're looking to build a holiday wigwam as an innovation, or because you want to live in an alternative home, then read on to find out where to start.
Steps
Method 1 of 3: Collecting the Materials Needed
 1 Find any canvas. Traditionally, wigwams were constructed from tanned buffalo or deer hide, which were waterproof and pliable. Buffalo skin is relatively difficult to obtain these days; most modern wigwams are built using canvas. The smaller the wigwam, the more difficult it is to manage the fire in it, so if you are only going to build one, consider making it significant in size.
 - For a comfortable-sized wigwam, you will need a piece of canvas approximately 15 x 30 feet.
 2 Prepare some poles for the house. The two main requirements for a wigwam are canvas and supports, about three feet longer than its width. For a really solid wigwam, you need about 12 supports. and the smoother they are, the better. Ideally a few inches thick and crafted from pine.
 - The easiest way to get hold of these beams is to buy them at a specialist store. Deforestation is also an option, but you need to make sure it is legal in your area. To be on the safe side, it's best to buy them and make sure they are strong and completely legal.
- Prepare the joists for use by smoothing out any rough areas with a penknife and sandpaper, and apply a layer of a 50/50 mixture of linseed oil and turpentine.This will ensure that your poles are protected for years to come.
 3 Cut out the wigwam template from the canvas. If you don't have a cut canvas for your tepee, you will have to cut it out. Transfer the template to the canvas first, but the main cut is a semicircle, with equal width and length, with notches to each end on the flat side in a semicircle, and with valves cut in the middle of the flat side for use as a "chimney", and a hole for entrance. You will also need to provide enough canvas to cover the entrance.
  4 Purchase 45 feet of rope or straw rope. Synthetic rope is not suitable for creating wigwams due to the difficulty of holding the supports, unlike natural ropes, it slides off.
 - It is also good to have about 12-15 pegs to fix the base of the wigwam to the ground, and if they remain, you can start a fire. If you want an authentic wigwam, get some porcupine quills or other long pins to hold the canvas in place.
Method 2 of 3: Installing the frame
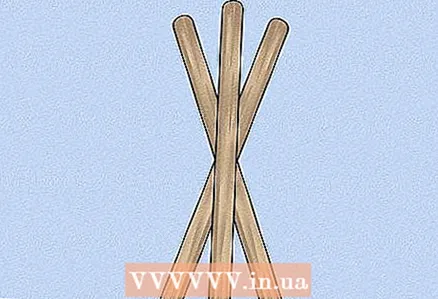 1 Build a tripod. The wigwam begins by creating a simple tripod from three beams. Place two poles on the ground next to each other and lay the third across them, creating a sharp angle at the top of about 30 degrees. The two adjacent beams will be corner beams, while the third will be used as a door.
 - For accurate measurements, lay out the canvas and collect the beams on top. From the vertices of the two base beams in the center of the canvas, pointing towards the center with the flat side, place the third one from the top so that its end protrudes about 1/3. This should be about 30 degrees.
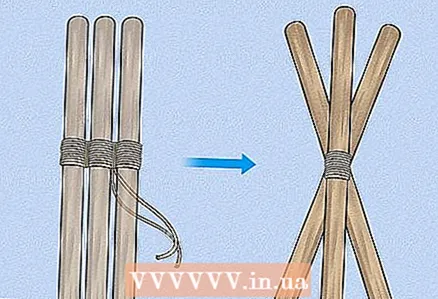 2 Tie a tripod using knots. Use about six feet of rope to tie the beams together. You should have about five feet on the short side and about 40 feet on the long side. Don't cut the rope. Short end, wrap around the beams several times, then tie to the other end of the remaining rope. The rest of the rope will come in handy later. Leave her coiled.
 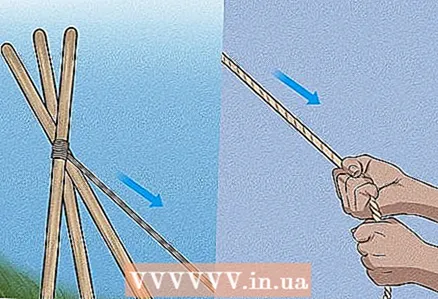 3 Pick up the wigwam. At the chosen location, lift the tied poles by pulling on the rope. We need helpers who would hold the tripod to avoid dragging.
 - At the moment, the wigwam looks more like a bipod. When they are upright, separate the two poles tied together and spread them about 9 feet apart. They will be the wall of the wigwam, while the third pole will be the door. The bases of the beams should form an almost isosceles triangle. The distance to the door rail should be a foot wider than between the corner beams.
- Make sure all corners of the tripod are firmly in place by pulling down on the rope, standing right in the center of the rope below the joist junction.
 4 Arrange the poles. Choose a sturdy pole to use as a "lift". Add poles by moving counterclockwise around the tripod, starting to the right of the door pole. The sides of the tripod between the door and corner handrail should have five beams. The back side, between the two corner beams, should have four poles, plus your "lift".
 - Leave space for the "lift" pole in the center of the rear of the wigwam. There should be four beams with a gap in the middle for the "lift". It will be used later to install the roof on the wigwam.
- Holding the base of each pole with your foot in an imaginary arc between the adjacent two posts and the door pole, carefully place the foot into the V-joint of the tripod created by the adjacent posts.
- The distance between all the poles should be about 3 feet.
 5 Wrap the poles. Holding the long end of the rope, walk about 4 times around the intersection of the beams. Leave the rest of the rope hanging from one of the corner supports.
Method 3 of 3: Covering the wigwam
 1 Place the "lift" rail in the center of the canvas. The lifting rail should be exactly in the center of the flat part of the canvas and in the center of the semicircular side.If you bought a prepared canvas, there should be small loops in the center of the canvas, and a rail should be attached to them.
 - It is very important to tie the canvas to the lifting bar. If the canvas slides off even a few centimeters, then folds will appear, the covering of the wigwam will be uneven and will release heat outside. To make sure the canvas does not slip, make one inch spacers in the eyelets.
 2 Roll up the canvas. While the canvas is still on the ground and the lifting pole is securely in place, fold the edges towards it. Do not roll up too tightly, as if you were folding the flag, so that you can unfold easily and evenly when you raise the lifting pole.
 - Lift this structure and place it in the gap that you have prudently left on the back wall of the tepee.
 3 Expand the canvas. With the handrail in place, unfold the canvas around the tepee frame from the back wall to the door rail. Make sure the smoke valves on the canvas are facing outward and tie them together. The wigwam looks almost complete at this stage.
  4 Lock the smoke valves. Most commercial wigwams have holes, but if you cut out the canvas yourself, you should use pins or pins to close the hole in the roof and join the edges of the canvas.
 - This can be done with porcupine quills, which have been used traditionally, but small wooden pins are more durable and affordable. They are available everywhere, as are the pine wigwam poles.
 5 Fix the canvas to the ground. It is wise to ensure that the canvas is well anchored to the ground using traditional metal tent pegs so that strong winds do not turn your teepee into a parachute. When you're ready to go inside, install a door to the outside and you're ready for a flat style life.
 - If you want to start a fire in your wigwam, you need to open the smoke valves, otherwise there is a risk of fire. Make hinges on the door side of the tepee to secure the door so that when you open it it doesn't pop back and extinguish the fire.
- Be very careful if you want to start a fire in cold weather. This will be a great source of heat and your wigwam will be warmed up in no time, but make sure the fire is optimally positioned in relation to the smoke dampers and never take your eyes off it.
 6 Ready.
What do you need
- 12-15 pine poles
- Canvas 15 x 13, or pre-cut teepee template with cover pattern
- Wooden pegs or other fastening materials to secure the canvas
- 45 feet of rope or straw rope
- Sharp knife or ax
- Roulette


