Author:
Helen Garcia
Date Of Creation:
17 April 2021
Update Date:
14 May 2024
Content
- Steps
- Method 1 of 6: Calligraphy Basics
- Method 2 of 6: How to Write Gothic Letters
- Method 3 of 6: How to write in italics
- Method 4 of 6: How to choose a calligraphy paper
- Method 5 of 6: How to write letters without using a pen
- Method 6 of 6: How to write letters using a stencil
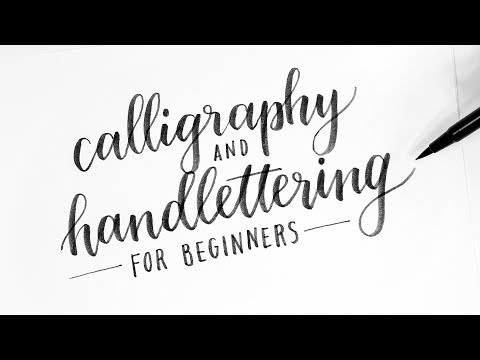
For many years, important documents were written by hand using a special handwritten font. With the advent of hundreds of computer fonts, the art of calligraphy has lost its relevance. However, calligraphy can come in handy when writing letters, cards, invitations, and other creative projects.
Steps
Method 1 of 6: Calligraphy Basics
 1 Master the basics of calligraphy. In calligraphy, letters are formed by alternating thick and thin strokes. They are not written the way we are used to. The contrast of bold and thin lines creates a recognizable pattern. Calligraphy has a few key rules:
 - When writing, do not change the angle of the pen.
- Do not apply too much pressure to the nib.
- Strive to ensure that all lines are parallel to each other, even in oval elements.
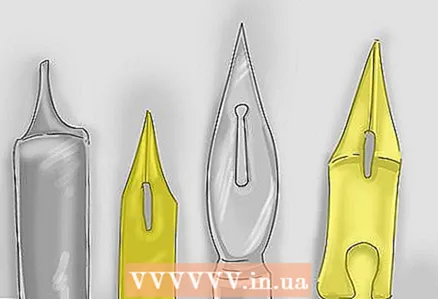 2 Buy a variety of feathers. The calligraphic pen, unlike the usual pens, has a wide and flat surface. This design creates a contrast between thin and thin lines, making calligraphy fonts look sophisticated. Feathers come in a variety of sizes, so buy a few and experiment with them.
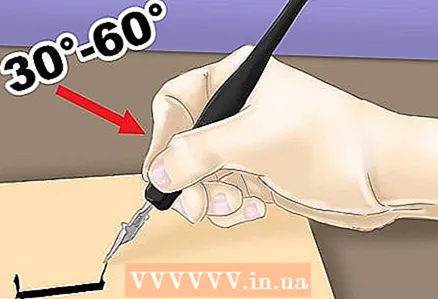
  3 Hold the pen at one angle. It is important to always hold the pen so that the angle of the pen does not change. The pen should point to the left and tilt at an angle of 30 ° –60 °. Each font has its own slant. The tilt also depends on how you hold the pen.
  4 Strive for uniformity in the shape of all elements. The nib should not turn when writing. For the letters to be correct, the nib should always point in one direction. Therefore, you will have to tear off the pen from the paper and add the strokes that form the letters. Each stroke follows the same rules, which makes all letters look the same.
  5 Do not apply too much pressure to the nib. Every stroke should be smooth. The pen can be dragged backward, forward and sideways. The palm, wrist, forearm, and elbow should not touch the table. Thanks to this position of the hand, the movements will turn out to be light.
 - If you press too hard on the nib, it breaks. In addition, the letters may turn out to be irregular, and your hand will quickly get tired.
- If you do not press the nib properly, the nib may tear through the paper and ink may leak out. Always work according to the basic rules of calligraphy.
 6 Make sure that the vertical, horizontal, and diagonal lines are parallel to each other. Whichever font you choose, this rule remains the same. For example, in calligraphic italics, lines are drawn up and down obliquely, and in Gothic, lines are drawn strictly vertically up and down.
  7 Do not allow the letters to be tilted differently. In calligraphy, it is extremely important to achieve the same angle of inclination of all elements. This is just as important as keeping the pen at the same angle. Even if you write the letters at the correct angle, they will not look the way they should if you were holding the pen incorrectly. Do not change the angle of the pen when writing different strokes.
 - You will need to rip the nib off the paper to make the letters consistent. To ensure the angle is always the same, do not rotate the holder when you pull it off the paper or move it between your fingers.
Method 2 of 6: How to Write Gothic Letters
 1 Try writing letters in the Gothic style. This style is characterized by wide, square letter shapes. Letters are written with the same vertical strokes. Gothic can be used to create a special atmosphere on book and music album covers, posters, and movie credits. The Gothic font is also used in the design of diplomas and certificates that are awarded for certain achievements.
  2 Pay attention to the uniformity of letterforms. The Gothic font is quite dense, and all the letters look wide and angular. The similar shape of the letters allows you to create uniform text. There are several rules in Gothic:
 - Hold the pen at an angle of 30 ° -45 ° to the paper.
- Draw lines only vertically.
- For decorative elements, draw diagonal lines from top to bottom.
- Write the letters in short, clear strokes.
- Make sure the elements are consistent.
 3 Hold the pen at a 30 ° angle. The angle may change slightly as you work, but it is important to remember that by keeping the angle constant, you will be able to create the same letters.
  4 Write each letter with multiple strokes. The letter should be written not in one movement with a turn, but in 2-4 strokes. Although all letters are different, they have many similar elements.
 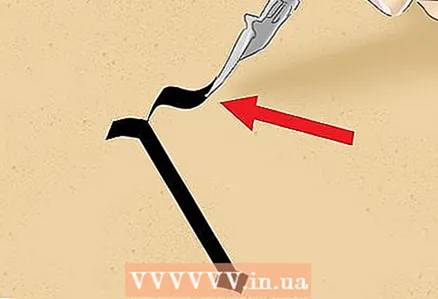 5 Draw a straight line downward. The letters of the Latin alphabet h, m, n, r and t will have the same first stroke. Hold the nib at a 30 ° angle and draw a straight line downward, and then add the ponytail at an exactly 45 ° angle. The ponytail should be short and sharp and should not overlap with other elements of the letter.
  6 Draw a curved line downward. The letters b, d, l, u and y will have the same first stroke. You will need to draw a straight line down with the ponytail to the right at a 45 ° angle. The line should be smooth rather than sharp.
  7 Write oval elements. To write an oval for b, c, d, e, o, p, g, and q, start at the top, then move right and down to write the top of the ovals. Then tear off the pen from the paper and draw another line down and to the left. The two lines should converge.
 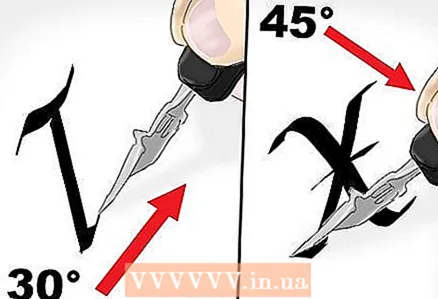 8 Watch the angle of inclination. Some elements require a 30 ° tilt, but when writing the letters k, v, w and x, you will need to change the tilt angle by 45 °. First, draw a line from top to bottom, and then move to the right or left at an angle of 45 °. When you get to the bottom point, change the angle by 30 ° to create a bend.
 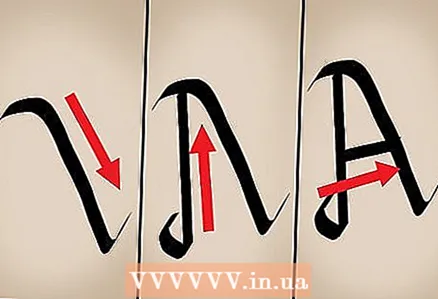 9 Write the letter "a" in three movements. The letter "a" is special - it is written in three movements. Take the pen at a 45 ° angle. To write a ponytail, draw a line to the right and up, and then down and to the right. Finish the line with a tail pointing up and to the right. Take your hand off the paper and write the bottom of the oval, drawing a line from left to right and down. Then write the top of the oval by drawing a straight line that connects to the beginning of the second stroke.
 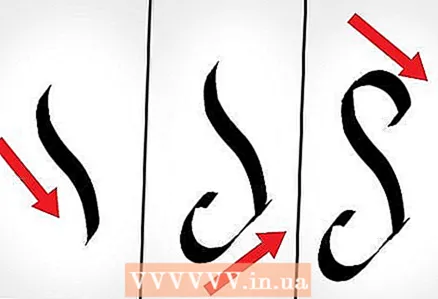 10 Write the letter "s" in three strokes. First, stroke the center line down from left to right. Write the bottom line from left to right and connect to the center stroke. Then write the top line from left to right, starting from the center line, and go down.
  11 Write the letter "z" with horizontal lines. To get a horizontal line, the pen needs to be moved left or right. To make the "z" curved, bend the line slightly at the beginning and end. Remember to maintain the same pen angle. Draw a center line from the right corner down at a 45 ° angle. At the end, write a second horizontal line starting from the end of the centerline and going to the right. Remember to bend the line at the beginning and end. The horizontal lines should have the same curvature.
 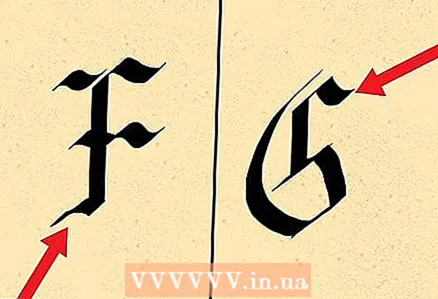 12 Pay attention to the repeating elements. Although "g" and "f" are spelled differently, they have the same main line and tail. Swipe down and write a ponytail on the left. Don't line up. Tear off the pen from the paper and draw another line down and to the left. The lines should connect.
  13 With these strokes, you can write the entire alphabet. All letters are written according to the same rules. Practice writing all the letters so that your alphabet looks consistent.
Method 3 of 6: How to write in italics
 1 Learn the features of italics. Calligraphic italics are a lot like regular cursive. Most letters are written in one motion, as italics are designed to speed up the writing process. You will need to master descending, ascending, and oval strokes.
 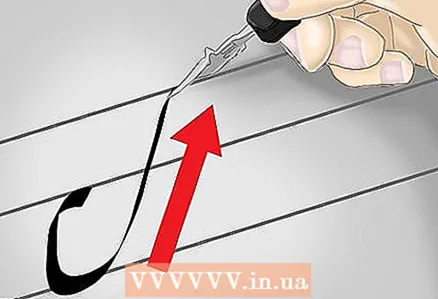 2 Learn to write the main stroke. Take lined paper and start just above the bottom ruler. Write a small ponytail down to the bottom ruler, and then draw a line up from left to right.
 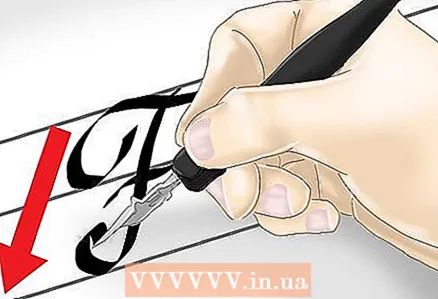 3 Learn to write downward strokes. The letters b, f, h, i, j, k, l, m, n, p, r, s, t, u, v, w, x, y, and z begin with a dash downward. In some letters, this stroke reaches the top baseline, in some - to the middle. The letter "f" will go beyond the bottom line. In these letters, the main descending stroke is written from right to left.
 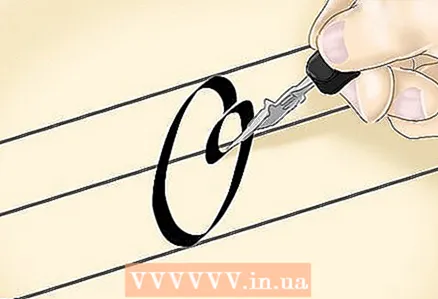 4 Practice writing an oval, as in the letter "o". Place the nib directly below the top ruler. Move to the right and draw a line to the top point. Then write the oval down and to the right.
 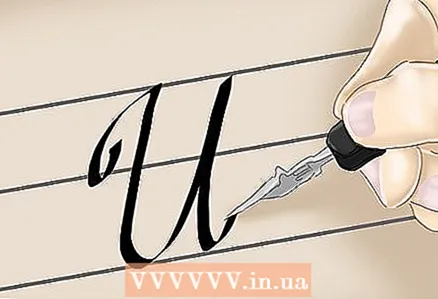 5 Write the letter "u". Place the pen on the bottom ruler. Draw your main line up, then draw down and write the ponytail up. After that, go back to the beginning of the letter, draw a line down and bend it so that the two lines connect.
 - This stroke is found in the letters i, j, m, n, r, v, w and y.
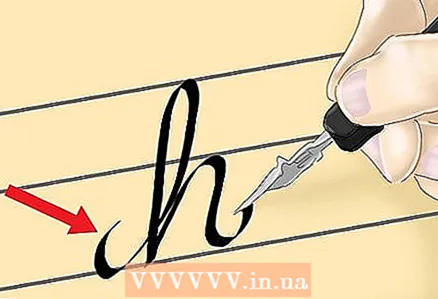 6 Write the letter "h". Place your pen on the bottom ruler and draw a line up to the top ruler. Then bend the line to the left and stroke down to the bottom ruler so that the two lines intersect at the bottom. Draw a line up to the middle and another stroke down. At the end, add the ponytail.
 - The letters b, f, k and l are spelled similarly.
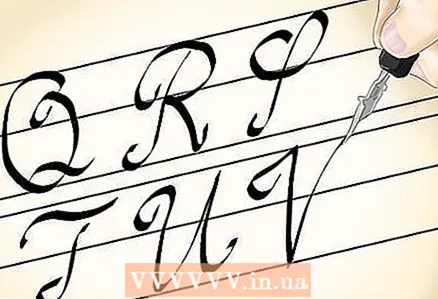 7 Try writing different letters. Use the italic alphabet to figure out what the letters should look like. Remember to keep an eye on the angle and do not write letters in one motion.
Method 4 of 6: How to choose a calligraphy paper
 1 Use glued paper. Sizing helps to reduce ink absorbency, so the ink does not spread. This is the most popular type of paper for calligraphy because it produces crisp, even letters.
 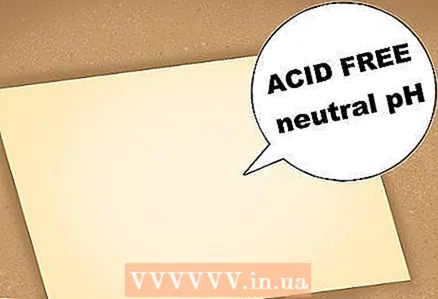 2 Choose paper that is neutral in acidity. Over time, the paper may begin to turn yellow and crumble. Neutral acidity paper is treated in a special way, so that it can be stored for a long time.
  3 Try writing on archival paper. This paper is made from cotton or cloth and is impregnated with alkali so that it does not turn yellow over time. For calligraphy, any paper and notepads marked "neutral acidity" or "archival" are suitable.
Method 5 of 6: How to write letters without using a pen
 1 First sketch out the lines with a pencil. This will fix the errors. The pencil is easy to erase and a corrected line can be drawn on top.
 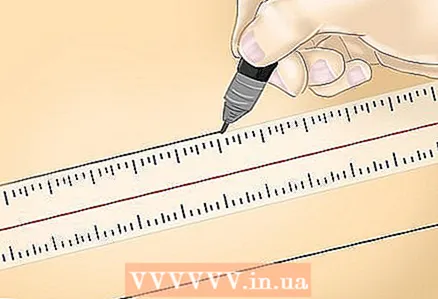 2 Draw straight lines with a ruler. The lines should be parallel to the top and side edges of the paper.
 - To prevent the paper or any other surface you are writing on from shifting, secure it. This will keep the letters straight.
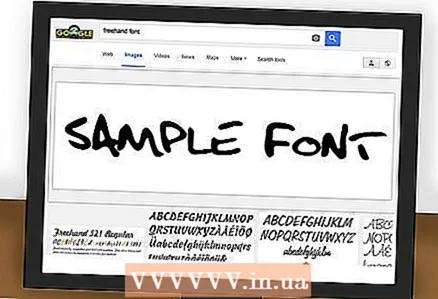 3 Select the font you want to copy from your computer. You can use text editor fonts or search for them on the Internet. Find the font you want and keep it in front of your eyes.
  4 Start drawing letters. Take your time and try to do everything as carefully as possible. Use a ruler if necessary.
  5 Draw a special pen over the pencil lines. Use a pen with a sharp point or a pen that glides very smoothly over the paper to create crisper lines. Special pens can be purchased online.
  6 Erase the markings. Be careful not to smudge the handle. Only erase lines when the ink is completely dry.
Method 6 of 6: How to write letters using a stencil
 1 Purchase an italic stencil. Using a stencil, you can get even letters. There are many stencils for different cursive fonts.
  2 Draw the letters with a pencil. First you need to apply the markup. This will make it easier for you to correct any mistakes with letters and gaps between them. Make a sketch with a quality calligraphy pencil. Special pencils have thin tips and a special lead that glides well on paper.
  3 Add additional elements. After the sketch is ready, add additional elements. You can draw dots along the lines, various wriggling lines that seem to grow out of letters, colored elements. What will be the final work, you decide.


