
Content
- Steps
- Part 1 of 2: Preparing the Cabinet Doors
- Part 2 of 2: Whitening the Cabinet
- Warnings
- What do you need
In the past, whitening of cabinets was limited to diluting the usual white paint with a solvent and then painting the furniture, resulting in an uneven color. White paint specifically designed for wood is now available. Bleached cabinets brighten the interior. In addition, after bleaching, the natural texture of the wood becomes visible. Some woods, such as pine, are better bleached; however, cabinets made from other species, such as oak, can be bleached through a process called staining. Regardless of the type of wood, the success of bleaching lies mainly in the correct preparation for the process, as well as sufficient drying time after application of the paint and protective coating. This article will show you how to bleach cabinets in your home.
Steps
Part 1 of 2: Preparing the Cabinet Doors
 1 Find out what kind of wood your cabinets are made of. It is easiest to bleach softwoods such as pine.
 - For oak, you will need a method of bleaching wood, such as staining. After it, final processing is required.Staining can also be done on soft woods such as pine, but it is mainly applied to oak, ash and other hard woods. The composition of the solution for staining oak or ash can be selected by yourself, or you can purchase a ready-made paint.
 2 Disconnect the doors from the cabinet. This will make it easier to bleach the doors and make it easier for you to reach the cabinet body. It is more convenient to work when the doors are disconnected.
 - Use a drill to remove the doors. When unscrewing the screws, mark them so that you know exactly where this or that screw comes from. This will help you reassemble the cabinet later by screwing the doors into place.
 3 Clean the doors. Before painting wood, wipe the doors with a cloth dampened with a standard degreaser. Degrease the front and back of the cabinet and the sides with a degreaser. Remove the agent by wiping the cabinet with a damp cloth and, if necessary, repeat the procedure until the surface is completely clean.
 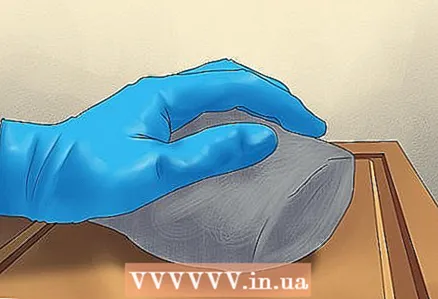 4 Remove old paint from doors. All paint must be removed from the wood before bleaching. Use a thinner to remove many layers of paint; if the paint has been applied in 1-2 coats, it can be removed by simple polishing. If it is difficult to determine the number of coats of old paint, start by polishing. When you see that this is not enough, use a solvent. First apply one coat of thinner or polishing paste using a steel wool. Then wipe off this layer with a rag.
 - Using steel wool and rags, place them in a metal bucket. Be sure to wear gloves and place any old fabric you don't need on the floor.
- Instead of a solvent, you can also use a special coating removal solution, referring to the instructions attached to it before working.
 5 Wipe the surface of the cabinet with sandpaper. This can be done manually or using a sander. The purpose of this operation is to give the furniture its natural wood color.
 - If you wipe the surface by hand, use a quarter sheet of 120 sandpaper folded in three. A piece of this size fits comfortably in the palm of your hand, making sanding easier. You can also wrap sandpaper around a block of wood to make it easier to work hard-to-reach areas using the corners of the block.
- The grinding machine will significantly speed up the work, especially in the case of a large work surface. If you have such a machine, be sure to use it to sand the cabinet doors.
- When sanding, try to work along, not across, the wood grain.
 6 Condition the wood with a conditioner. If the cabinet is made of soft wood, such as pine, it is necessary to lubricate its surface with a special conditioner, otherwise it may become uneven when painted. The conditioner can also bring out the texture of the wood. Use a standard product available from your local hardware store.
 - Apply conditioner with a clean emulsion paint brush, then wait 30 minutes. Then lightly rub the wood with 120 grit paper. This will ensure that the paint is absorbed evenly.
Part 2 of 2: Whitening the Cabinet
 1 Choose a lightening wood paint. Various paints give the wood a lighter or darker tone, so choose a color that suits you, considering your surroundings. There are many brands that offer a wide variety of wood paints.
 - Water-based wood paints produce less fumes, dry quickly and are easier to clean than oil paints, but discolor faster. Only use oil paint if the area is well ventilated.
 2 Check paint before applying. Before you start painting, it is advisable to test the paint by applying it to a piece of wood, similar to the one from which the cabinet is made.
 - Shake the paint can thoroughly before opening it. As a result, the paint will mix, and the sediment will dissolve in it, which could fall to the bottom of the can during long storage.
- Apply paint to an unwanted piece of wood with a brush and let it dry for 2 to 3 minutes. Make sure to select the correct paint before proceeding.
 3 Paint the wardrobe. Apply the paint to the wood with a clean rag, rubbing it into the wood in long, smooth strokes in one direction. Move along the grain of the wood, emphasizing its structure. Wipe off excess paint with another clean rag or a piece of soft cotton cloth folded several times. The harder you press on the fabric, the more the wood texture will show through after painting.
 - If you are staining an oak cabinet, apply the mortar with a brush while moving across wood fibers. This is necessary in order for the paint to penetrate into all the pores, which are quite large in oak. After rubbing the solution into the indentations, wipe the surface with a clean cloth to remove excess paint.
- If the rags used for painting become too sticky, replace them with a new one.
 4 Let the cabinet dry completely. This can take from one to two days. If the surface is sticky to the touch, then the paint is not completely dry and you need to wait a little longer.
 - 5 Finish the job with a top coat. Whitening can bring out the texture of the wood, but it does not provide surface protection. Apply a layer of non-yellow opaque paint; use a water-based varnish, acrylic or tung oil, they will penetrate the pores and protect the wood.
- Apply the top coat using a high quality brush designed for emulsion and water-based paint to avoid bristles on the cabinet surface. Apply overlapping strokes to completely cover the surface of the wood.

- Wait about 4 hours for the first layer of protective coat to dry, then lightly rub the surface with 220 sandpaper. Wipe the wood with a heavy cloth to remove any wood dust, then apply a second, final coat of the outer coat.
- After painting the bottom of the cabinet, place it on small bricks or planks to allow the paint to dry without staining the floor.
- Do not use an oil-based protective coating as it will give the wood a yellowish tint after bleaching.
- Apply the top coat using a high quality brush designed for emulsion and water-based paint to avoid bristles on the cabinet surface. Apply overlapping strokes to completely cover the surface of the wood.
 6 Replace the bleached cabinet. After screwing the doors to the cabinet, put it in its original place.
Warnings
- Do not use an oil-based protective coating as it will give your furniture a yellowish tint.
What do you need
- Steel sponge
- Clean rags
- Metal bucket
- Gloves
- Waste pieces of fabric
- Paint thinner or polishing paste
- Sandpaper 120
- Sandpaper 220
- Grinding machine (if available)
- Bleach wood paint (water or oil) or wood stain
- An unnecessary piece of wood
- Paint brushes (high quality, designed for water or oil paint)
- Water-based varnish, clear acrylic or tung oil


