Author:
Frank Hunt
Date Of Creation:
20 March 2021
Update Date:
15 May 2024
Content
- To step
- Method 1 of 5: Prepare the hair
- Method 2 of 5: Choosing a hairstyle
- Method 3 of 5: Cut the hair
- Tips
- Warnings
Cutting someone's hair can be an exercise in creativity, a matter of saving money or the cause of a haircut that goes wrong that takes weeks to come. Here are some principles, based on professional hairdressing training, to help you get started.
To step
Method 1 of 5: Prepare the hair
 Wash the hair. Just like an artist starts with a clean cloth, you should start with clean hair before cutting. Dirty hair or hair that still has styling products in it will not give you a good idea of what the hair will look like when you are done.
 - Use a shampoo and conditioner suitable for the type of hair you will be cutting. There are products for different types of hair - colored hair, dry hair, damaged hair, thinning hair and fine hair - so choose something that works best for this hair type.
- If the hair tends to get tangled, use a conditioner that will get the hair out of the tang. You don't want your comb to get stuck when you go through the hair.
 In special circumstances, work with dry hair. Make sure the hair is dry before you start working with the clippers, or if you want to thin the hair very carefully and do not want to remove too much volume.
 - Cut the hair dry if you just want to remove some split ends; these are easier to see on dry hair.
- If you are in a hurry, you will save time if you cut it dry.
Method 2 of 5: Choosing a hairstyle
- Select the desired cut. Whether you're cutting your own hair or someone else's, before you can do anything you need to figure out what look and cut you're going for. Ask (or think about) what shape the style should be, how long the hair should be cut, or if there are any style inspirations you can use as a guide.
 Determine the face shape. A haircut should match the shape of the face and enhance its features.
 - Oval. An oval face is the only face that goes with any style.
- Round. A layered top with volume and height and a bit more thinned hair under the cheekbones makes the face appear longer and gives the illusion of a thinner jawline.
- Heart shape. Get a style that has more volume at the bottom of the face and less volume at the forehead.
- Square. The idea is to soften the face a bit, so wispy bangs and wavy hairstyles will help with this. Straight lines, straight bangs and straight or flat hair should be avoided.
- Elongated. Consider bangs, especially side bangs can suggest a shorter forehead.
- Diamond. Choose a hairstyle with many layers. Avoid bangs unless you're going with a slightly off-centered look.
 Find detailed instructions for the hairstyle you want to make. You shouldn't just do anything when it comes to creating a hairstyle. There are tons of resources to give you step-by-step instruction for the style you want.
 - Watch videos online. Check YouTube and special hairstyle websites for videos that explain the hairstyle you want to make step by step. Make sure the person explaining it is an experienced hairdresser.
- Browse hairstyles magazines. Some magazines provide tutorials with photos showing you how to make a particular hairstyle.
- Check the websites of companies that make hair products. Often they also have manuals on their websites.
 Familiarize yourself with the terminology. You need to know what certain terms hairdressers use when talking about cutting hair so that you can follow the instructions more closely.
 - Angle means the position of the scissors when you cut; you may need to hold it vertically, horizontally or at 45 degrees.
- Pick up has to do with the angle of the hair when you hold it to cut; If the points point to the ground, that is an angle of 0 degrees. If it is to the side and thus parallel to the floor, it is 90 degrees (horizontal). If the hair is held so that the tips point to the ceiling, it is 180 degrees.
- Cutting is a technique used to create wispy layers or to thin out the hair.
- Layering means that you make different lengths in the hair. The long layers give the illusion of length and the short layers give volume.
- Gradual is a style where the hair is cut progressively shorter at the back to create a rounded shape. A bob is an example of this.
Method 3 of 5: Cut the hair
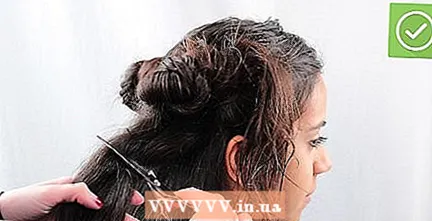
 Divide the hair into different parts. Hairdressing schools teach a standard division technique where the hair is divided into 7 parts: top, right side, left side, right crown, left crown, right neck and left neck. Let hang about 4 cm around the hairline.
 - Start by separating from the point just behind the ears on one side to the same point on the other. Now part both sides of the head just along the edge of the parietal bone to isolate the hair on top of the head.
- Comb the hair smooth towards the center of the section on top and twist it into a bun and secure with a (butterfly) hair clip. Does the same on the right and left side of the head.
- Now part the center at the back of the head. Isolate the right and left crown by dividing the hair on a line from behind the ears to the part you just made in the middle.
- These horizontal partings should form a straight horizontal line across the back of the head.
- Comb to smooth these parts and twist them up and secure them just like the previous parts.
- The remaining two parts right and left neck - are easily secured in two different buns.
- After you have secured all the pieces, go all over the head again, piece by piece, loosening about 4 cm along all the edges and then tie the different pieces back together.
 Follow the instructions for your hairstyle. In some cases you will work from back to front; in other cases you start right at the front; in still other cases, cut along the hairline first and then continue from there. Every style is different and has a different approach.
  Put the hair up. Before you start blow drying it is a good idea to put the hair up first. This prevents the hair from going in all directions.
  The final finish. Check the hair again and touch up blemishes. Now you can also shorten the bangs or make the hair a little less heavy.
Tips
- Use professional scissors for best results.
- Make sure he / she is happy with what you did.
Warnings
- Do not cut too much if you are a novice. You can always cut some more if it's not enough, but you should wait a few months if you've taken too much off.


