Author:
Sara Rhodes
Date Of Creation:
9 February 2021
Update Date:
15 May 2024

Content
- Steps
- Method 1 of 3: Weights for a tent made from scrap materials
- Method 2 of 3: Buckets of sand, gravel, or water
- Method 3 of 3: PVC Pipe Tent Weights
- What do you need
- Weights from scrap materials
- Bucket weights
- PVC weights
Setting up a garden tent or awning on the grass is easy. However, if you need to place the tent on concrete or other solid surface, you must secure it to prevent the tent being blown away. Fortunately, there are many ways to make your tent weights yourself and at a minimal cost. These can be buckets of water or sand, ready-made weighting bags for tents, cinder blocks or PVC pipes.
Steps
Method 1 of 3: Weights for a tent made from scrap materials
 1 The simplest solution is to buy ready-made weighting bags for the tent. There are ready-made weighting bags for tents and awnings on sale. As a rule, they must be filled with sand on their own, and then attached to the upper corners of the frame and the legs of the tent. This is a more expensive option than homemade weights, but it will save you time and effort.
 - If you are using a tent for a public event, check that the weight of the weighting bags meets the requirements of the event organizers. The packaging of the tent weight bags should indicate the weight the bag is designed for. Follow the manufacturer's directions and the requirements of the event organizer.
 2 Use cinder blocks as weights. A standard hollow cinder block weighs about 12 kg and can be used as a tent weight. Tie rope around the cinder block and tie the other end of the rope to the top corner of your tent frame. The cinder blocks can be tied to the tent legs with a rope or elastic cable, and then the end of the rope can be attached to the top bar of the frame.
 - At some public events, it is not allowed to use cinder blocks as weights for tents, since it is easy to catch on them with your foot and fall. Obtain permission from the event organizer before using cinder blocks.
- At home, it is very convenient to use cinder blocks to strengthen the tent. You can wrap them in old towels or sheets so that no one gets scratched on the cinder block if they accidentally bump into it.
 3 Use boom discs to save money. If you have a barbell at home, you can use discs to reinforce the tarpaulin. Stack multiple discs one on top of the other, aligning the center hole. Pass a rope through the hole, tie the discs in a knot, and then tie the rope to the top bar of your tent frame.
 - If you are using a tent at a public event, check with the organizers to see if the barbell discs are allowed as weights for the tent.
Method 2 of 3: Buckets of sand, gravel, or water
 1 You will need 4-8 20-liter buckets to weight the tent. The advantage of this method is that it is convenient to store and transport empty buckets. Buckets are a good weighting option for a tent if you know for sure that there is water, sand or gravel where the tent will stand. It is better to use buckets with a handle - it is convenient to tie a rope to it.
  2 Fill the buckets with the correct amount of ballast. At mass events - for example, at festivals - there is often a regulation that prescribes the weight of the weighting agent for each tent leg. The largest required weight is usually about 18 kg per leg. Depending on which bucket filler you plan to use, you will need a different amount of it.
 - If you are using water as ballast, fill the buckets to the top so that each bucket contains about 18 liters.
- If you are using sand, you will need about 14 liters. Fill the buckets about 2/3 full of sand.
- A full 20 liter bucket of gravel weighs about 30 kg, so you only need half a bucket of gravel to reinforce the tent.
 3 Fill the buckets with concrete and you have permanent tent weights. Some tents and awning owners prefer to have a ready-made weighting material on hand. To make such a weighting agent, mix the dry concrete mixture with water according to the manufacturer's instructions and fill the buckets with concrete halfway. You won't be able to use the buckets for other purposes, but you will have permanent, ready-to-use tent weights.
  4 Tie an elastic cord or string to the handle of each bucket. If you are using a cable, you can attach it to the handle with a clip. The rope should be tied to the handle of the bucket with a secure knot. The length of the rope should be long enough to reach the top bar of the frame and still be sufficient for a knot. The cable must stretch the same distance.
 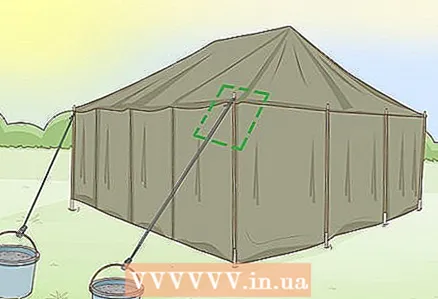 5 Attach the opposite end of a cable or rope to the tent frame. A rope or cable must be attached to the top corner of the frame above the leg, so that the bucket of concrete is close to or resting on the ground. If the bucket is not touching the ground, tie it to the tent leg with another piece of rope or cable. This will prevent the bucket from swaying, its contents from getting enough sleep or splashing out, and it will also protect those who pass by the tent.
 - If the buckets have lids, place them over the buckets.
- If you are using water as ballast, the bucket should be on the ground while you tie it to the tent. It is best to fill the bucket with water right next to the tent so as not to spill as little water as possible.
Method 3 of 3: PVC Pipe Tent Weights
 1 Buy PVC pipes and other materials you need from your hardware store. To make pipe weights, you will need 8 x 10 cm (4 in) PVC plugs, an electric drill, goggles, gloves, 16 nuts and 8 washers with a 1.6 cm (5/8 in) diameter and 4 1 x 1 .6 cm (5/8 inches). In addition, you will need 4 pieces of PVC pipe 90 cm long, PVC glue and degreaser, at least 23 kg of quick-drying cement, water, a cement mixing container, and a rope or elastic rope.
 - When finished, the tent weights will weigh about 18 kg each. Smaller weights can be made; this will require shorter pipe lengths 7.6 cm (3 in) in diameter and 60 cm in length.
- Some tent owners prefer to have 8 weights of 9 kg each, as they are easier to transport.
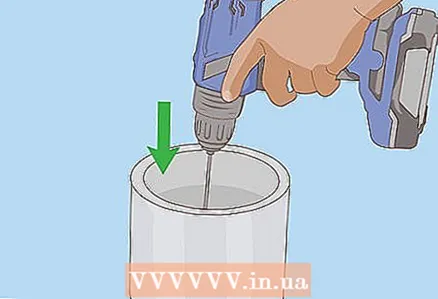
 2 Drill holes in the four plugs. Mark the center of the four plugs with a permanent marker and drill a hole there with a 1.6 cm (5/8 inch) drill.
 - Always wear protective goggles and gloves when operating a power tool.
 3 Attach a bolt with a hinge to each of the four plugs. Insert through the holes drilled in the plugs through the bolt with the hinge. From the top and bottom side of the plug, slide it over the bolt with a loop along the nut. Insert a washer from the inside between the nut and the plug. Tighten the nuts tightly, gripping the plug on both sides. Fasten two nuts with a washer between them to the lower end of the bolt. The bottom end of the bolt with nuts and washer will sink into the cement and further hold the bolt in place.
  4 Glue the end caps with the hinged bolts to the pipes. Manufacturers of PVC adhesives often recommend degreasing the surfaces to be glued beforehand. Often, the degreaser is on the shelf next to the adhesive. Many brands of PVC adhesive come with a brush.
 - Follow all instructions of the adhesive manufacturer when gluing plugs to pipes. Wait as long as indicated on the label until the glue is completely dry.
 5 Mix the cement and fill the pipes with it. Use a 20 liter bucket to mix the cement mortar and water. Follow the directions on the label. Remember that cement hardens quickly, so you need to do everything without undue delay. When all the pipe sections are filled with cement, lean them vertically against the wall, placing them on the hinged plug and let the cement harden.
 - You may need help at this stage. Once you've mixed the cement, you need one person to hold the pipe upright and another to fill the pipes with cement using a scoop. The pipe you are filling with cement must be tapped lightly on the ground periodically so that the cement falls down and fills the voids.
- It may be worth mixing the cement not all at once, but dividing it into two portions. This way you will not worry that the cement will harden ahead of time.
 6 Drill a small hole in the four bottom plugs. The plugs that will cover the bottom of the pipe section should have a small hole for air to escape after you glue these plugs to the pipe. Drill with a thin drill through the small hole in the bottom caps, taking care to wear protective goggles and gloves.
 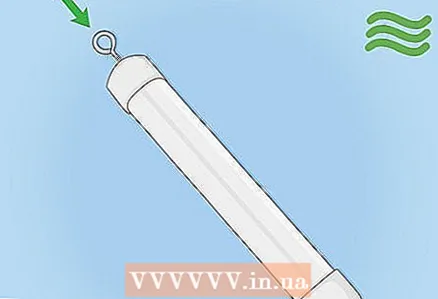 7 After the cement has set in the pipes, glue the bottom plugs to them. Wait for the cement inside the pipes to completely harden; it will take several hours. Prepare plugs, PVC glue and degreaser. Glue the bottom plugs to the pipes. Wait for the required period of time until the glue is completely dry according to the instructions of the glue manufacturer.
 - Your tent weights are ready to use. You will need them when setting up your tent on a hard surface.
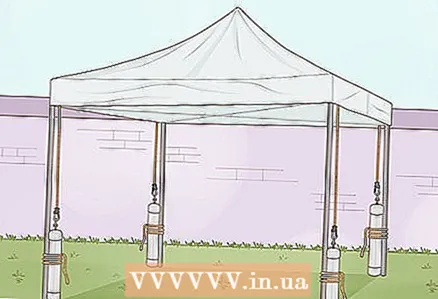 8 Tie each weight to the tent frame with a rope or elastic cord. To attach the weights to the mounted tent, tie a rope to the loops on the weights or attach the cable with clips. The other end of the rope should be tied or attached to the top corners of the frame above the legs of your tent. The rope should be long enough so that the weight barely touches or stands on the ground. Tie a weight on all 4 corners of your tent.
 - You can additionally attach the weights to the tent legs near the ground using a rope or a textile Velcro fastener so that the weights do not swing and no one trips over them.
What do you need
Weights from scrap materials
- Ready-made tent weight bags
- Cinder blocks
- Barbell discs
- Rope or elastic rope
Bucket weights
- 4-8 20 liter buckets
- Filler of your choice
- Rope or elastic rope
PVC weights
- 8 plugs for 10 cm (4 in) PVC pipe
- Electric drill, goggles, gloves
- 16 nuts and 8 washers 1.6 cm (5/8 in.)
- 4 x 1.6 cm (5/8 in.) Eye bolts
- 4 pieces of 91 cm (36 in) PVC pipe
- Adhesive and degreaser for PVC
- Fast drying cement, minimum 23 kg
- Water
- Cement mixing tank
- Rope or elastic rope


