Content
- Steps
- Method 1 of 17: Bust
- Method 2 of 17: Under the bust
- Method 3 of 17: Waist
- Method 4 of 17: Hips
- Method 5 of 17: Bra size
- Method 6 of 17: Shoulder Width
- Method 7 of 17: Lower Shoulder Length
- Method 8 of 17: Front Length
- Method 9 of 17: Back Length
- Method 10 of 17: Getting Up
- Method 11 of 17: Inseam
- Method 12 of 17: Thigh
- Method 13 of 17: Sleeve Length
- Method 14 of 17: Shoulders
- Method 15 of 17: Growth
- Method 16 of 17: Dress Length
- Method 17 of 17: Skirt length
- Tips
- What do you need
Every woman should know her measurements of bust, waist and hips, as well as her bra size. Other measurements, such as inseam, shoulder width and sleeve length, are used less frequently. However, women who always want to look at the highest level, both in business and in casual clothes, and for this, adjust clothes to their figure, should know these measurements well.
Steps
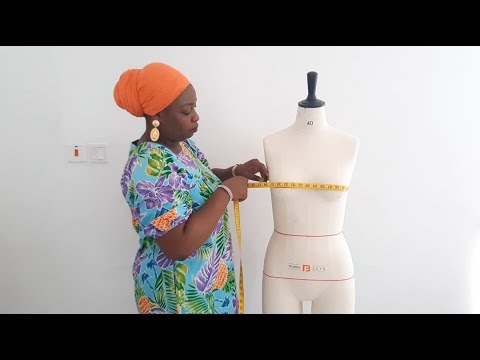
Method 1 of 17: Bust
This is the basic measurement that you will need when buying any outerwear, jacket or dress.
- 1 Stand in front of a full-length mirror. The back should be straight.
 2 Grasp your back with a soft tape measure so that it goes over the shoulder blades and under the armpits. The tape should be flat and parallel to the floor. Grasp the most prominent part of the bust in front.
 - 3Slip your thumb under the tape to avoid pulling it too tight.
- 4Connect both ends of the tape at the front.
- 5 Look in the mirror how many centimeters you got. If you have trouble seeing, then gently tilt your head down to get a better view. At the same time, the back should remain straight.
- 6Use a pencil and paper to write down your measurement.
Method 2 of 17: Under the bust
- 1Pull the measuring tape tightly around your chest so that it runs just below your bust.
- 2Use a pencil and paper to write down this measurement below.
Method 3 of 17: Waist
This is the second most important measurement, it will be useful to you, no matter what clothes you buy: coat, pants or dress.
- 1Strip to your underwear and stand in front of a full-length mirror.
- 2 Standing straight, bend over to determine where the curve is in front and side of your body. This is your waist. Measure the narrowest part of your waist, which is usually between your ribcage and your navel.
- 3Return to an upright position.
 4 Wrap a tape around your waist, keeping it parallel to the floor.
- 5Don't hold your breath or suck in your stomach.
- 6Slide your thumb under the tape to avoid pulling it too tight.
- 7Center the ends of the centimeter tape together at the front.
- 8 Look in the mirror to see how many centimeters you have. For a better view, lean forward while keeping your back straight.
- 9Write your measurement on a piece of paper.
Method 4 of 17: Hips
This is the last basic yardstick. You will need it when shopping for trousers, skirts, shorts or dresses.
- 1 Stand in front of a full-length mirror. Keep your back straight with your heels together.
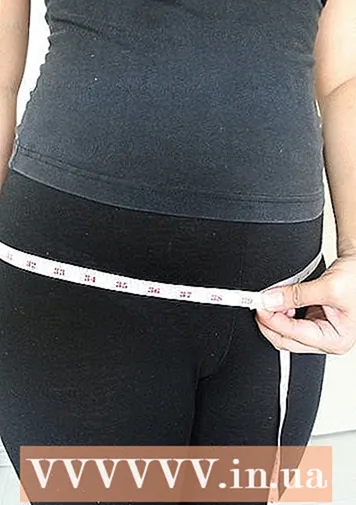 2 Wrap a tape measure around the widest part of your hips and buttocks. This is usually 18-23 cm below the waist. Place the tape parallel to the floor.
 - 3Slide your thumb under the tape to avoid pulling it too tight.
- 4Join the ends of the tape together at the front.
- 5 Look in the mirror to see how many centimeters you have. For a better view, lean forward with your legs straight and feet together.
- 6Write your measurement on a piece of paper.
Method 5 of 17: Bra size
You will need these numbers when buying a bra, swimsuit, underwear or any clothing with a built-in bra.
- 1Take off your shirt, but keep your bra.
- 2 Stand in front of a full-length mirror. The back should be straight.
- 3 Wrap a tape measure around your bra, just under your bust. Place the tape parallel to the floor.
- 4Look in the mirror how many centimeters you have, or tilt your head, but so that your back remains straight.
- 5 Round the sum to the nearest whole number. This is the girth size. Do not add anything to this figure.
- 6Round your bust size to the nearest whole number.
- 7 Subtract the girth from the rounded bust size. For example, if your bust is 91 cm and your girth is 86 cm, then the difference will be 5 cm.
- 8 Add one cup size for every 2.5 cm difference. That is, a 2.5cm difference is Cup A, 5cm difference is Cup B, 7.5cm difference is Cup C, 10cm difference is Cup D, and so on.
- 9Write down your bust and cup size below on a piece of paper.
Method 6 of 17: Shoulder Width
This measurement is commonly used for outerwear, jackets and tailor-made dresses.
- 1 Stand in front of a full-length mirror. Keep your back straight and your shoulders relaxed.
- 2 Pull a measuring tape from the outside edge of one shoulder to the outside edge of the other shoulder. Place the tape parallel to the floor.
- 3 Look in the mirror how many centimeters you have. Tilt your head gently to get a better view without changing your position.
- 4Use a pencil and paper to write down your measurement.
Method 7 of 17: Lower Shoulder Length
This little-known measure is used for outerwear, jackets and tailor-made dresses.
- 1 Stand in front of a full-length mirror. Keep your back straight and your shoulders relaxed.
- 2 Pull a measuring tape down the middle of your shoulder blades from the base of one hand to the base of the other. This will be the distance from the center of one armhole to the other. Place the tape parallel to the floor.
Method 8 of 17: Front Length
This little-known measure is used for outerwear, jackets and tailor-made dresses.
- 1Get help from a friend.
- 2Stand in front of a full-length mirror with your back straight and your shoulders relaxed.
- 3Explain to your friend that he should be holding one end of the tape measure on the top of his shoulder at the base of his neck.
- 4Have your friend pull the tape from front to bottom through your chest to your waist.
- 5Write down the measurement with a pencil on paper.
Method 9 of 17: Back Length
This little-known measure is used for outerwear, jackets and tailor-made dresses.
- 1Use a friend's help.
- 2Stand in front of a full-length mirror with your back straight and your shoulders relaxed.
- 3Explain to your friend that he should keep one end of the tape measure on top of his shoulder in the center.
- 4Have a friend pull the ribbon down to your waist.
- 5Write down the measurement with a pencil on paper.
Method 10 of 17: Getting Up
This measurement is usually used for tailored trousers.
- 1Stand in front of a mirror with your back straight and your legs and feet slightly apart.
- 2Place one end of the tape at the back at the center of your waist.
- 3 Gently, without pulling on the tape, pull it between your legs and over the crotch. Hold the other end of the tape at the back in the center of the waist.
- 4Look at the measurement in the mirror or gently tilt your head without changing your position.
- 5Write down your measurement on paper.
Method 11 of 17: Inseam
This measurement is used when sewing wide or any other trousers. It is necessary to determine the exact length of the product.
- 1Get help from a friend.
- 2 Have a friend use tape to measure the length of your inside leg from ankle to crotch. You must stand upright during the measurement.
- 3Use matching jeans to measure the inseam yourself.
- 4Pull the tape from the bottom hem to the bottom point in the crotch area.
- 5Round to the nearest centimeter and write down the measurement on paper.
Method 12 of 17: Thigh
This little-known measure is used to tailor stockings and trousers to order.
- 1Stand in front of a mirror with your legs slightly apart.
- 2 Wrap the tape around the widest part of your thigh. Keep the tape parallel to the floor, taut, but not so tight that it cuts into your skin.
- 3Connect the ends of the tape in front of the thigh.
- 4Look in the mirror how many centimeters you have, or look down while holding the tape on your thigh.
- 5Write down your measurement on paper.
Method 13 of 17: Sleeve Length
This measure is used for formal, business tailored outerwear.
- 1Get help from a friend.
- 2Standing, bend your arm at a 90-degree angle and rest it on your thigh.
- 3Ask a friend to hold one end of the tape in the center of the back of your neck.
- 4 Have your friend run the tape down the outside of your shoulder, across your elbow, and up to your wrist. It should be one complete measurement. Don't break it apart.
- 5Write down the measurement with a pencil on paper.
Method 14 of 17: Shoulders
This little-known measure is used when outerwear or dresses are made to order or adjusted to fit by a tailor.
- 1Stand in front of a mirror and extend your hand to the side.
- 2Wrap the tape around your shoulders at their widest point, starting and ending the measurement from the front.
- 3Pull the measuring tape taut, but not so tight that it cuts into your skin.
- 4Look at the measurement in the mirror or tilt your head without moving your hand or tape.
- 5Write down your measurement on paper.
Method 15 of 17: Growth
Measure your height. This measurement is needed for a variety of clothing.
- 1 Stand on the floor barefoot or in socks. Turn your back to the wall and spread your legs slightly.
- 2 Ask a friend to measure you from the back from heels to crown. Make sure the tape is flat and perpendicular to the floor.
- 3If you measure yourself, place a book or any other flat object on top of your head.
- 4Use a pencil to mark where the bottom edge of the book touches the wall.
- 5Move away from the wall.
- 6Measure the distance from the floor to the mark.
- 7Record this measurement with the rest of the measurements.
Method 16 of 17: Dress Length
This measurement, as the name implies, is used when buying and sewing a dress.
- 1Get help from a friend.
- 2 Stand in front of a full-length mirror. Keep your back straight and your legs together.
- 3Explain to your friend that he should hold one end of the tape in the center of the top of your shoulder.
- 4Have a friend run a measuring tape from the front, across the most prominent part of your chest, to the knee, or to where the hem of your dress will end.
- 5Write your measurement on a piece of paper.
Method 17 of 17: Skirt length
This measurement, as the name suggests, is used when buying or sewing a skirt.
- 1Get help from a friend.
- 2 Stand in front of a full-length mirror. Keep your back straight and your legs together.
- 3Explain to your friend that he should keep one end of the tape at the center of his waist.
- 4Have your friend pull the tape down to the knee or to where the hem of your skirt will end.
- 5Write your measurement on a piece of paper.
Tips
- If you're not shy, ask the lingerie section of your department store or lingerie store to have your bra size measured. Many women find it difficult to take this measurement on their own.
- Take your measurements a few days before and after your period to accommodate changing fluid volumes.
- If you are in doubt about the accuracy of your measurements, ask a professional tailor or seamstress to take your measurements.
- It is better to measure yourself after a hearty lunch or dinner to get measurements of clothes that will fit comfortably.
What do you need
- Soft (fabric) centimeter tape.
- Pencil
- Paper
- Full-length mirror
- Hardcover book or other flat object


