Author:
Clyde Lopez
Date Of Creation:
23 June 2021
Update Date:
11 May 2024

Content
- Steps
- Part 1 of 3: Making a sun-flared skirt
- Part 2 of 3: Making an Applique with a Poodle and Leash
- Part 3 of 3: Making the Belt
- Tips
- What do you need
With the recommendations in this article, you won't have to spend two whole weeks of your time making a poodle skirt. The poodle skirt model reviewed here is equipped with a wide elastic waistband, and the hem does not require hemming. To sew a skirt, first of all, you need to cut out a sun-flared skirt from the fabric, then sew a poodle-shaped applique on the hem and complete the work by attaching a wide elastic belt to the skirt. If you have basic sewing skills, then there will be no problem making a poodle skirt.
Steps
Part 1 of 3: Making a sun-flared skirt
 1 Measure around your waist and add 5 cm to it. Making a flared sun requires some knowledge of geometry, but it is not as difficult as it might seem. First, you need to measure your waist to determine the size of your skirt. Measure yourself with a tape measure and write down the resulting measurement. Then add an additional 5 cm to the value.
 - For example, if your waist circumference is 76 cm, the waist of the skirt will be 81 cm. The waist of the skirt should be slightly larger to accommodate the subsequent gathering of the material at the belt.
 2 To calculate the first required radius for cutting a skirt, divide the waist measurement by 6.28. Write down the resulting number. You will need it to make the correct waist cut on your skirt.
 - For example, if the waist of the skirt is 81 cm, the required radius would be 12.9 cm.
 3 Fold a piece of felt in half and find the center point of the fold. Mark this point with a marker or tailor's chalk. This point will become the center of the semicircle that you will draw to mark and cut out the waistline of the skirt.
 - If you are using black or dark felt, try using a tailor's marker or light-colored chalk for marking.
 4 Make a homemade compass. You need to make a compass from a tailor's pin, a piece of string and a pen. With it, you can correctly draw the waist of the skirt.
 - Take a long piece of string and tie it to the handle. Then measure the required length of the twine that extends from the handle. It must match the length of the radius. For example, if the calculated radius is 12.9 cm, measure this length on the string. Tie a knot at this point, but do not cut the string, as the cut of the string usually begins to crumble right away and the tailor's pin will simply not stick to it.With this approach, you can even use one twine in your work with three knots on it: the first knot in order to tie the string to the handle, the second knot in order to outline a semicircle of the waist, and the third knot to draw the bottom edge of the skirt. In this case, the knots for drawing the waistline and the lower edge of the skirt should be at the correct distance from the handle and pinned accurately with a pin to the center mark on the fabric.
- Then pin the string to the center mark on the felt. The string and pen will be used as a compass to draw semicircles on the fabric. You may need to secure the pin to the table with tape so that it does not wobble as you draw the semicircles.
 5 Stretch the string and use a pen to draw a semicircle. Leave the fabric still folded in half and raise the handle. Be sure to pin the end of the string to the fabric again. Begin by drawing a semicircle from the fold of the fabric to one side of the pin, and with the pendulum move the pen in a semicircle to the opposite edge. The resulting arc will rest on the fold of the fabric and the convex side will look at the edge opposite to the fold.
 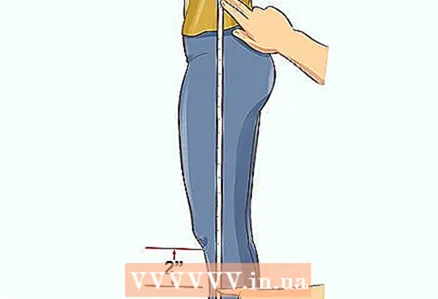 6 Measure from your waistline to 5cm below your knee. With this step, you will determine the required length of the skirt. Add the resulting number to the original radius. The new number will become new radius.
 - For example, if you need a skirt that is 50 cm long, and the initial radius is 12.9 cm, then the second radius will be 62.9 cm.
 7 Adjust the compass to draw the second semicircle. Peel off the old piece of string from the handle and remove it. You won't need it anymore. Then take a new piece of string and tie it to the handle. Measure the new length of the ponytail of twine from the handle. It must match the size of the new radius.
 - For example, if the new radius is 62.9 cm, then you need to measure 62.9 cm on the string, starting from the handle.
- Next, you need to pin the string to the center point of the fold of the fabric and draw a second semicircle of a larger size. You should end up with something like a rainbow or half a donut.
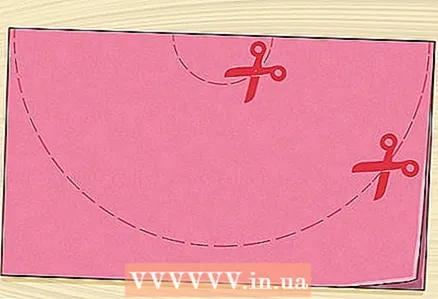 8 Cut out the large semicircle first and then the small one. Do not use zigzag scissors as the felt will not peel off, so you do not need them. Cut out both layers of felt at the same time. This will ensure that the skirt is cut evenly.
 - Also try to cut the fabric along the inside of the lines you just drew. So they will not remain on the canvas of the skirt itself.
Part 2 of 3: Making an Applique with a Poodle and Leash
 1 Do it yourself or get a ready-made poodle applique. At a fabric and handicraft store, you can buy a ready-made Poodle patch or make your own from white, black, or gray felt. There are many free poodle outline templates online.
 - Try searching for “poodle outlines,” “cat outlines,” “giraffe outlines,” or whatever animal you want to wear on your skirt.
- If you have certain artistic skills, then you can try to draw the outlines of the poodle yourself by hand.
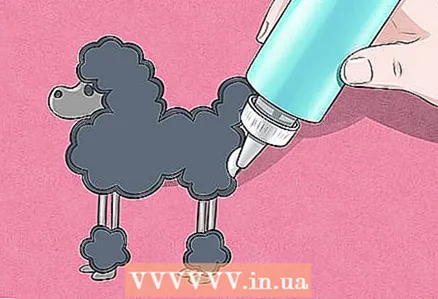 2 Use iron or glue to glue the poodle applique to the skirt. Decals can be ironed on, or you can use textile glue or a small hot glue gun to apply your homemade applique. Hot glue allows you to quickly fix the poodle applique and its leash. It also fixes the applique more reliably than textile glue. If you will be using textile glue, you will need to leave the applique to dry overnight. Try to press down on the appliqué with a heavy book to help the poodle stick better to the felt while the glue dries. Follow the steps below to apply the decal to the skirt.
 - Place the Poodle Applique on the skirt near the bottom edge and cover it with a piece of cloth (preferably cotton).
- Set the iron to the highest temperature (no steam) and press down on the applique for 35-45 seconds.
- Turn the skirt over to the wrong side, attach a piece of fabric on this side, and from here again iron the appliqué attachment point. Again, press the applique down with an iron for 35-45 seconds.
- Then remove the piece of fabric and unplug the iron. Allow the applique to cool before attaching the leash to it.
 3 Add a leash to the applique. From the top of the poodle's neck to the waist of the skirt, apply a line of textile glue. In this case, the line should make several loops on its way. Then attach a narrow tape, zigzag, or sequin strip to the glue line. Allow the glue to dry completely before moving on to the next step.
Part 3 of 3: Making the Belt
 1 Measure your waist and add 2.5 cm to your measurement. To measure your waist, use a measuring tape. Then add 2.5 cm to the resulting measurement. The total value will represent the required length of the waist elastic.
 - For example, if the waist circumference is 76 cm, then the length of the elastic will be 78.5 cm.
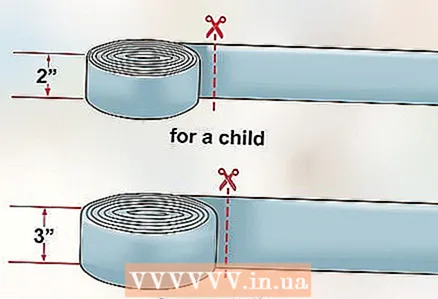 2 Cut the required length of the waistband. If you are sewing a skirt for a child, take a waist elastic 5 cm wide.If you are sewing a skirt for an adult, use a belt elastic 7.5 cm wide.Most often, a black waist elastic is used for skirts, but a white waist elastic will look good on a black skirt ...
  3 Sew the ends of the elastic together. In this case, it is necessary to leave seam allowances 1.3 cm wide and be sure to perform bartacks at the beginning and at the end of the sewing. When you have finished sewing, trim off the excess thread ends.
  4 Iron and hem the seam allowances. Turn the elastic so that the seam allowances are facing you. Take an iron and iron out the allowances. They should now look in opposite directions and fit snugly against the main elastic band. Stitch the seam allowances to the main elastic.
 - Be sure to bartack at the beginning and end of the stitching and trim any excess threads. This step will prevent the gum from crumbling. In addition, you will achieve a neat appearance of the seam from the inside.
- A sewing machine is your best bet, but the seam allowances can also be glued with textile glue.
 5 Bring the waist of the skirt inside the elastic band ring and pin it up. The seam allowances on the waistband should be on the inside. The top edge of the skirt and the bottom edge of the elastic should be overlapped by about 6 mm.
 - Remember that you do not need to turn the skirt over to the wrong side for this step. All sewing of the belt will be done from the front side.
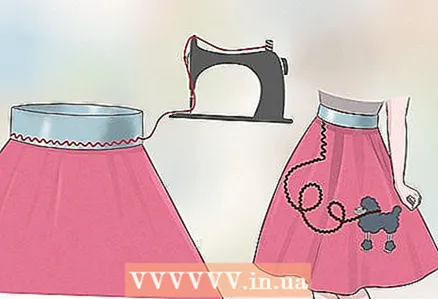 6 Sew on the elastic waistband of the skirt with a zigzag stitch. Remember to stretch the elastic as you stitch so that it sews evenly onto the felt. This will help the skirt to stretch better. Continue sewing until you have completely sewn through the entire circle of the belt.
 - When you finish sewing, the waist of the skirt will gather at the waist. Your poodle skirt is now ready to wear!
Tips
- The skirt can be made from felt of any color, but most often they use black, pink, blue and red. Poodles are usually made white or black.
- It is not necessary to make a poodle applique on the skirt. You can use the applique of any other dog, for example, a French Bulldog. You can also make an applique for a cat or a pig.
- Consider complementing your skirt with two-tone shoes, a black and white blouse, and a chiffon scarf to match the skirt.
- Try adding some extra flair to the poodle skirt. On the applique, you can glue small rhinestones instead of eyes, and also glue rhinestones around the poodle's neck along the collar line.
What do you need
- A square piece of felt measuring 140x140 cm and another small piece of other felt for making a poodle applique (or you can use a ready-made applique)
- Waist elastic 5 or 7.5 cm wide (if you will be sewing a black skirt, use a white elastic)
- A piece of black or white felt or a ready-made poodle applique
- Ribbon, zigzag or sequin strip
- Adhesive for textiles
- Threads to match the waist elastic
- Sewing machine
- Scissors
- Twine and handle
- Tape measure
- Tailor's pins


