Author:
Joan Hall
Date Of Creation:
3 July 2021
Update Date:
10 May 2024
Content
- Steps
- Method 1 of 3: Using handwriting tools
- Method 2 of 3: Using drawing tools
- Method 3 of 3: Export the drawing to a separate image file
- Tips
- Additional articles
PowerPoint has a basic set of tools for drawing shapes and lines on slides. To be able to draw freehand or use predefined shape shapes, you need to go to the Review tab and then click the Start Inking button (in Office 365, the same functionality is available on the Draw tab). You can also use the Shapes button on the Home tab to draw shapes and lines. If you're using PowerPoint as an alternative to MS Paint or another graphics program, the created slides can be exported to a variety of image file formats when saved.
Steps
Method 1 of 3: Using handwriting tools
 1 Start Microsoft PowerPoint. If you do not have this program, then Microsoft is currently offering a free trial version of the office suite.
  2 Select the Review tab. It is located in the toolbar on the right.
 - For Office 365 users, the tab might be called Draw. It will contain the same drawing tools as the Ink Tools. If you don't see the Draw tab, you may need to update your Office suite or this option may not be supported by your device.
 3 Click the Start Inking button. It is located on the right side of the toolbar and allows you to open a new set of tools - “Handwriting Tools”.
  4 To draw by hand, select the Pen tool. This button is located on the left and allows you to draw baselines.
 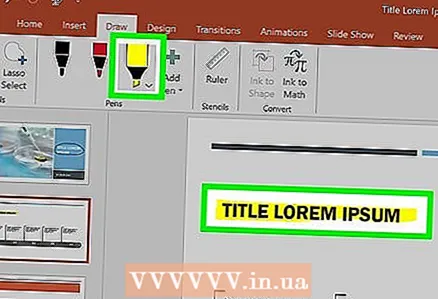 5 Use the Selection tool to draw transparent lines. This tool allows you to draw thicker lines with such transparency that they do not overlap the underlying graphics or text.
 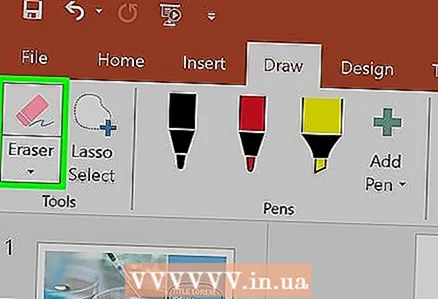 6 Use the Eraser tool to remove the drawn elements. After selecting it, press and hold the left mouse button, then move the cursor along the drawn line that you want to erase.
 - Click the arrow below the Eraser button to select the thickness of the tool.
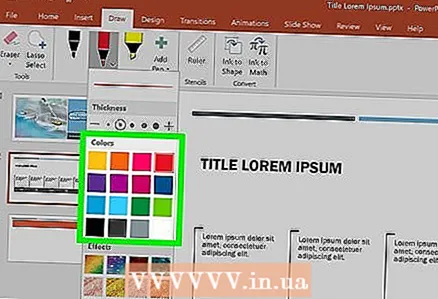 7 Change the colors used to paint. Click the Color drop-down menu in the Pens button group to select the appropriate color for the pen or highlighter from the palette.
 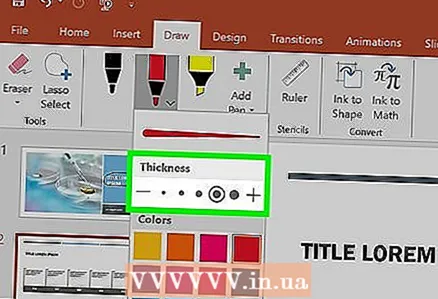 8 Adjust the thickness of the lines you draw. Click on the Weight drop-down menu to select the appropriate line weight for the pen or highlighter.
 - Line colors and weights can also be selected to the left of the “Color” and “Thickness” buttons in the preset options panel.
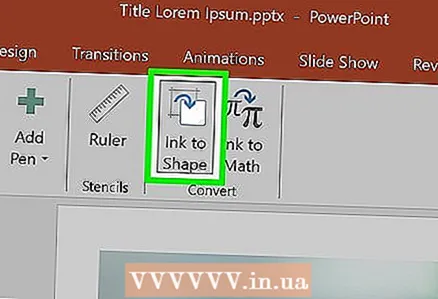 9 Use the button “Convert to Shapes”. It allows you to automatically transform your freehand shapes into regular shapes. For example, a hand-drawn circle will be converted to a perfect circle.
 - Also, this function can determine the shape of the drawn figure by the number of lines used for it (in a square, hexagon, and so on).
- The function works only when the “Convert to Shapes” button is clicked. The lines that were drawn before clicking this button will not be converted.
 10 Use the "Select Objects" button. It allows you to select the drawn elements and drag them to another place on the screen.
 - You can also use the Free Selection button and circle the area you want to select if you have any problems with that. Free selection allows only drawn elements to be selected.
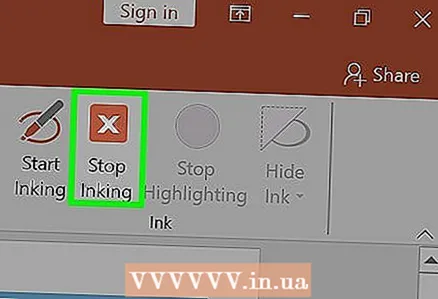 11 Click on the “End Handwriting” button. This button automatically activates the Select Objects button after working with a pen or highlighter. If you have not made any edits to the document, then it will automatically return you to the "Review" tab.
Method 2 of 3: Using drawing tools
 1 Start Microsoft PowerPoint. The steps below will also teach you how to work with free PowerPoint alternatives like Google Slides or Openoffice Impress, however, the specific menu item titles and locations will vary slightly.
  2 Select the "Home" tab. It is located in the upper left corner of the toolbar and is selected by default if you have just created a new document.
 - All drawing tools will be displayed on the toolbar on the right in the "Draw" button group. The layout of the buttons on the Mac is the same, but this group of buttons does not have a name.
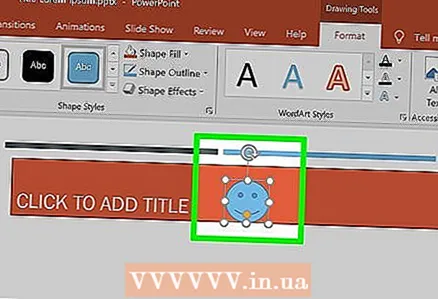
 3 Select the Shapes tool. On Windows, a list of shapes and lines will appear to the left of the Draw button group. On Mac, this list will appear after you click the Shapes button and will be located to the right of the group of untitled buttons.
 - Click on the arrow to expand the list of possible shapes or lines.
- To draw a line by hand, select the Drawn Curve line from the list of lines.
 4 To start drawing, hold down the left mouse button and move the cursor. The line or shape will be drawn according to where the starting and ending points of the movement of the pressed and then released mouse button will be located.
  5 Select presets for a skin style using the Quick Styles button. It is located in the right area of the toolbar and opens the possibility of choosing different shades and degrees of transparency for a specific line or shape.
 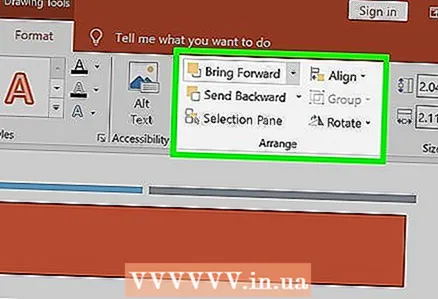 6 Use the "Arrange" button. It is also located in the right pane of the toolbar and allows you to expand the list of object positioning options. Options such as "Bring Forward" or "Bring Backward" allow you to control how objects overlap.
  7 Use the shape settings. To the right of the drawing tools are three buttons: Shape Fill, Shape Outline, and Shape Effects.
 - The "Shape Fill" button opens a palette of colors for coloring the drawn shape.
- The "Shape Outline" button opens a palette of colors for coloring only the shape outline.
- The Shape Effects button opens a list of predefined graphic shape settings such as Relief, Glow, or Shadow. In this case, you can use several options at once.
- These effects do not affect the drawn lines themselves.
Method 3 of 3: Export the drawing to a separate image file
 1 Open the File menu and select Save As. As a result, a window will open asking you to enter the name of the saved file and its location.
 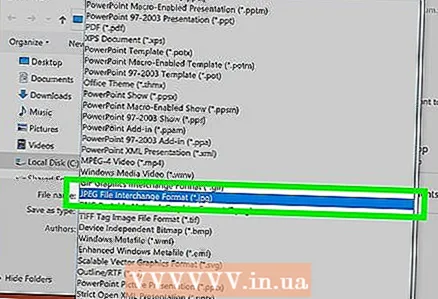 2 Select the file type for the picture. Below the field for entering the file name there is a drop-down menu with a list of possible formats for saving the document. In it you can find various types of picture files (JPG, GIF, PNG, BMP and others).
 - The default saved file format is a PowerPoint PPTX presentation file.
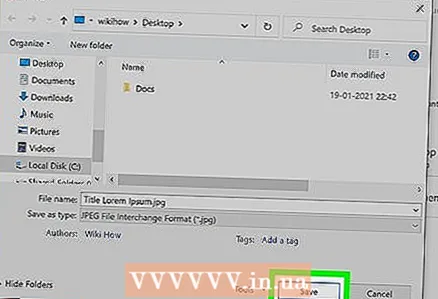 3 Click the “Save” button. A copy of your drawing will be saved with the entered name and in the selected format.
 - If you save a file with several slides, then you will have to choose between two options for exporting them: “All slides” or “Only current slide”.
Tips
- If you want to be able to edit your slide, then save a copy of it in PPTX format. After converting the file to image format, you will not be able to edit it with PowerPoint tools.
- You can create a new blank slide on the main tab of the control panel by clicking the “New Slide” button and then selecting the “Blank Slide” option.
- For tablet and touch screen users, PowerPoint 2016 supports the use of a stylus in manual mode for easy drawing.
Additional articles
 How to find the product key for Office How to extract pages from a PDF document to create a new PDF document
  How to edit documents on iPhone
  How to access work email from home
  How to rotate pages in a PDF document using Adobe Acrobat
  How to select text in a PDF document
  How to apply a formula to an entire column in Google Sheets on a computer
  How to Change the Background of a Picture in MS Paint (Green Screen Method)
  How to use Microsoft Access
  How to remove text in PDF documents using Adobe Acrobat
  How to show hidden rows in Google Sheets on computer
  How to view PDFs in full screen mode
  How to create a CSV file
  How to convert a Microsoft Word document to PDF format


